[4 Solutions] Could not load file or assembly ‘MOM.Implementation’
A MOM.Implementation is a AMD Catalyst software error which occurs during the installation of the AMD Catalyst software when Microsoft’s .NET Framework is unable to find the files needed for it’s installation.

How to Fix Could not Load File or Assembly ‘MOM.Implementation’
We have prepared an article covering the most important solutions to this problem so make sure you follow it carefully and don’t give up halfway through just because a solution sounds a bit difficult. Good luck and you hopefully won’t see the same error ever again.
Solution 1: Uninstall and Update ATI Catalyst Drivers
One of the most common causes for the “Could not load file or assembly ‘MOM.Implementation” error message on Windows are old and no longer supported ATI Catalyst drivers which should be updates immediately. The message usually appears on boot annoying the users and prolonging the booting time significantly.
Follow the steps below in order to first get rid of the old drivers and then reinstall the new ones.
- First of all, you will need to uninstall the driver you currently have installed on your machine.
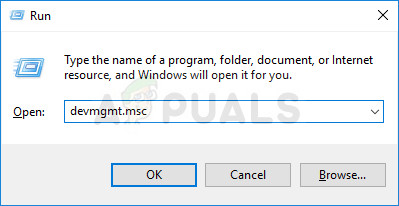
- Type “Device Manager” into the search field next to the Start menu button to open the device manager window. You can also use the Windows Key + R key combination in order to open the Run dialog box. Type “devmgmt.msc” in the box and click OK or Enter key.
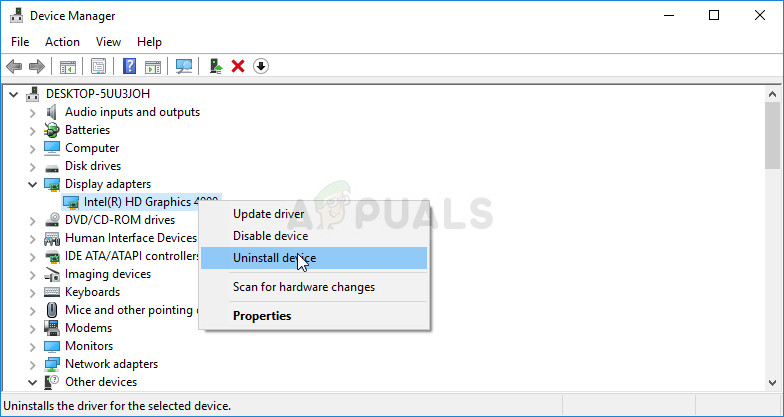
- Expand the “Display Adapters” section. This will display all display adapters that the machine has installed at the moment. Right click on the AMD graphics card you want to uninstall and select “Uninstall device”. This will remove the card from the list and uninstall the graphics device. Make sure you choose the right one since you will sometimes have the integrated graphics card on the list as well.
- Click “OK” when prompted to uninstall the device.
Now we need to make sure the drivers are completely uninstalled as users have run into other issues if they simply uninstalled the driver from Device Manager. Unfortunately, you will also have to run the cleanup utility made my AMD to make sure you delete all remaining files and registry entries.
- The AMD Clean Uninstall Utility can be downloaded from this link. Note that this will start the downloading process immediately. This tool is designed to be supported only on systems running Microsoft Windows 7 and above so skip this solution if you are running XP or older.
- After downloading the AMD Clean Uninstall Utility, locate the file where it was saved (the Downloads folder by default) and double click on the “AMDCleanupUtility.exe” entry.
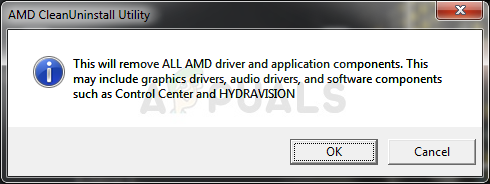
- A warning message will appear stating that the AMD Clean Uninstall Utility will remove ALL AMD driver and application components so click “OK” to continue.
- After clicking “OK” the tool will be minimized to the notification area (system tray) and the progress will be displayed as a tool tip. The uninstall process will continue to run in the background. To check the progress, you can hover the mouse over the AMD icon in the notification area.
- While the uninstall process is running, the display may flicker or turn black for a couple of seconds. This is a normal occurrence while the system is applying new settings.
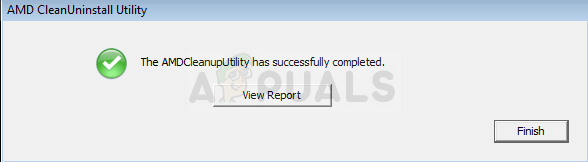
- Once the uninstallation process is finished, a message is displayed stating it has successfully completed. Click “View Report” to see the list of components that were uninstalled otherwise, click “Finish” to exit the utility.
- To finalize the uninstall process click “Yes” to reboot the computer. The system must be rebooted after running this utility in order to apply the changes made.
Now that you have completely uninstalled the driver for your AMD graphics card, it’s time to install the most up-to-date one using the steps provided below:
- After the PC boots, the new driver should be installed automatically without the need of your intervention. However, if you notice that you are now using the integrated graphics card instead, the driver wasn’t installed automatically and you will have to do it manually.
- Navigate to AMD’s webpage in order to see the list of available drivers for your operating system. Choose the latest one, download it, and run it from the Downloads folder.
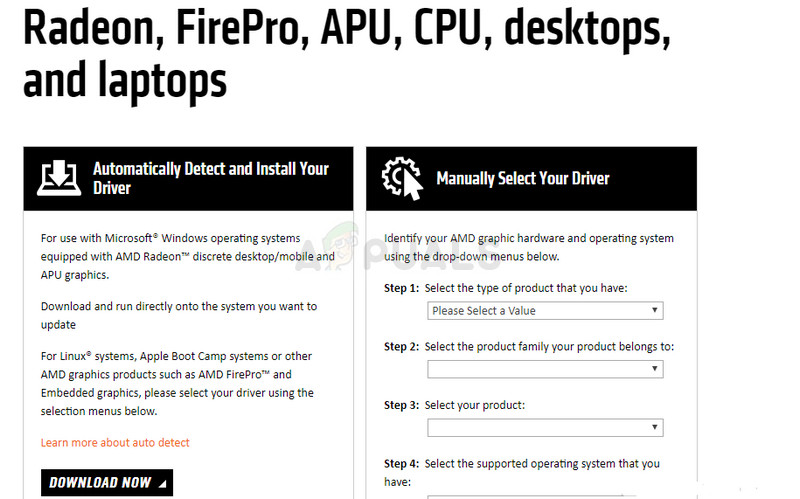
- Follow the instructions on-screen in order to install the driver, restart your PC after the install is over and connect the adapter to your computer if it was disconnected. Check to see if the annoying error message still appears.
Solution 2: Uninstall the Catalyst Center if You Aren’t Using AMD Products
There are plenty of scenarios where a mistake has been made and users have installed the Catalyst Center as the computer was using the AMD graphics card but changes have been made.
You could have taken out the card and used another one instead or it came preinstalled when you got the PC. Either way, it will cause a conflict and this error will appear. Follow the steps below in order to fix this! If you have an AMD graphics card, skip this solution!
- First of all, make sure you are logged in with administrator permissions as you won’t be able to delete programs using any other account.
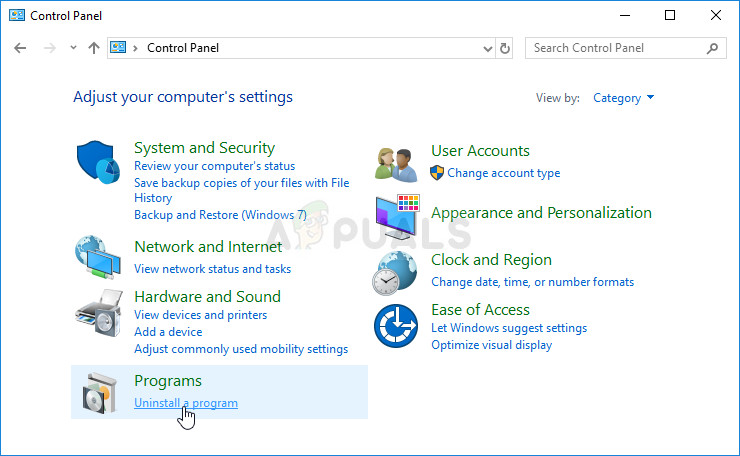
- Click on the Start menu button and open Control Panel by searching for it. Alternatively, you can click on the gear icon in order to open Settings if you are using Windows 10 for a simpler approach.
- In Control Panel, set the View as option to Category at the top right corner and click on Uninstall a Program under the Programs section.
- If you are using the Settings app, clicking on Apps should immediately open a list of all installed programs and apps on your PC.
- Locate the Catalyst Control Center in Control Panel or Settings and click on Uninstall.
- Its uninstall wizard should open after a dialog box prompting you to confirm your choice and really uninstall the Catalyst Control Center from your computer. Confirm it and follow the instructions which will appear on screen in order to do so.
- Click Finish when the uninstalled completes the process and restart your computer to see whether the error at boot will still appear.
Solution 3: Repair the AMD Catalyst Install Manager
AMD has plenty of different tools installed on your computer and it’s hard to pinpoint the one which needs to be fixed. However, some users have reported that initiating the repair process on your AMD Catalyst Install Manager tool may help you solve the problem without much hassle.
- First of all, make sure you are logged in with administrator permissions as you won’t be able to run install wizards using any other account.
- Click on the Start menu button and open Control Panel by searching for it. Alternatively, you can use the Windows Key + R key combination and type in “control panel” before clicking OK.
- In Control Panel, set the View as option to Category at the top right corner and click on Uninstall a Program under the Programs section.
- Locate the AMD Catalyst Install Manager in Control Panel and click on Repair/Change depending on your version of Windows.
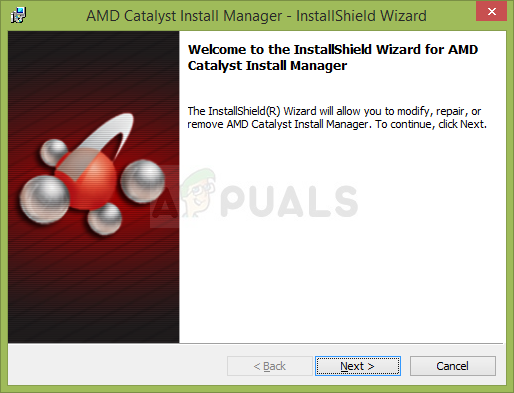
- A Window called “AMD Catalyst Install Manager – InstallShield Wizard” will appear so click the Next button until you are prompted with the “Uninstall/Repair AMD Software Components” screen with three options. Make sure you click on Repair Catalyst Install Manager.
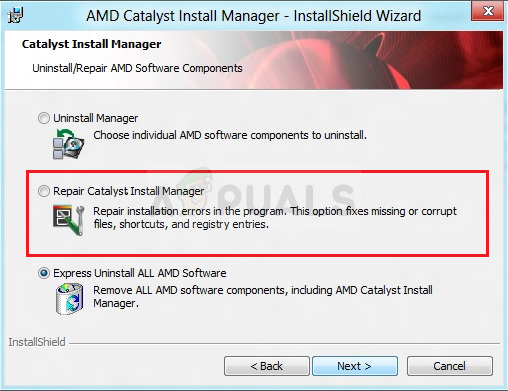
- You should be able to navigate to the “Ready to Repair the Program” so click on Repair and wait for the process to finish. Restart your computer and check to see if the annoying message still appears.
Solution 4: Update and Repair .NET Framework
Having the latest version of .NET Framework is absolutely a must if you wish for your computer to run smoothly and updating and repairing it has managed to solve this exact issue on many computers belonging to users around the world. Try it out and check for yourself!
Navigate to this link and click the red download button in order to download the latest version of Microsoft .NET Framework. After the download has finished, locate the file you downloaded and run it. Note that you will need to have constant access to the Internet. Follow the instructions on-screen to proceed with the installation.
- After installing the latest version, it’s time to check its integrity. On your keyboard, use the Windows Key + R key combination to open the Run dialog box.
- Type in Control Panel and click OK in order to open it.

- Click the Uninstall a Program option and click Turn Windows features on or off. Make sure you locate the .NET Framework 4.x.x entry and make sure it’s enabled. The numbers may differ depending on the version of the operating system you have installed
- If the check box next to .NET Framework 4.x.x is not enabled, enable it by clicking the box. Click OK to close the Windows Feature window and reboot the computer.
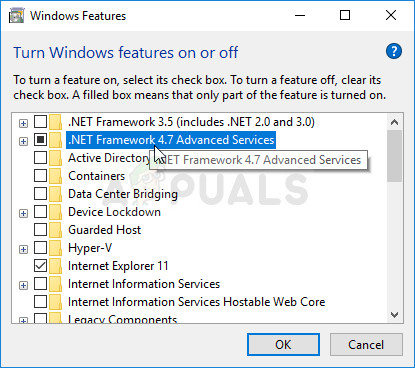
- If .Net Framework 4.x.x is already enabled, you can repair .Net Framework by clearing the box and rebooting the computer. After the computer has restarted, re-enable .Net Framework and restart the computer again. Check to see if the “Could not load file or assembly ‘MOM.Implementation” error appears again after booting.


