Fix ‘Connections to Bluetooth audio devices and wireless displays’
Bluetooth devices and wireless displays are on the rise again because of their compatibility and ease of access. The very thought of headphones or wireless displays without a cable seems inviting. There is a fair chance that you will buy peripherals for your computer which will have the feature to connect wirelessly or via Bluetooth.

However, like all other connection mediums, problems can also creep from time to time in Bluetooth devices or wireless displays. We have put together a short guide that will touch basic troubleshooting tips and techniques to get your device back up and running. Make sure that you follow all the steps carefully and start from the top.
What causes problems in Bluetooth audio devices and wireless displays?
The causes of issues that you might face are very broad-ranging from drivers to small options in the settings. Some of the reasons for these issues are but not limited to:
- Your PC is not discoverable to other Bluetooth devices. If it is not visible, you will not be able to find/connect to it at all.
- The Bluetooth driver is not working properly or is outdated.
- The device might be paired but not connected. This happens in a lot of cases if you connect more than one Bluetooth device.
- The wireless display may not be connected correctly or may not be supported.
In this article, we will also touch the basic troubleshooting techniques for Miracast and WiGig devices. Make sure that you have an administrator account and have an internet connection. Also, make sure that you have a Bluetooth supported computer. Normal PC towers don’t usually have Bluetooth built-in. You have to purchase additional hardware. Laptops on the other hand mostly have in-built Bluetooth readily available.
Solution 1: Making your PC Discoverable (Bluetooth)
If you cannot connect to your Bluetooth from the other device or vice versa, you need to make sure that the Bluetooth is indeed visible to other devices. By default, the discoverability is hidden from all other devices and you need to manually enable it.
- Press Windows + S, type “settings” in the dialogue box, and open the Settings application.
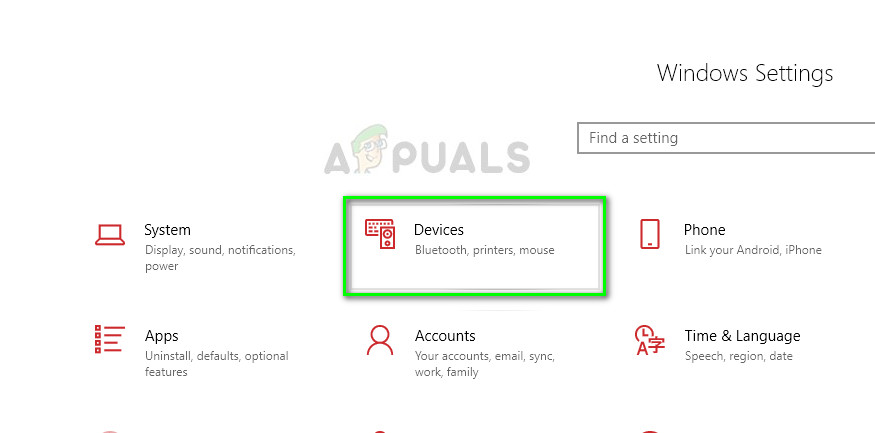
- Once in Settings, click on the sub-category of Devices.

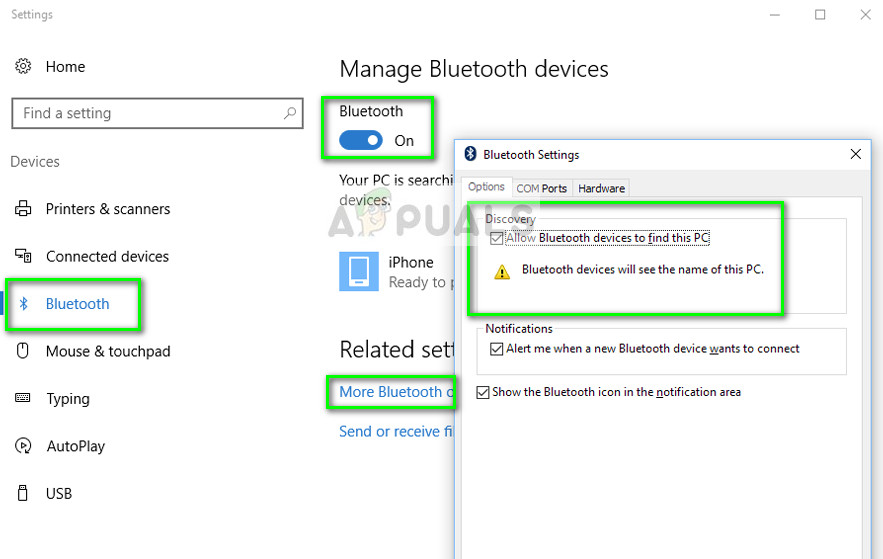
- Once in devices, click on Bluetooth from the left navigation bar and make sure that Bluetooth is on. Now select More Bluetooth options.
- Under the tab of Options, make sure that the option Allow Bluetooth devices to find this PC is enabled.

- Now when you head back to the main Bluetooth screen, you will hopefully see your device with the option ‘Ready to pair’.
If you have multiple Bluetooth devices connected to your computer, you should perform the following steps to connect to it.
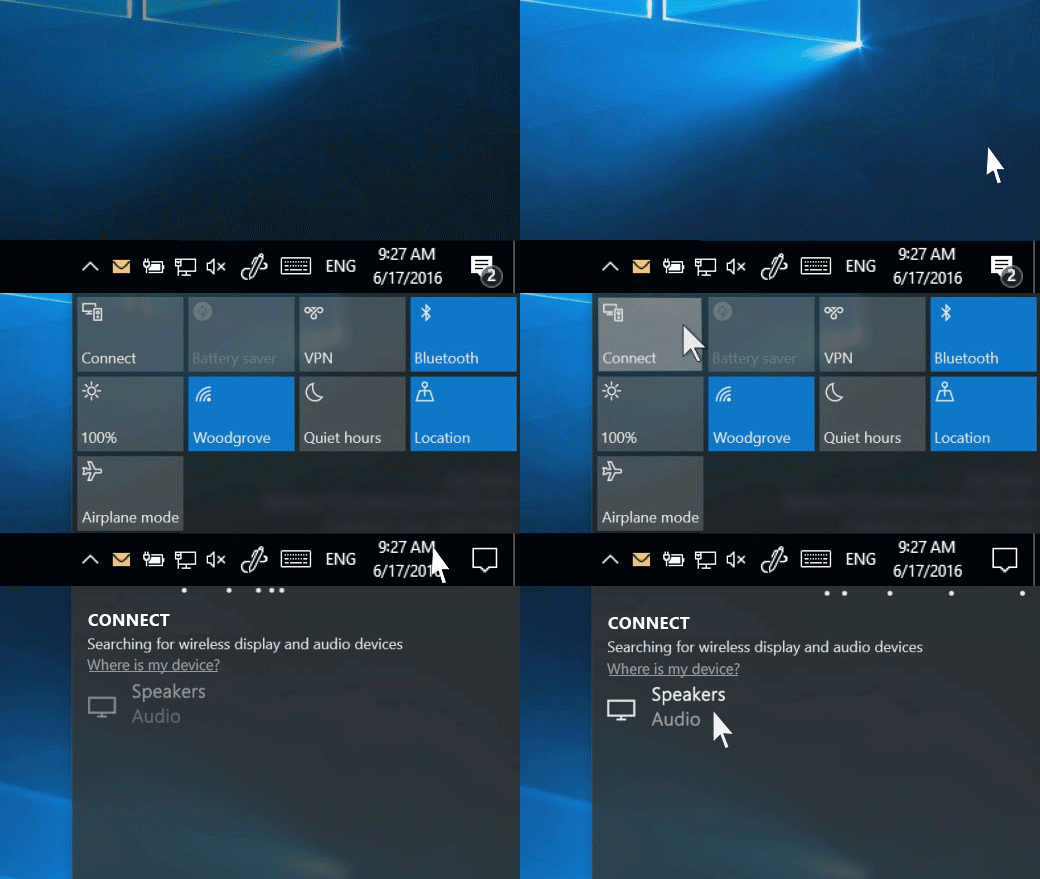
- Press Windows + A to launch the Action bar.
- Now select the button Connect present and click on the device which you want to connect to.

Solution 2: Updating Bluetooth Driver
If you are having problems maintaining an established connection from your computer, you should check if the Bluetooth drivers are up-to-date and are not corrupt. This happens with a lot of users potentially after a Windows Update which breaks the drivers. Or if you are using a PC and have attached additional hardware for Bluetooth, you need to have the latest drivers installed for that specific hardware since it is third-party and not part of your motherboard.
- Press Windows + R, type “devmgmt.msc” in the dialogue box and press Enter.
- Once in the Device Manager, select the option of Bluetooth to expand the category. Once in, locate your Bluetooth hardware. Right-click it and select Update Driver Software.

- Now you have two options. Either you can attempt updating the driver Automatically (through Windows update) or Manually (by selecting the driver software). You can first try to update Automatically. If that doesn’t work, you need to navigate to the manufacturer’s website and after downloading the driver software, use the manual method and navigate to the downloaded file.

- Restart your computer after installing the drivers and check if the error message went away.
Troubleshooting Miracast Devices
Miracast enables users to seamlessly display multimedia content between Miracast supported devices. It connects two different devices using network infrastructure or Wi-Fi Direct. It is used by numerous devices and is one of the most popular connectivity methods in the market. Here are some troubleshooting techniques for you to check if you are having issues connecting with Miracast devices.
- First, you need to make sure that your computer supports Miracast You can check the information that came with the product or by navigating to the manufacturer’s website.
To find out if your computer supports Miracast, follow the steps listed below.
- Press Windows + R, type “dxdiag” in the dialogue box and press Enter.
- Now navigate to the System tab and click on the button Save all information. You will be asked to for a location to save the content into. Choose Desktop.

- Now open the text file and under System Information, you will whether your device supports Miracast or not.

- Make sure that your Wi-Fi is turned on and connected to the correct

- Make sure that the display you want to project also supports If it doesn’t, you can easily purchase a Miracast adapter which will plug into an HDMI port.
- Restart both your computer and the device before attempting to connect again.
- You can attempt at reconnecting the device after removing it. To remove it, navigate to the path Settings > Devices > Bluetooth and other devices and under the Wireless display or adapter, remove the device. Restart your computer and attempt at connecting again.
Troubleshooting WiGig devices
WiGig is a newer technology that supports the data transfer of around 7 Gigabytes per second. This is approximately 10 times faster than the 802.11n Wi-Fi standard. If you are trying to connect WiGig devices, you can apply the following troubleshooting steps and see if they solve your situation.
- Make sure that your computer supports WiGig and is turned on. If your computer has WiGig, you can easily see in Settings > Network and Internet > Airplane mode.
- You also need to make sure that the display also supports WiGig. If it doesn’t, you would need a WiGig dock.


