How to Fix a Slow and Lagging Windows 10 System
Windows 10 is great and there’s no doubt that Microsoft is pushing a lot of updates to make it even better. But, a lot of users regularly complain about the slow and laggy Windows 10. There is no denying that a lot of Windows 10 users, or even users who are using other Windows OS, will face the slow computer issue. You will notice that your machine was really fast when you installed a fresh copy of Windows or when it came out of the box. But, now your machine is really slow. This lag in the machine won’t cause any major issues but it will make your overall Windows experience quite annoying. The slow and laggy Windows will definitely waste a lot of your time and might cost you some money especially if you are using it for business purposes.
The lag and slowness aren’t always caused by the Operating system, there can be a lot of various different reasons for the slowness of your Windows. The lag issue might be because of the low RAM or because of a virus/malware using up your resources or it might simply be because of a heavy program running in the background. Since there are many reasons for this, there are a lot of solutions as well.
Method 1: Turn off Unwanted Programs
The first that should be done in a scenario where your system is really slow is to get rid of unwanted programs. There are a lot of programs that run in the background and uses a portion of your resources. These programs can cause a lot of lag in your Windows especially if there are quite a few of them.
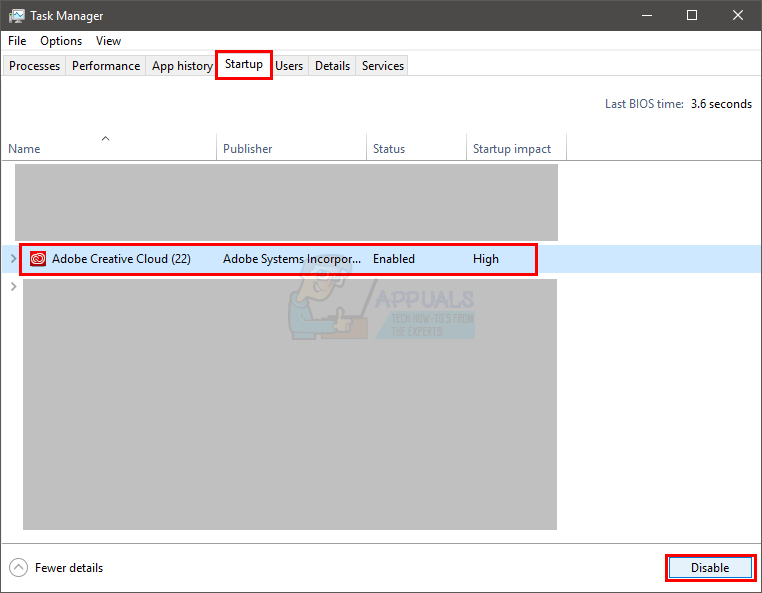
Keep in mind that we aren’t talking about the viruses or other malicious programs that run in the background. We are talking about regular programs that a lot of users use on a daily basis like Adobe Creative Cloud or your antivirus program or OneDrive. These programs usually come with a default setting to start on your computer startup. So, these will start running in the background as soon as you log in to your computer. A lot of these can easily be disabled if you aren’t using them.
- Press and Hold CTRL, SHIFT and Esc key simultaneously (CTRL + SHIFT + ESC) to open the task manager
- Click on the Startup tab
- Now, look at the programs mentioned there. There should be a few of them. Select the one that you don’t use regularly and click on Disable. Repeat this step for every program that you see in the list.
Note: If you want, you can open the program that you see in the startup and turn off the automatically start on startup option. The option’s location will vary from program to program but these options are usually in the settings and can easily be found. Just uncheck that option and save your settings so you don’t have to disable the program on every startup. Do this only for programs that you don’t want to start when your computer starts.
Check Antiviruses: You should also try to disable your antivirus for a few minutes and see if it changes the speed of your system. Most of these antiviruses take up a lot of resources. The anti-virus programs scan files and websites before opening them so a lot of resources are being taken by them, continuously. Almost every anti-virus has an option to disable it for a short amount of time e.g. 10-15 minutes. Just right click on your anti-virus icon from the system tray (bottom right corner of your desktop screen) and select Disable. You will probably see an option of disabling the anti-virus for 10 minutes or until the computer restarts.
Note: The Disable option will vary from anti-virus to anti-virus. But, there should be an option in your anti-virus settings somewhere.
Method 2: Check Drivers
This method is for people who experienced the lag after a Windows 10 update. You can follow the steps given below even if the problem didn’t occur after a Windows 10 update but the chances of this working will be high for those who recently installed the Windows 10 update.
Basically, Windows 10 favors its own generic drivers over third party drivers a lot. So, there is a chance that Windows 10 might replace your old drivers with its own generic set whenever you install a new update. There’s also a chance that your drivers might be outdated and that’s what might be causing the lag.
The drivers that you should check are the display drivers. These drivers, if problematic, can cause slowness and lag on your PC.
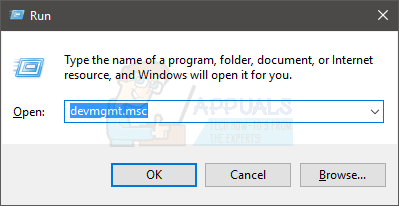
- Hold Windows key and press R
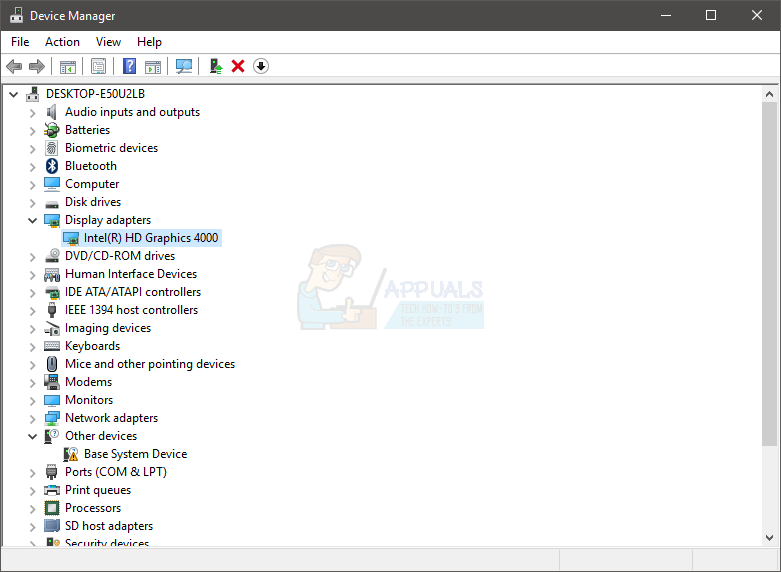
- Type devmgmt.msc and press Enter

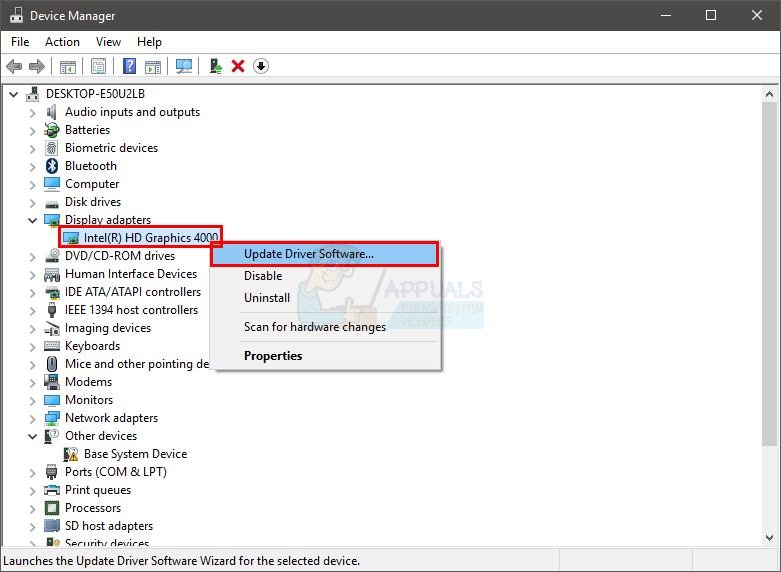
- Now, check your important drivers especially the Display Drivers. Double click the Display Adaptors and then double click your display device as well
- Click on the Driver tab
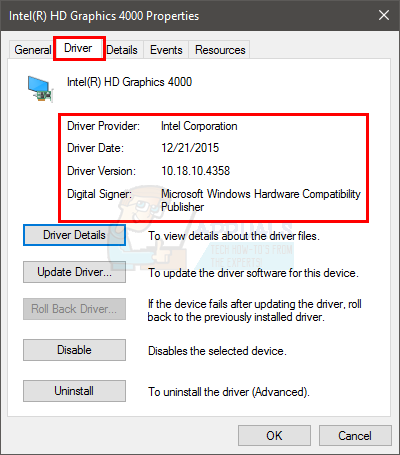
Look at the information provided there. If the driver provider is changed then that means the slow and lag is because of the changed driver. Just simply click on the Uninstall button and follow the on-screen instructions. Once the driver is uninstalled, you can download and install your third-party drivers or roll back to the previous ones if they were installed before the update
If the problem isn’t solved by replacing the driver or the driver wasn’t changed then you might try to update the driver as well. Go to your manufacturers’ website and look for the latest driver versions. If you find an updated driver then download the driver file and follow the steps given below
- Hold Windows key and press R
- Type devmgmt.msc and press Enter
- Double click the category of the device you found the latest drivers for. For example, if you found the latest drivers for your display device then double click the Display Adaptors.
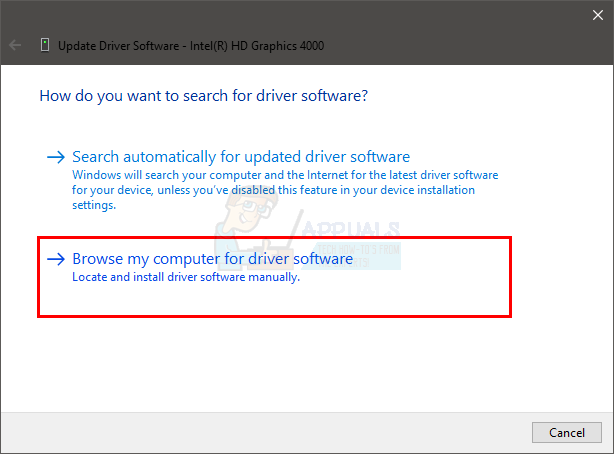
- Right-click your device and click Update Driver Software…
- Select Browse my computer for driver software
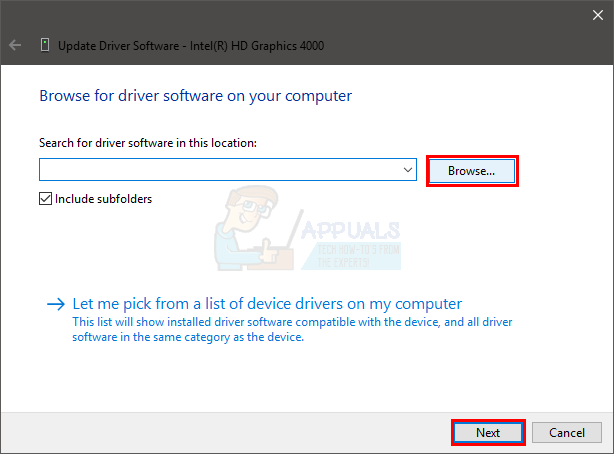
- Click Browse and navigate to the location where you downloaded the driver, select the driver and click Open
- Click Next and follow any additional on-screen instructions
The problem should be gone once you’re done updating the drivers.
Method 3: Scan for Viruses
A lot of the times, the slow and lag on your Windows is caused by the viruses. Viruses and malware usually install programs on your computer and those programs runs on the background. These programs use the resources of your computer as well as your internet resources especially if they are sending important information back to the attacker. If your internet is unusually slow as well then that is a good indicator that you need a proper machine scan.
Open your Antivirus program and perform a deep scan of your system. Do not perform a quick scan as that isn’t as efficient as a deep scan.
If you don’t have an antivirus program installed on your machine then we will recommend Malwarebytes. It is a very popular and very good anti-malware software that is trusted by many. You can download it by clicking here and download a free version.
Method 4: Fragmentation
Note: If you have an SSD then skip this method. There is no point in defragmenting your SSD.
This is another very important thing that is overlooked in most cases. Fragmentation happens over time which causes your computer to slow down. Now, what is fragmentation? Basically, the files on your drive get fragmented on your hard drive. This means that parts of your files are spread far apart on your hard drive. Another way to look at it is that the parts of your file aren’t at a single place on your Hard Drive. This slows down the PC because the computer has to gather the parts of the file from the entire Hard Disk.
Fragmentation happens over time because the more a file is read, modified and overwritten the more fragmented it will get. That is why your computer might be really fast in the beginning but slowed down after some time. This may be because of the fragmentation especially if you don’t defragment your Hard Drive on a regular basis.
Windows comes with its own de-fragmentation utility that fixes this problem. So, you can run that tool and solve this issue. Follow the steps given below to perform de-fragmentation on your system.
Note: Defragmentation takes a lot of time so make sure that you don’t have to do anything else on the computer.
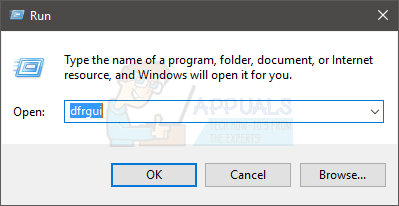
- Hold Windows key and press R
- Type “dfrgui” and press Enter
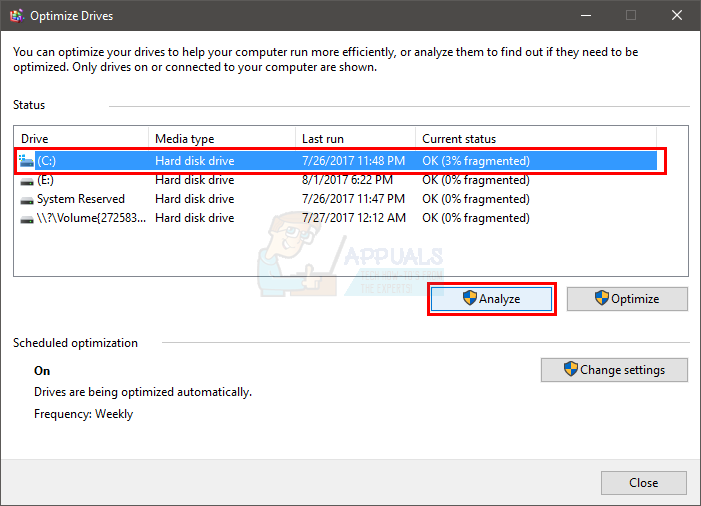
- Select the drive that you want to defragment and click on Analyze. This will show you the status of your drive and how much the drive is fragmented. A rule of thumb is that you should defragment if the drive is more 10% fragmented. However, there is no hard in defragmenting even if the drive isn’t fragmented to 10%
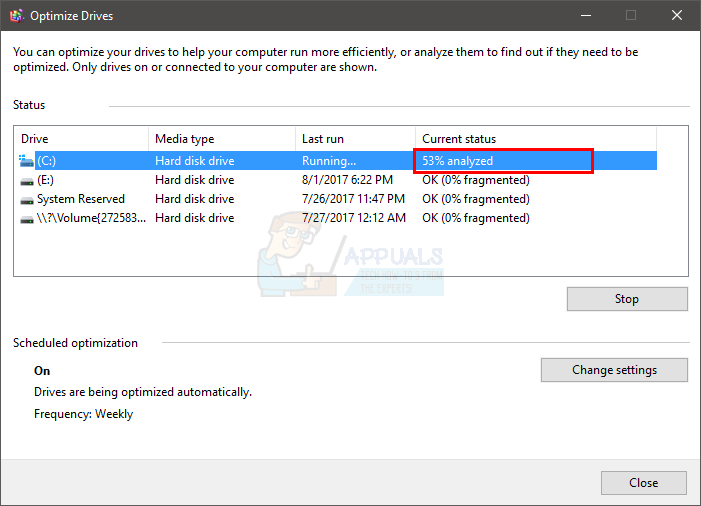
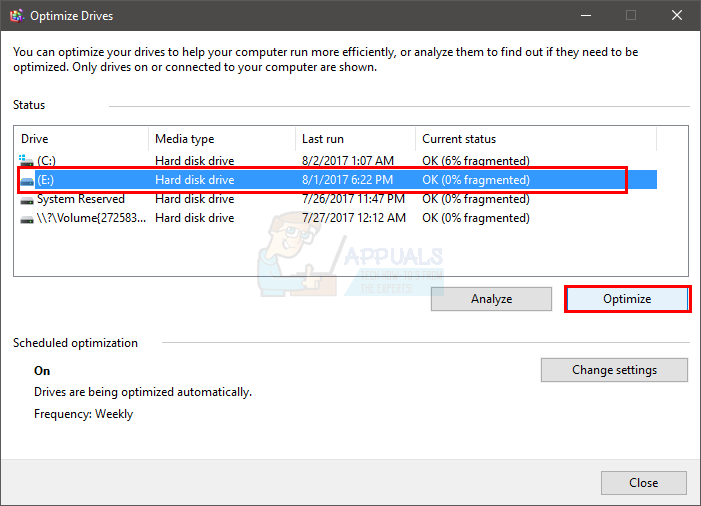
- Once the Analyzing period is finished, you should be able to see the fragmentation status of your drives. If the drive you selected is heavily fragmented then select your drive and click on Optimize. This will start the defragmentation process
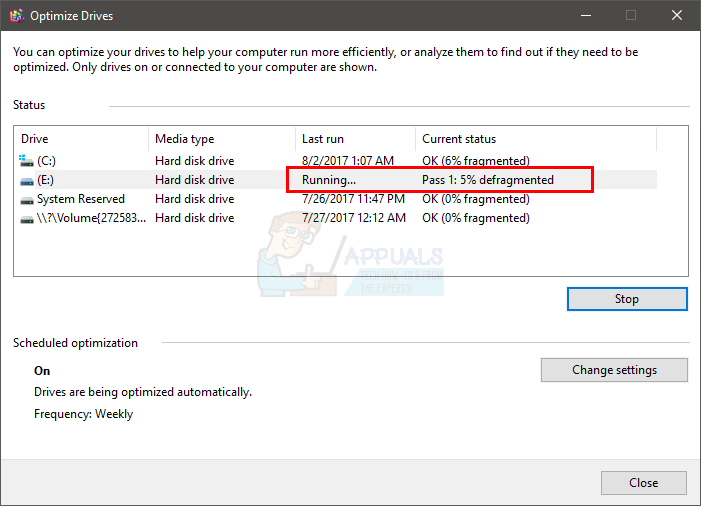
You can take a break while the Windows defragments your drive. Once it is done, you will be able to see the results and the status of your drive.
Method 5: RAM
Sometimes the problem might simply be with your computer’s capacity. Your system will obviously be slow if your computer doesn’t have enough RAM to work with. Even if your computer isn’t slow, it is recommended to have the maximum amount of RAM that your PC can support (or at least have a decent amount of RAM). This is mainly because having sufficient RAM does wonder for your PC. Also, RAMs are very cheap these days so a few dollars are worth the speed that you will get for it.
Upgrading your RAM will solve the problem if it was caused by not having enough resources. Programs like anti-viruses take up a lot of resources. Having enough RAM will make sure that your system is running fairly quickly even with the anti-virus enabled.
So, go to your computer manufacturer’s website and look at your model. Check to see how much RAM do you have and how much is supported. If you have space and the money then upgrade your RAM. Because there isn’t anything else that you can do if the problem is because of the hardware limitations.
Method 6: Clear Temporary Files
Your Windows operating system has a dedicated folder for storing temporary files from all applications that you run on your computer regularly. These files served as cached data of certain launch configurations that the application generates at startup but in case the computer stores them on the hard drive, the launching process gets sped up.
However, if these files have been corrupted over time or if they have taken a huge chunk of the storage, they can actually end up preventing the computer from running smoothly. Therefore, in this step, we will be clearing out any temporary files that the computer might be stored to speed it up.
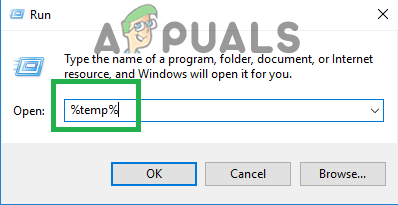
- Press “Windows” + “R” to open the run prompt.
- Type in “%temp%” and press “Enter” to launch the temporary files folder.
Typing in “%temp%” and pressing “Enter”. - Press “Ctrl” + “A” to select all files and then press “Shift” + “Delete” to clear them from your computer.
Method 7: Perform Disk Cleanup
In some situations, the main partition might be filled up with unnecessary files and that might actually be preventing the computer from running at the normal speed. These files might include update leftovers, older backups, cached data from system files or some older updates that were left back in case you wanted to downgrade your version of Windows.
However, in this step, we will be performing a Disk Cleanup to ensure that there is enough space on our main partition and that all this junk is cleaned up to provide for a more optimal storage environment in the main partition.
- Press “Windows” + “E” to open the File Explorer and click on the “This PC” option from the left pane.
- Right-click on your main partition and select “Properties”.
- Click on the “Disk Cleanup” option and a new window should pop up.
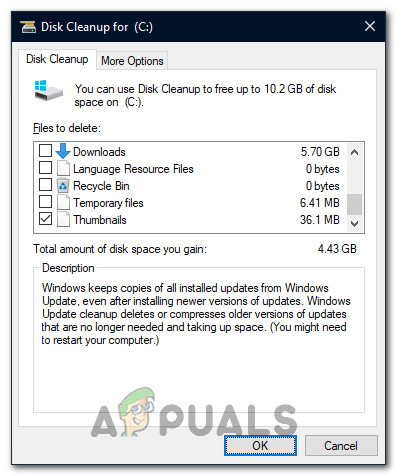
- Click on the “Clean up System Files” button to provide for a more advanced clean up.
- Navigate through the available options and check the ones that you think might be more suitable for you.
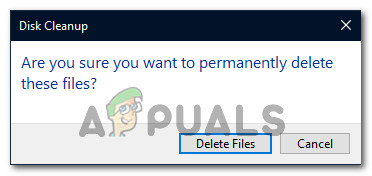
Selecting the suitable options - Click on “OK” to start the Disk Cleaning process.
- Select the “Delete Files” option in the prompt that pops up.
Clicking on “Delete Files” - Check to see if there is any improvement after running the Disk Cleanup utility on your computer.
Method 8: Install Windows Updates
While updates are often delivered to the Windows 10 users, they are mostly not installed by a lot of users due to the bad reputation that they carry with them. In spite of this, some updates are very necessary to keep your system running with optimal performance. Therefore, in this step, we will be applying some Windows Update on your computer to make sure that it is running the latest version of Windows 10.
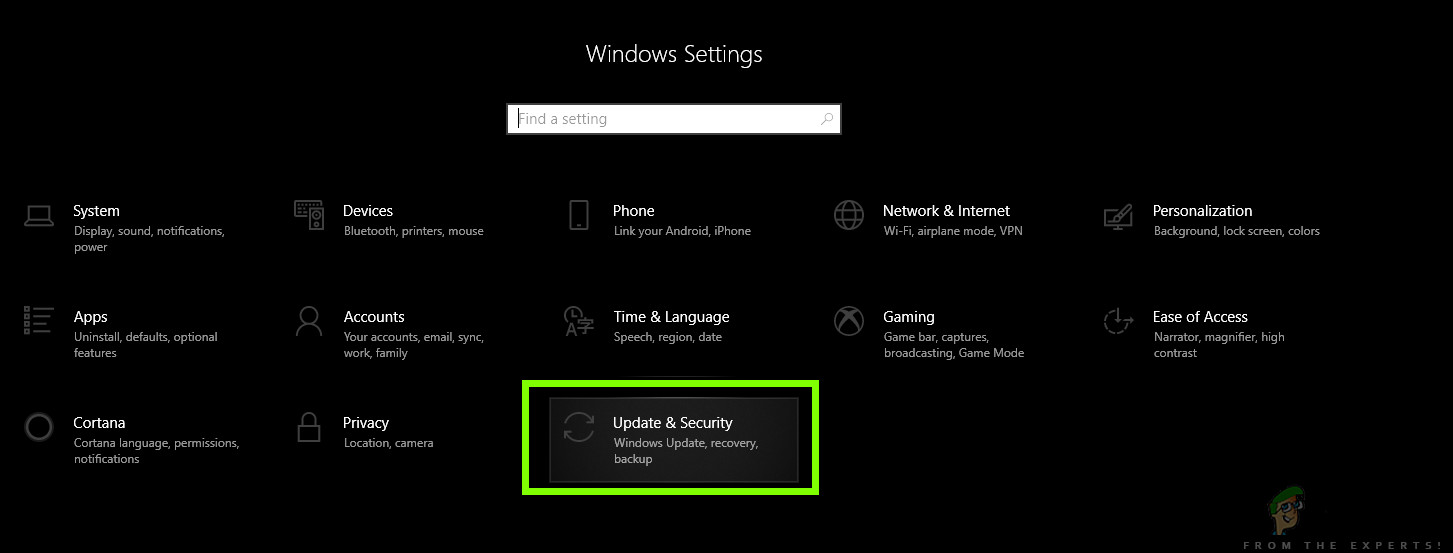
- Press “Windows’ + “I” on your keyboard to launch the settings.
- In the settings, click on the “Update and Security” option and then select the “Windows Update” button from the left tab.
Settings/Updates and Security - Click on the “Check for Updates” option and let Windows run an automatic check for any available updates.
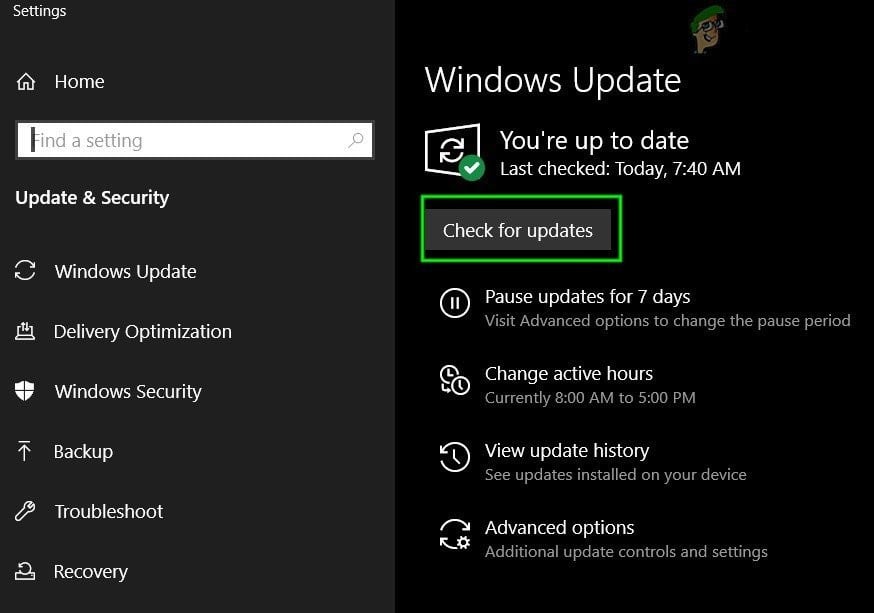
Check For Updates in Windows Update - Updates will now automatically downloaded on your computer and you will probably be asked to restart your computer to install these updates.
- After installing the updates, check to see if your system has sped up a little.
Method 9: Use ReadyBoost
This is a step that can be performed on very old computers that are likely running slow with Windows 10 due to their hardware deficiencies. Due to this incapability of the hardware, you can make use of an extra USB that you might have on your hand to increase your performance a little bit by employing the ReadyBoost feature that Windows offers.
Basically, the feature makes use of that USB by assigning it only to the computer which renders its storage capability weakened, and then it uses the USB as a Temporary RAM to store some files that would otherwise be loaded up from scratch. In order to make use of this feature:
-
- Connect the USB to the computer and make sure to back up any extra data from it beforehand.
- Press “Windows’ + “E” on the Windows Explorer and click on the “This PC” option from the left-hand side.
- The USB should show up in the list of connected devices to the computer.
- Right-click on it and select the “Format Device” option.
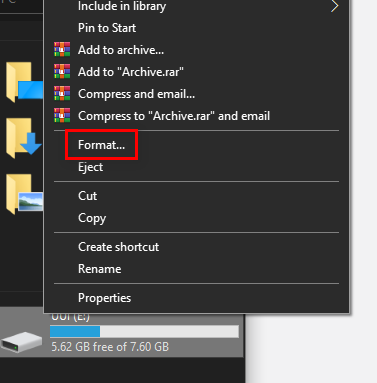
Formatting the SD card - Click on “Start” to begin the formatting process of the USB.
- Now, right-click on the USB again and click on the “ReadyBoost” tab at the top.
- Check the “Dedicate this device to ReadyBoost” option and then push the slider all the up to the max.
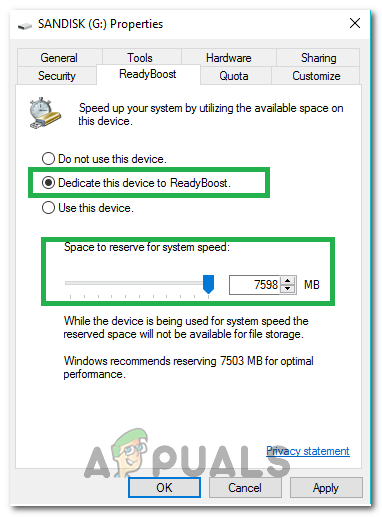
Selecting the “Dedicate this device to ReadyBoost” option - Click on “Apply” to save your changes and click on “OK” to exit out of the window.
- Check to see if applying the ReadyBoost has increased the speed of your computer.
Method 10: Increase Page File Size
While running applications or using any system services on the computer, the operating system actually creates some small cache files on the disk temporarily to make sure that it doesn’t need to reload these files again and again which increases the speed of the system and allows for more optimal performance.
However, in some situations, your PC might be running out of this Page File Size that has been allocated to it. Either you might’ve changed this setting to conserve system storage on your computer or it might’ve been automatically changed. Therefore, in this step, we will be changing it by increasing the Page File Size.
- Press “Windows” + “R” to launch the run prompt.
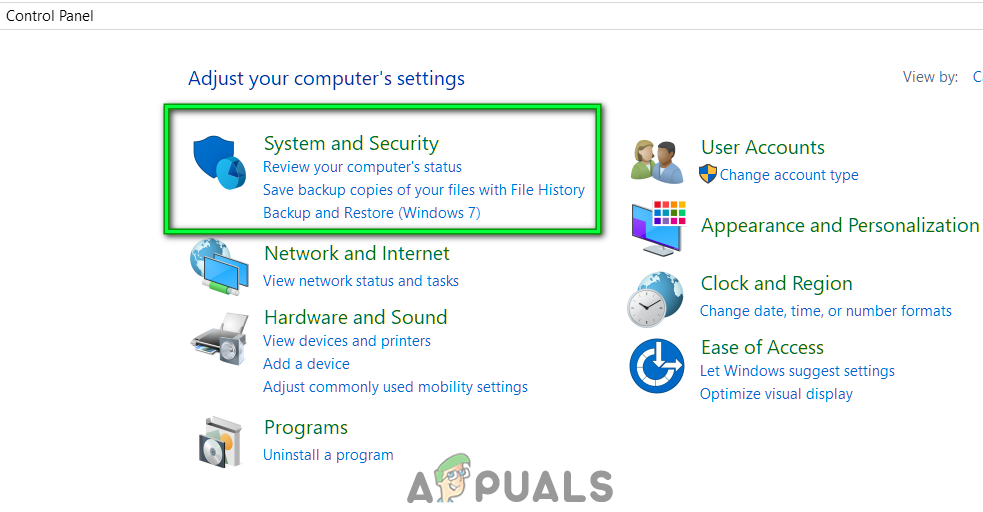
- Type in “Control Panel” and press “Enter to launch the classical control panel interface.
- Click on the “System and Security” option and then select “System” on the next screen.
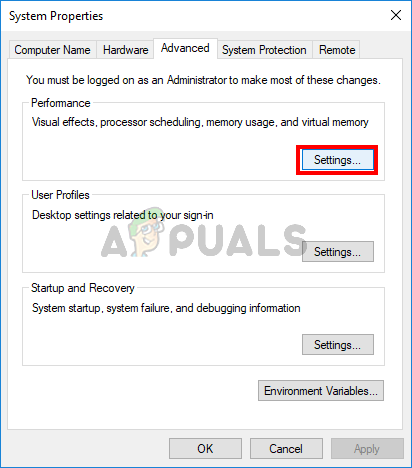
Tap System and Security - In the system settings, click on the “Advanced System Settings” option from the left side.
- Click on the “Advanced” option and then click on the “Settings” option below the “Performance” heading.
Advanced Performance Settings - Again, click on the “Advanced” tab in the new window and click on the “Change” button below the Virtual memory heading.
- Uncheck the automatically manage paging file size for all drives option and check the “Custom Size” option.
- From here, make sure to enter “4096 MB” and “8192 MB” in the initial and the Maximum Size options available for the drive.
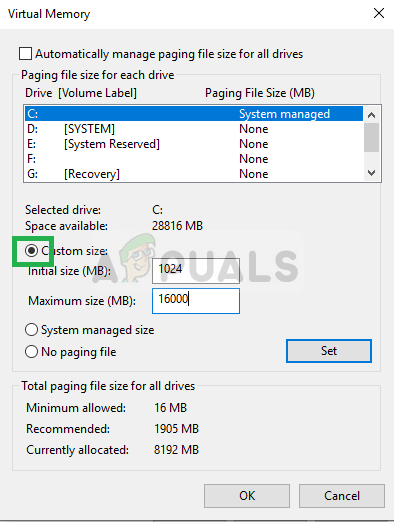
Checking The Custom Size Option - Click on “OK’ to save your changes and exit out of the window.
- After increasing the page file size, check to see if the system performance is improved on your computer.
Method 11: Adjust and Cater for Visual Effects on Windows 10
In some cases, the Visual Effects that are used by Windows 10 on your computer might not be good for your hardware usage and resource usage on your computer. Windows 10 isn’t a lightweight operating system and by default, it comes equipped with all sorts of extra features that aren’t really useful in day to day usage.
Therefore, in this step, we will be disabling these features and then check if the system performance is increased by doing so. You can adjust these options to your own liking to and have more options enabled to you depending upon your personal preference but it is highly recommended that you disable them all if you are on a very low-end pc.
- Press “Windows” + “R” to launch the run prompt.
- Type in “Control Panel” and press “Enter to launch the classical control panel interface.
- Click on the “System and Security” option and then select “System” on the next screen.
Tap System and Security - In the system settings, click on the “Advanced System Settings” option from the left side.
- Click on the “Advanced” option and then click on the “Settings” option below the “Performance” heading.
Advanced Performance Settings - Click on the “Visual Effects” tab and then click on the “Adjust for the best performance” option.
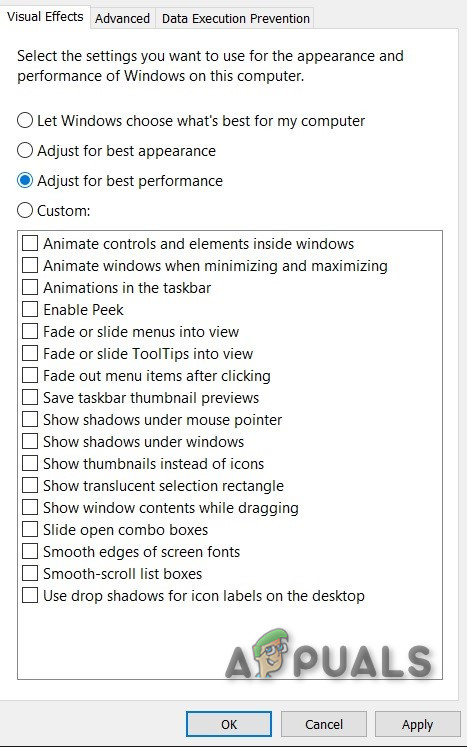
Adjust for best performance - Select “Apply” and then click on the “OK’ button to close out of the window.
- Check to see if the Windows performance has improved by disabling these visual effects. You can also choose to customize this setting by disabling individual options in the Visual Effects tab by unchecking the boxes but it is recommended to just adjust for best performance since you are on a low-end computer.
Method 12: Stop OneDrive
Another nuisance on the Windows 10 operating system in the OneDrive application that comes enabled by default if you chose the Microsoft Sign in option and it automatically backs up certain files on your computer. Although it is useful, it can sometimes end up seriously hindering your computers performance due to continued resource usage.
Therefore, in this step, we will be disabling it from starting up when the computer starts and also close if it is currently running in the background. This should get you some performance improvements if it was actively syncing in the background of your computer.
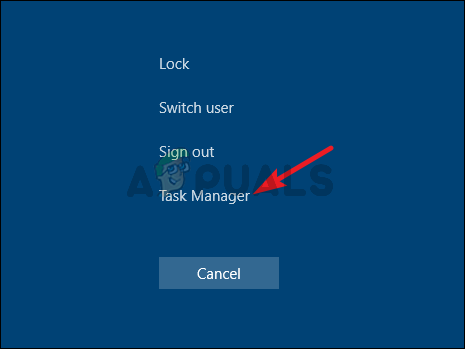
- Press “Windows’ + “R” to launch the Run prompt.
- Type in “Taskmgr” and press “Enter” to launch the Windows Task Manager.

Running the Task Manager - Click on the “Startup” tab and select “OneDrive” if it listed there.
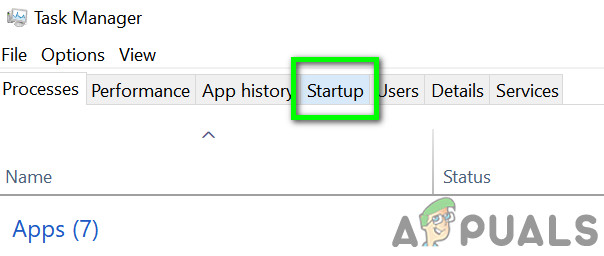
Navigate to Startup Tab of the Task Manager - Click on the “Disable” button to prevent OneDrive from launching when the computer is launched.
- After this, click on the “More Icons” option from the lower right side of your taskbar and right-click on the OneDrive icon.
- Select “Quit OneDrive” to close out of Microsoft OneDrive on your computer.
- Press “Ctrl” + “Alt” + “Del” and then click on the “Task Manager” to navigate back to the Task Manager Window.
Opening Task Manager - In the processes tab, click on the “OneDrive” process and click on the “End Task” button.
- This should end the OneDrive application from syncing in the background of your computer.
- Check to see if computer performance has improved by doing so.
Method 13: Restore Computer
If you haven’t been able to observe any substantial gains in the performance of your computer so far after trying all of the options above, one of the things that we can try is to revert our system to an earlier date in which it may have been working better. This is for you to decide if you have noticed any recent performance loss on your computer.
- Press “Windows” + “R” buttons on your keyboard to launch the run prompt.
- Type in “rstrui” in the run prompt and press “Enter” to launch the Windows Restore window.
- In the Windows Restore Window, it should give you a “Recommended Restore Point” if you have recently gone through a major change on your computer.
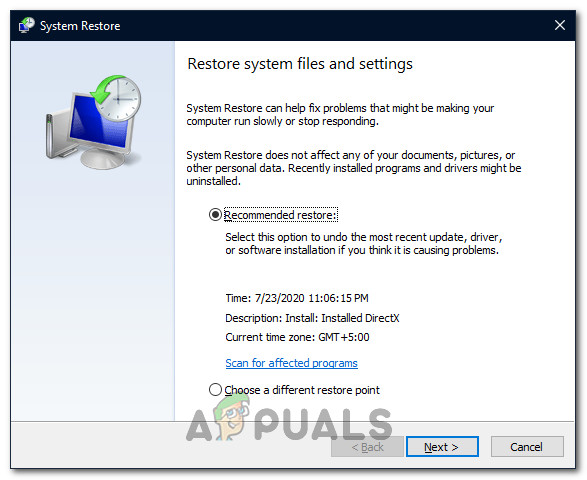
Choosing the Restore Points - Otherwise, there should be a “Choose a Different Restore Point” option present as well.
- Choose the option that you think would be better for your computer and click on “Next”.
- Proceed with the on-screen instructions to successfully revert your computer to an earlier restore point and check to see if doing so has fixed the issue with your computer running slow.
Method 14: Change Power Plan
If you are using a laptop this solutions should be the most effective for you but even on a computer, changing the power plan that your operating system is using can be a major factor in determining the speed of your computer. Basically, the more power your hardware consumes, the more room it has for performance improvement. If the hardware is given less power than is actually required, it can cause some serious performance hurdles. Therefore, in this step, we will be changing the computer’s power plan.
- Press “Windows” + “R” to launch the Run prompt.
- Type in “Control” and then press “Enter” to launch the control panel interface.
- In the Control Panel, click on the “View By:” option and then select the “Large Icons:” option.
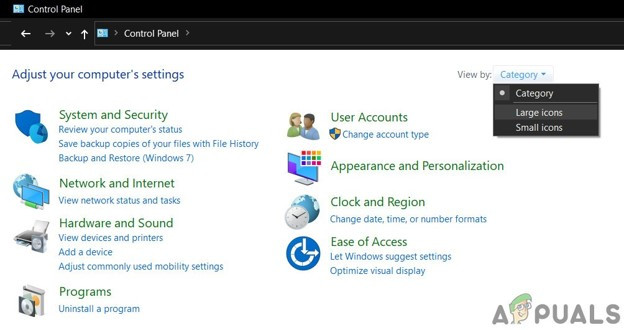
Change Category to Large Icons - Select the “Power Options” button in the Control Panel and then click on the “High Performance” button to allow for the operating system to use the High-Performance profile.
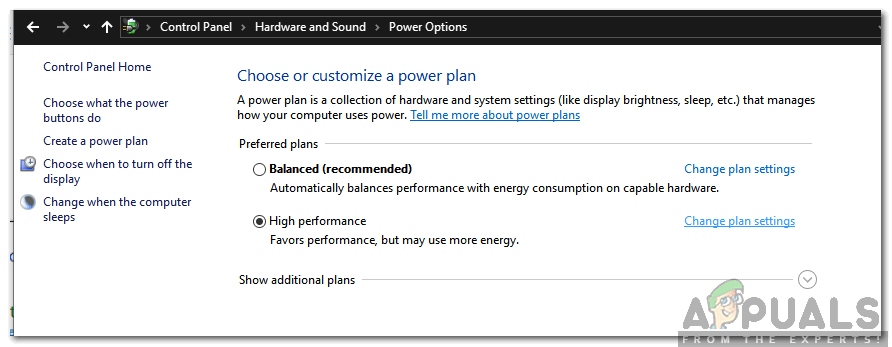
Checking “High Performance” and selecting “Change Plan Settings” - Closeout of this window for the changes to take effect.
- Check to see if this improves the performance of the computer running Windows 10.
uhh
It don’t helped.