How to Fix 0x80bd0009 Audio Receiver Error on Xbox One?
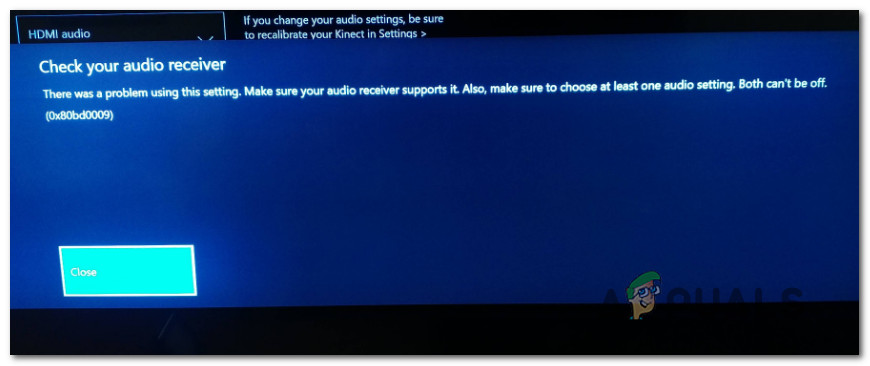
Several Xbox One users have been reaching us with questions after being unable to connect their console with a 3rd party soundbar or Home Cinema. Most affected users are reporting that they are encountering this issue despite downloading and installing the appropriate firmware. The error message is mainly reported to occur when the user tries to select Dolby Atmos (HDMI Only) as the default bitstream format from the list of available options. As soon as they perform this action, they get the error code 0x80bd0009.
What’s causing the 0x80bd0009 Error on Xbox One?
We investigated this particular error by looking at various user reports and by testing out the various repair strategies that are recommended by other users that have managed to fix the 0x80bd0009 error code on Xbox One. As it turns out, there are several different scenarios that will spawn this problem. Here’s a shortlist with culprits that might be responsible for the error:
- Xbox Firmware glitch – As it turns out, this particular issue was already patched by Microsoft engineers, since the issue is over one year old. If you’re encountering this problem, the first thing you should do is update your Xbox One firmware version to the latest available. This procedure should resolve the instances where the error code was occurring due to this patched glitch.
- Broken automated settings – Depending on which soundbar you’re using, it’s possible that you’re encountering the issue due to the fact that you’re using automated Video settings that are not compatible with Dolby Atmos. In this case, you can resolve the issue by adjusting some video settings manually.
If you’re currently struggling to resolve this error message, this article will provide you with a couple of different troubleshooting strategies that should allow you to resolve the problem. Down below, you’ll find a collection of potential fixes that were confirmed to be effective by at least one affected user.
For the best results, we advise you to follow the instructions below in the same order that we arranged them in. Eventually, you should stumble upon a fix that should resolve the issue regardless of the culprit that might be responsible for it.
Let’s begin!
Method 1: Update Xbox One to the latest version
Since it’s been more than one year since this bug originally appeared, Microsoft has already patched it through the official channels. A while ago, you needed to use the Insider Hub in order to apply the fix that will resolve the Xbox One problem related to Dolby Atmos, but now that’s no longer necessary.
Several affected users that were also encountering this fix have reported that they were finally able to use Dolby Atmos on their console after updating their console version to the latest. This is strong evidence that the patch fixing the issue is now being deployed to all consoles, not just to the ones that are signed inside the Insider Hub.
To take advantage of the Dolby Atmos fix and resolve the problem on your console, start following the instructions below to update your Xbox One console to the latest:
- With your Xbox Console fully turned on, press the Xbox button on your console once to open up the guide menu. Then, from the list of options, navigate to the Settings icon and choose All settings.
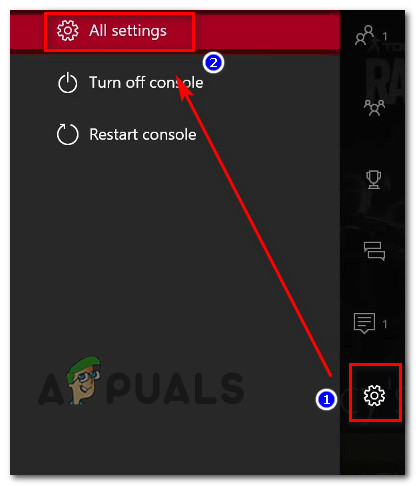
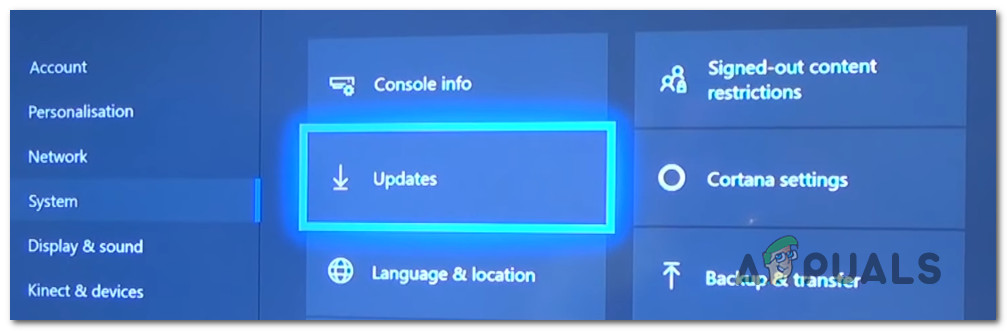
Accessing the Settings menu on Xbox One - Once you’re inside the Settings menu, select System from the left-hand menu on the left-hand section. With the System tab selected, move over to the right-hand side pane and choose Updates from the right-hand side list.
Accessing the Updates screen - If a new update is available, you’ll see a prompt letting you know that a new version is available. When you see it, follow the on-screen instructions to install the latest update that is available for your Xbox One console.
- Once the installation is complete, restart your console manually if you’re not automatically prompted to do so.
- At the next console status, try to set up Dolby Atmos once again and see if the issue is now resolved.
If you’re still encountering the 0x80bd0009 error code when you try to configure Dolby Atmos, move down to the next method below.
Method 2: Using the manual settings
In case you’re encountering this issue when trying to configure Dolby Atmos to run on your Xbox One X or your Xbox One S console, this method should allow you to fix the problem. If Dolby Atmos functions just fine inside the standalone application or with other connected devices but you can’t get it to work with your gaming console, chances are you need to do some manual adjustments.
Several affected users that also found themselves in this exact scenario have managed to resolve the problem by going into the Settings menu and adjusting some Display & Sound settings so that Dolby Atmos is correctly configured.
Here’s what you need to do:
- With your console fully turned on, press the Xbox button on your console once to open up the guide menu. Next, from the newly opened menu, navigate to the Settings icon and choose All Settings from the next menu.
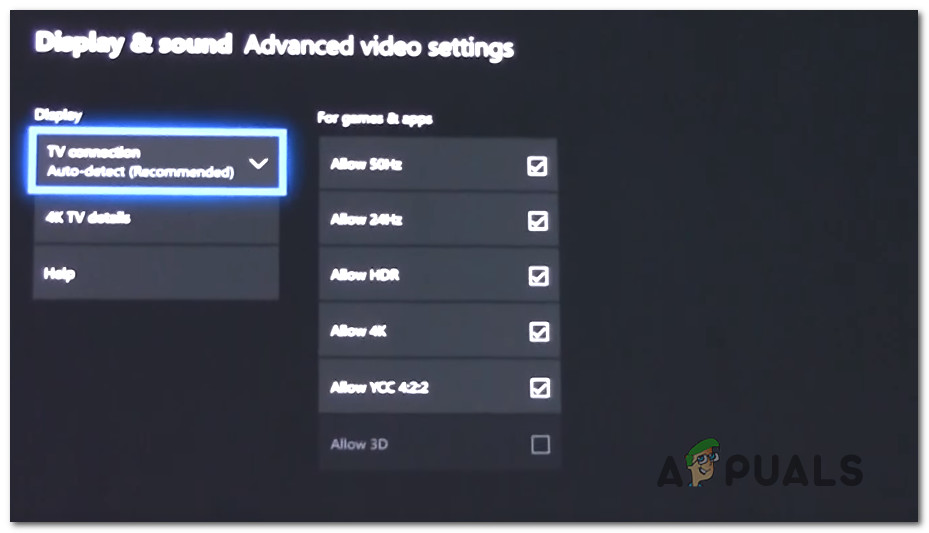
Accessing the Settings menu on Xbox One - Once you’re inside the Settings screen, select Display & sound from the left-hand menu, then move over to the right-hand side and start by selecting Video Output. After you’re inside the Video Output menu, select the Advanced video settings menu from the list of available options.
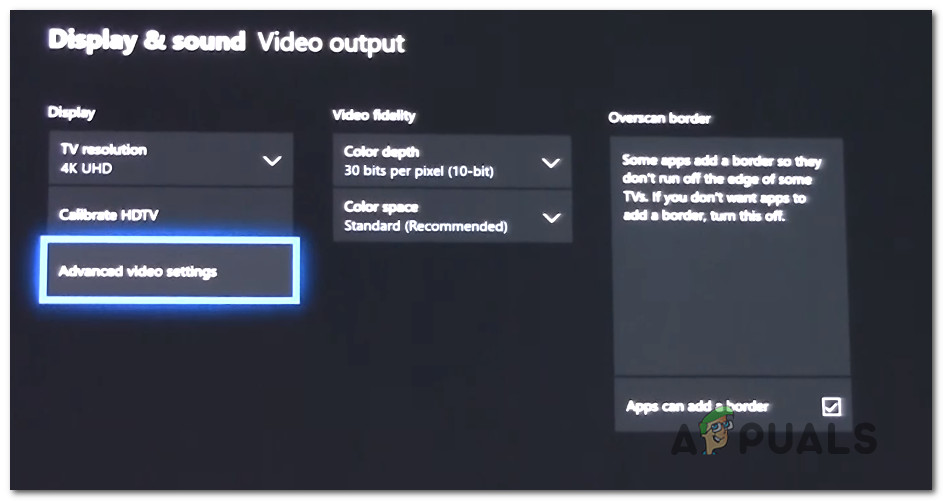
Accessing the Advanced Video Settings menu of Xbox One - Once you’re inside the Advanced video settings menu, change the default display option from Auto-detect to HDMI.
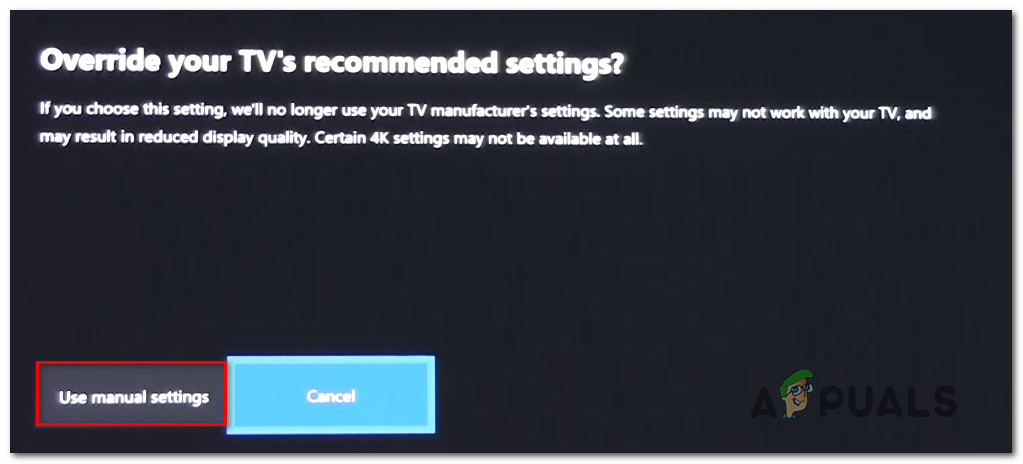
Changing the default display option - When you get asked whether you want to override your TV’s recommended settings, choose Use Manual settings from the list of available settings.
Establishing Manual settings for Display Quality - As soon as you enforce this change, the display quality will change to a very fuzzy picture (most likely 640 x 480). When this happens, select the 4K TV details menu, then select TV resolution and change it 1080p. If you get asked whether you want to keep this resolution, choose Yes.
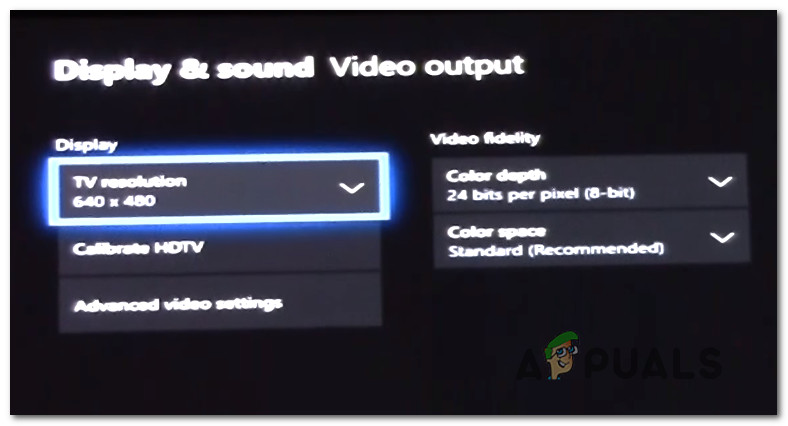
Changing the TV resolution to the correct one - Next, move over to the Video Fidelity section and choose Color depth. Then, from the list of available options, choose the appropriate settings according to your TV pannel.

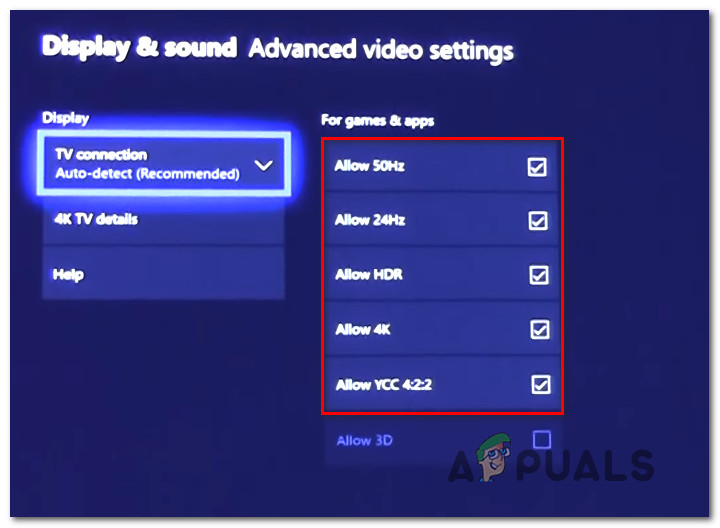
Adjusting the color depth - As soon as the color depth setting is adjusted, return to the Advanced video settings menu and check the boxed associated with Allow HDR, Allow 4k, Allow 50Hz, Allow 24Hz.
Allowing advanced video settings - Once you’re done with the video settings, return to Display & Sound settings, then go to Audio output. Next, select the Bitstream format from the list of available options and set it to Dolby Digital.
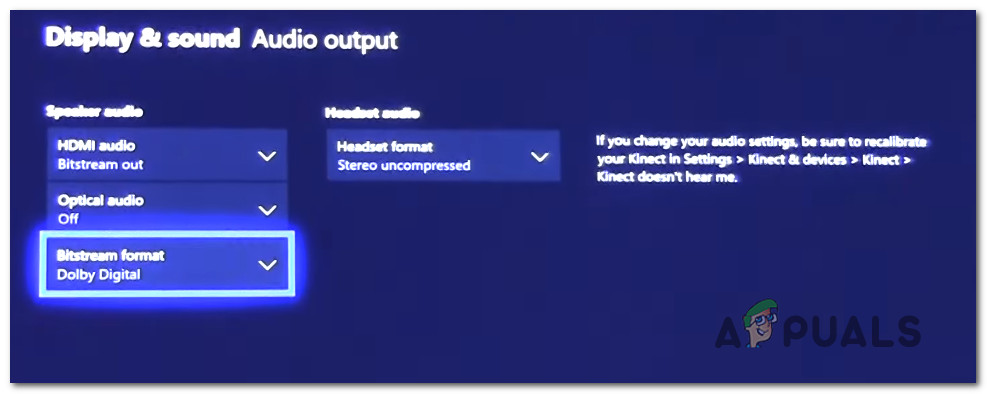
Setting Dolby Atmos to Dolby Digital - Under normal circumstances, you should no longer see the 0x80bd0009 error code that was previously preventing you from using the Dolby Atmos technology on your console.
If you followed the instructions above and the issue is still not resolved, move down to the next method below.

Did not work