How to Disable “Open File – Security Warning” in Windows 7
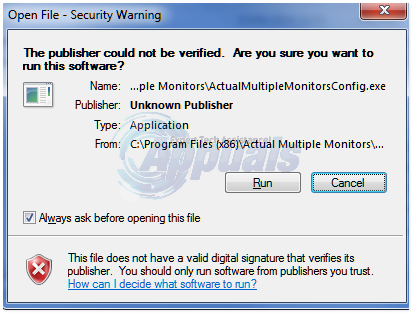
We all need security measures to be put in place to protect us while using computer systems. Windows 7, like any other platform, also has its fair share of security risks and threats. It is for this reason that Microsoft set out to put measures in place to warn you of potential attacks on your system. One such mechanism happens to be the security warning “Do you want to run this file?” Usually you will see the name, publisher, type and source of the “suspicious” file. This pulls the user’s attention to the file in question and they proceed only after closer scrutiny.
This feature takes into account that in the course of using computers, users sometimes download programs without much consideration. These programs pose the threat of infecting computers. However, if you have a good antivirus program in place, there is really no need to have these warnings popping up every now and then. Quite frankly the warning messages in Windows 7can get irritating. If you have had enough of the annoyance, there are some ways through which you can eradicate the irksome messages.
NOTE: Disabling the security warning is a security threat in itself. Do this if you have a strong updated antivirus program on your PC.
Method 1: Registry Editor
Hold the Windows Key and Press R.
Type regedit.exe in the run dialog and press ENTER or click OK. Make sure you take a backup of registry settings (click here)

In case a User Account Control warning appears after the above step, click “Yes” or press ENTER again.
The registry editor appears here. You will have the explorer window to the left and the components or elements to be edited on the right hand side of it.
Click on the element “HKEY_CURRENT_USER”. It will expand into sub folders. Under it, click on “Software” to yet again access more subfolders.
Continue to the sub folders Microsoft -> Windows -> CurrentVersion -> Policies, and then to In some rare cases you may not find the Association sub folder. If so, create it by yourself. Still under Policies, right click on an empty space and choose NEW -> Key -> Associations

Click on the Associations folder, and then move to the right hand side of the window. Identify the LowRiskFileTypes Double click it. Just in case there is no such entry on your system, yet again create a new one with the name LowRiskFileTypes (Right Click in the Left Pane, choose New -> String Value).
Take note that the security warning applies to specific program extensions. You have to key them in by yourself. If you know the exact files prompting the warning go ahead and fill in the file extensions you want to be overlooked by the system. Otherwise, just paste the below entries into the resulting window under “value data”:
.avi;.bat;.cmd;.exe;.htm;.html;.lnk;.mpg;.mpeg;.mov;.mp3;.mp4;.mkv;.msi;.m3u;.rar;.reg;.txt;.vbs;.wav;.zip;.7z
To add more values, just add ;.value-here to the end of the line.
These extensions are not limited whatsoever; you can key in any file extensions that you think trigger the security warning.

After you finish, press OK and close the registry window. Restart your PC. That’s it! The irksome warning is no more.
Method 2: Local Group Policy Editor
If you are not up to the task of fiddling around with registry keys, editing the Local Group Policy is your next best bet.However, the Group Policy feature is only built into Pro Versions.
Do as follows:
Go to “Run” and type “gpedit.msc”; or access the policy editor by any other preferred means.
Go to User Configuration, and then click on Administrative Templates. Go to the Windows Components sub folder and then again to Attachment Manager.
On the list of entries, locate the item “Do note preserve zone information in file attachments” and open it. Change the value to Enabled then say OK. Close the window and save the changes. Do not go out of the Group Policy Editor just yet.
Open the “Inclusion list for low file types” item. Yet again, change the setting to “Enabled”, and in the options box also enter the file extensions written under Method 1. Click OK (settings will be saved after closing). You can now exit the policy editor and restart your computer.
Method 3: Internet Options’ Security Tab
There is yet another way of eliminating the security warning. This is through editing Internet Settings. Just follow the steps below.
Hold the Windows Key and Press R and type “inetcpl.cpl” in the run window that appears. Press ENTER or click OK.
The internet properties window appears. Click on the “Security” tab in the upper region of the Internet Properties window. You will see security levels for your current zone.
Click on the “Custom Level” button; another window appears right away. Locate the line that says “Launching applications and unsafe files (not secure)” and choose “Enable”.
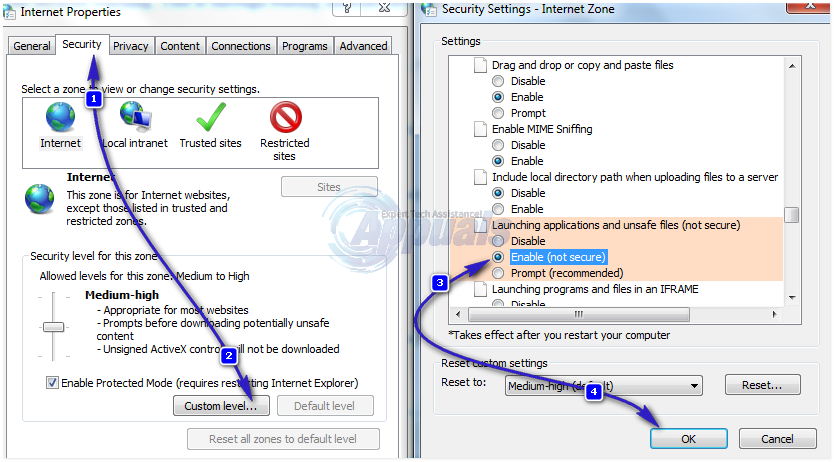
Click on OK. A warning appears; just click yes. Click OK again to exit the internet settings.
If necessary, restart your computer.
You have successfully disabled the “Open File – Security Warning” in Windows 10” warning.
Good afternoon, i have downloaded a workshop manual on my laptop, but with every page i want to open it gives me a security alert and its getting bloody irretating. Can i switch it off?