How to Create a Sound Rack Preset in Overloud TH3
Overloud TH3 is one of the top-rated guitar amplifier simulation software available, delivering incredible tones if you learn how to use it. You could always use the hundreds of available presets, but to really get your own signature tone, you should build your own preset – and this Appual’s exclusive guide will show you everything you need.
We’ll be creating a brand new tone preset from scratch throughout this guide, but you can also download the preset here >
Appual’s Hard Rock – Metal Preset for Overloud TH3.ovp
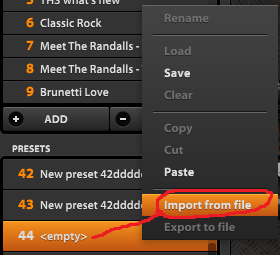
To load it into Overloud TH3 and preview the exact same preset we’ll be making from scratch in this tutorial, just save it somewhere on your computer, then right-click an <empty> preset in Overloud TH3 and “Import from file”.
There’s hundreds of effects and tones you can utilize, but we’re going to keep it simple for this guide and create a sound rack for a modern, professional heavy metal type of sound. We’re not simply cranking up the gains here – we’re going to cover every aspect of the sound rack so that you can feel comfortable with the entire program.
Let’s start by launching Overloud TH3, click on any of the banks, then scroll down until you find an empty preset slot. Double click it.
We now have an empty space to work with. We should first add our amplifier, because everything else will revolve around this. On the right side of Overloud TH3, click the drop-down box labelled “All categories” next to the orange Components button. Then choose Amp.
As you can see, there’s a large list of amp models to choose from – if you hover your mouse cursor over each model individually, you’ll be told what the amp’s real life counterpart is. So, for our heavy metal tone, lets go with the Heavy51 (US) Lead, which is based on a Peavey 5150 amp head. Drag it from the components list to the middle of the screen.
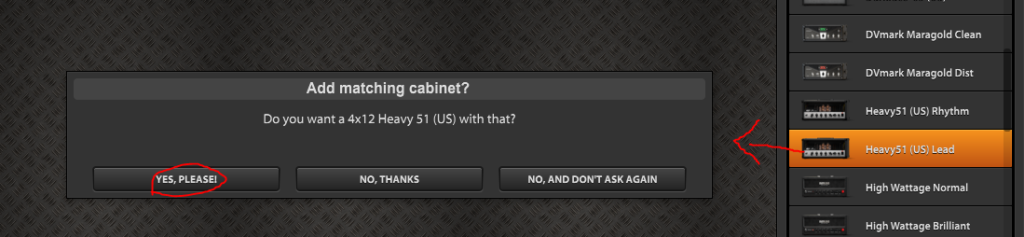
A pop-up will display, asking if you want to add a 4×12 Heavy 51 (US) – this is a cabinet. If you don’t know the difference, not all guitar amplifiers have speakers built into them, like the amp we added. An amplifier without a speaker is called an amp head, and it connects to a cabinet. An amplifier with speakers built into it is, for example the popular Line 6 Spider series, is called an amp + cabinet combination (or combo amp for short).
So now we have our amp and cabinet – at this point, you should go ahead and connect your guitar to your computer. Appual’s has a great guide on recording guitar on PC, which includes audio interface recommendations and driver settings for the best audio latency – “How to Record Guitar on PC Using Reaper DAW”.
Now if you give your guitar a few strums, it probably sounds okay – like a basic amp. But to really nail our tone, we want to add some effects and settings. For really heavy metal, we want more gain and distortion. Lets add an overdrive pedal.
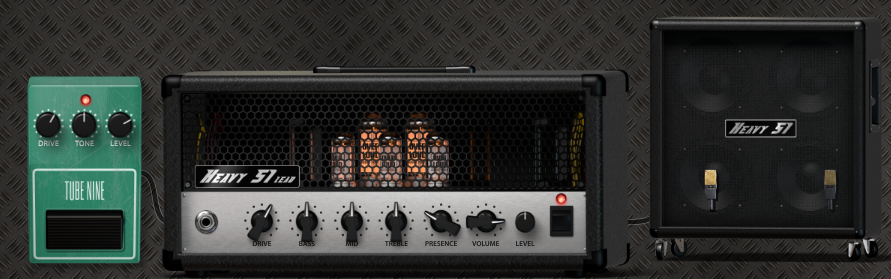
In the components menu, click the dropdown menu again and choose Overdrive. For hard rock and heavy metal distortion, you should go with either the SDriveOne (based on the Boss SD-1) or the TUBE NINE (based on the Ibanez Tube Screamer). These are both great distortion pedals and many guitar enthusiasts rate them about equally. Drag your overdrive pedal in front of the amp head! Your sound rack should look like this now:
At this point, you might be getting some static feedback from your guitar through your speakers (unless you have high-end pickups installed). The solution is to raise the Noise Gate threshold in the Master settings.
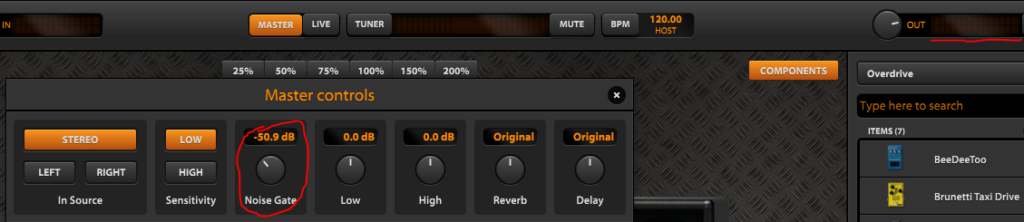
At the top of Overloud TH3, click the Master controls button, and dial up the knob for Noise Gate. You don’t want to turn it up too high, just enough that static feedback is barely audible. Just hold your guitar without strumming it, and watch the orange bars in the “Out” monitor in the top right corner of Overloud TH3. You want to adjust the Noise Gate until you only have maybe 1 or 2 bars of “static noise” when you aren’t playing your guitar.
You can also adjust Overloud TH3’s sensitivity to your pickups here as well – if you have single-coil pickups, leave it on “Low”. If you have dual humbuckers on your guitar, switch it to “High”.
So now we’re going to get really deep into the nitty-gritty of our tone. One professional secret worth knowing is how microphones and their positioning effect the tone, depth, and space of your guitar sound.
Double-click on the Cabinet in the sound rack to open its settings. You’ll see dropdown menus for Mic A and Mic B, and decibel knocks for each mic. Now, there’s a ton of microphone models to choose from in the dropdown menus, but a standard in the industry is the Shure SM57 microphone – its just an insanely popular microphone for recording guitar, and pretty much every studio engineer owns one.
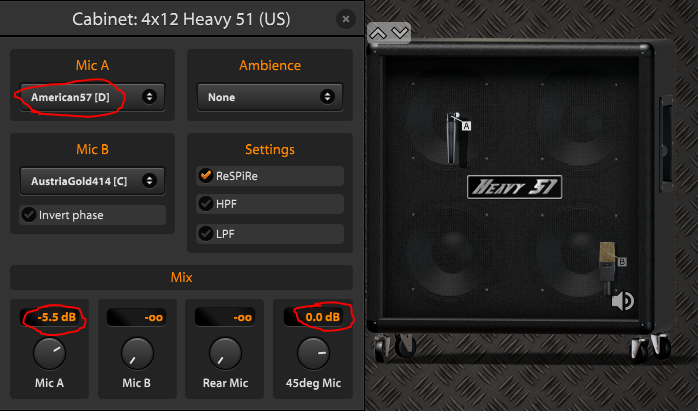
In the dropdown menu for Mic A, choose “American57 (D)” – this mic is based on the Shure SM57. The “D” stands for “Dynamic”, whereas mics with “C” next to them mean “Condenser”. We’re going to completely ignore Mic B, because its muted by default and we don’t really need it for the tone we’re going for.
Now we’ve got our mic chosen, lets adjust the microphone positioning and decibel level. If you left click and hold on the microphone in front of the cabinet, you can drag it around – its positioning will actually affect your overall tone. So, if you wanted a deeper, more bassy tone, you would put it around the edges of the speaker cone. But we want a nice, loud metal tone that captures the high frequencies of guitar solos, so position the microphone directly in the center of one of the speaker cones.
Next, we can adjust the microphones distance from the cabinet speaker, by right-clicking and dragging. When you right-click on the microphone and drag your mouse up or down, you’ll see the mic being pulled further or closer to the cabinet. For a nice depth to your tone, try pulling the mic just a tiny bit away from the speaker – just enough to see a shadow of the mic over the cabinet speaker.
Now let’s adjust the individual mic volumes. One common studio technique, especially for hard rock and heavy metal recording, is to utilize a 45-degree microphone in combination with your main microphone. Adding a 45-degree microphone results in a warmer tone – this all boils down to the way microphones capture frequencies at different angles, so I’d suggest doing some research on microphone positioning techniques if you want to delve really deep into this.
In any case, lets adjust our 45-degree microphone to around 0.0dB, and lower microphone A to about -5.5dB. This will allow the warm tones and frequencies from the 45-degree microphone to shine a bit over the microphone A.
Next, let isolate our high frequencies so that your individual notes and scaling solos will really scream out. We’re going to use an equalizer for this. In the Components drop-down menu, choose Equalizer, then drag the Parametric EQ between your amp head and cabinet.
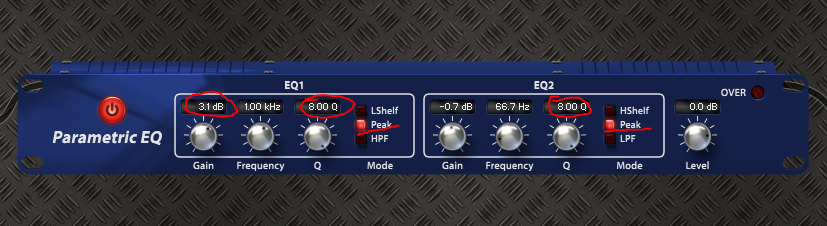
On the Equalizer’s face, turn it on Peak mode on both sides (as pictured below), and on the left side, increase the Gain to around 3dB, and turn the Q knob all the way up to 8.00 Q on both sides of the Equalizer.
Our tone is starting to sound pretty sexy (and I hope you’ve been tweaking things to your preference as we go along, guitar pickups also make a huge difference here). Let’s add some effects pedals to wrap things up.
A delay pedal will let us get a really sweet reverb / echo type of effect you hear on so many guitar solos. In the Components dropdown menu, choose Delay, then drag the D-Delay pedal directly to the right of your amp head. Then, just to catch any stray feedback, lets also add a Gate Expander pedal – that can be found in Components > Noise reduction > Gate Expander. Place it next to the D-Delay pedal.
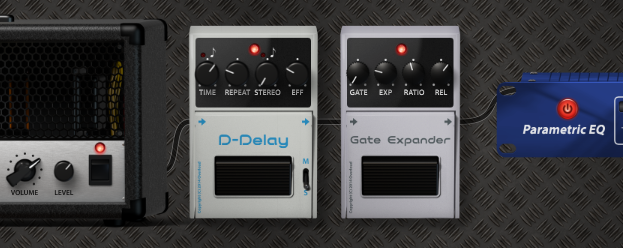
Leave both the D-Delay and Gate Expander knobs on their default values, unless you want to experiment.
You should be able to experiment from here and add whatever you like – just remember the basic pattern of adding pedals. Overdrive pedal -> amp head -> effects pedals -> Equalizer -> amp cabinet. If you want to throw in a wah pedal, I’d recommend putting it at the front of the chain, before the overdrive pedal.
As a final note, you can control the pedals with a midi floorboard if you have one – preferably one with pedals, so that you can adjust the amount of your effects while playing, rather than just switching them on or off. Some good midi floorboards for this purpose include:
- BEHRINGER FCB1010
- Yamaha MFC10 MIDI Foot Controller
- Line 6 FBV Express MkII
Once you connect a midi floorboard to your computer, you would go into Overloud TH3’s Midi settings, and then you can assign the various pedal effects in TH3 to the foot-switches and pedals on your midi floorboard.
That concludes our tone tutorial! Happy rocking!


This is by far one of the best tutorials Ive used for this seriously UNDERRATED software TH3. Thank you very much.