How to Create a New User Account and Transfer all the Data to it?
Microsoft Windows allows users to have more than one profile account on your computer. This means that the computer can facilitate multiple user accounts with each of their configurations different from the rest.
There are numerous occasions when you want to create a new user account. Either your original account is not working as expected or you want to create a new account for a sibling. We will traverse through all the steps one by one and help you create an account. Furthermore, we will also cover how you can transfer the data from an old account to the new one (this is mostly done when your current account is corrupt or not working as expected).
Note: You will require an administrator account to follow this method.
How to Create a New Local Account?
What is the difference between a local account and a Microsoft account? A local account is nothing more than an account which is used to access the computer present in front of you. A local account is limited to that specific computer only. You will have full functionality on the computer but you will be missing some important features made possible by Microsoft accounts.
Microsoft account is just a new name replacing Windows Live ID. If you have already used services such as Outlook.com, OneDrive, Hotmail, Xbox Live, you already have a Microsoft account. Microsoft has combined all these features into one email address and password. We will first create a local account on your computer. Later on, we will show how you can switch your newly created local account into a Microsoft one.
- First, boot your computer in safe mode.
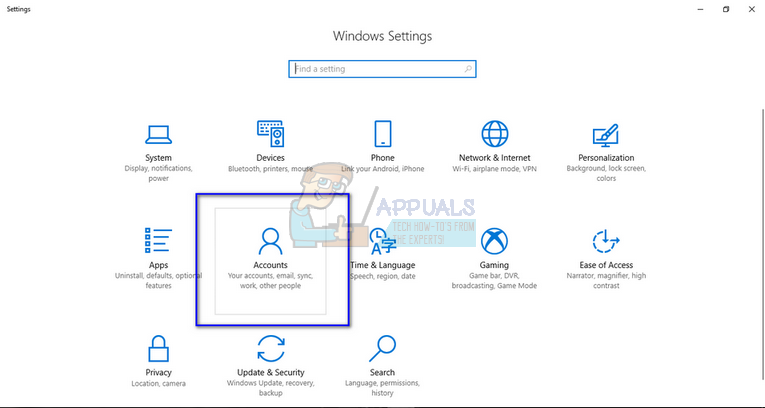
- Open an administrator account. Type Settings in the start menu dialogue box and click on Accounts.

- Now click “Other people” options present at the left side of the window.
- Once inside select the menu, select “Add someone else to this PC”.

- Now Windows will guide you through its wizard on how to create a new account. When the new window comes forth, click “I don’t have this person’s sign-in information”.

- Now select the option “Add a user without Microsoft”. Windows will now prompt you to make a new Microsoft account and display a window like this.

- Enter all the details and chose an easy password which you can remember.
- Now you can easily switch to a new local account, and move all your personal files to it without any barriers. We will now go through the process on how to move your personal files.
How to Copy all the Settings and Files to the New Account?
We went through how to create a new user account on your computer. If you are making an account for a sibling or friend, you don’t have to follow the rest of the tutorial. If you are creating an account because of some problem (such as corruption or misconfiguration of settings), we will go through how you can copy all your data from your current account to the newly created one.
- Press Windows + E to pop up Windows Explorer. Select “View” tab, click on “Options” and select “Change folder and search options”.

- Uncheck the option “Hide protected operating system files (Recommend)” and check “Show hidden files, folders, and drives”.

- Navigate to the folder “Documents and Settings” present in Local Disk (C).

- If you are unable to open the folder, it means you have no access to it. Right-click on it and select “Properties”. Click on the “Security” tab, highlight “Everyone” and click “Advanced” so we can change the permissions. Check “Full control” and click “Apply”. After saving changes, exit the window. You will now be able to access the folder.

- Select the username of the user from whom you are copying the files from (your original account). Select all the files except the ones listed below:
Ntuser.dat
Ntuser.dat.log
Ntuser.ini
Copy all the files you just select (Ctrl + C or pressing anywhere and selecting Copy).

- Now navigate to the new user profile which you just created using the steps listed above (C:\Documents and Settings\New_Username folder). Click “Paste”. If you are asked whether you want to replace the file, press “Yes”.
Log into the new user account and see if all the settings are there according to your requirement. If they aren’t, you can make the necessary changes and copy all the files from the original user account.
How to Switch your Local Account to a Microsoft Account?
Since we already created a local account and went through the process on how to transfer the data, we will now switch it to a Microsoft one where your Microsoft Email will be used. Do note that this step is optional as your computer will work as expected even if we don’t link it to your Microsoft ID.
- Now navigate to Settings > Accounts > Your Account and select the option “Sign in with a Microsoft Account instead”.

- Enter your username and password and click Sign in.

- Your local account will now be switched and linked to your Microsoft ID (Microsoft Account).
Note: Follow these steps if you cannot access your Account Settings
If somehow you cannot access account settings, we can try making a new account using the command prompt. Do note that you still require administrator privileges
- Press Windows + S to launch the search bar. Type “command prompt” in the dialogue box, right-click on the result and select “Run as administrator”.
- Once at the command prompt, execute the following command:
net user /add [username] [password]
- This will create a new user account on your computer. Now we will grant administrator privileges to this account.
new localgroup administrators [username] /add

- These commands will make a local administrator account instantly. Reboot your PC and log into the new account.


