How to: Configure Exchange Account on Thunderbird
The Microsoft Exchange Server is a calendaring and mail server created by none other than Microsoft itself. Even though the Microsoft Exchange Server runs exclusively on the Microsoft Windows Server product line, it is one of the most popular and most commonly used email servers out there, especially in the business world. As popular and widely used as Microsoft Exchange is, it cannot be accessed through an email client such as Mozilla Thunderbird. Or at least that was the case not too long ago.
Now, thanks to a little Thunderbird add-on by R Kent James dubbed ExQuilla, Thunderbird can be connected to Microsoft Exchange 2007 and 2010 servers through Exchange Web Services (EWS). In addition, the cherry on top of this delightful sundae is the fact that all you need to do in order to connect to your Microsoft Exchange server through Thunderbird is download a little add-on, install it and configure your Exchange server account into it. The full process you need to go through is as follows:
Go here and download the version of ExQuilla that corresponds with the OS you are using. Open Thunderbird.
- Navigate to Tools > Addons.

- Click the settings wheel on the top right, then choose “Install Add-on from File“

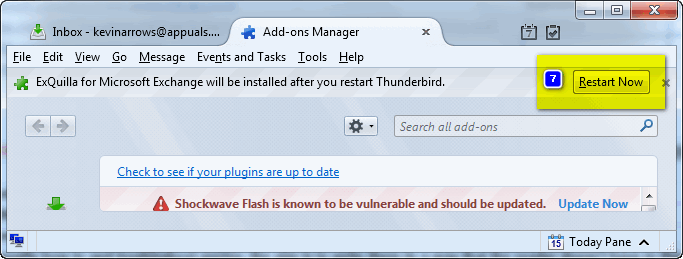
- Browse to where you saved ExQuilla, select it and click on Install. Once the ExQuilla add-on has been installed, restart Thunderbird.

- After it has been installed, click Restart Now.
- Installing ExQuilla is just half the actual procedure. The other half is configuring your Microsoft Exchange email account on Thunderbird through ExQuilla. To do so, you need to:
- Click on Tools in the toolbar at the top. In the contextual menu, hover over ExQuilla for Microsoft Exchange -> Click on Add Microsoft Exchange Account.

- Enter your Email address and password into the respective fields and click on Next.
- Note: If that doesn’t work, select the Login with username and domain option, fill in the User name and Domain fields and click on Next as an alternative method of configuring your Microsoft Exchange email account.
- On the next screen, either click on do auto-discover to have your Microsoft Exchange server’s URL and your name entered into their respective fields automatically (this only works if your Exchange server is configured to be discovered automatically) or select the Manual option and enter them manually.
- Click on Next. Once you do so, follow the onscreen instructions and you will have successfully configured your Microsoft Exchange email account into Thunderbird using ExQuilla.
Once you have configured your Microsoft Exchange email account into Thunderbird, you can play around with a few settings and preferences by going to Tools > Account Settings. Your Microsoft Exchange server email account will show up just like any other email account on Thunderbird would. By going to Tools > Account Settings and selecting your Exchange Server account, you can play around with settings such as the URL that Thunderbird uses to contact your Exchange server and features such as Use Exchange Address Book and Log Server Interactions.