How to connect a ‘PS3 Controller for gaming with your computer’
PC Gaming is the most preferred gaming platform that many hardcore gaming enthusiasts may prefer, but most can agree that the flexibility offered by external controllers surpasses the limitations of the standard keyboard and mouse input setup. There are hundreds of PC specific gaming controllers out there, some easy on the pocket but unsatisfactory, others sought after for their stellar performance but foregone due to their hefty costs.
For those that own console gaming controllers, a free way to get a good controller integrated with your PC is to re-purpose your console controller for your PC gaming. If you own the Sony Play Station 3 or have a Play Station 3 Dual Shock controller lying around, you can follow this guide to set it up with your Windows PC to use as your input for your PC gaming.
There are two primary methods to go about the Play Station 3 controller integration on your PC: integration via SCP Driver Package and integration via SCP Toolkit. The former can be used for the wireless connectivity of your controller via Bluetooth as well.
To configure your Sony Play Station 3 Dual Shock controller with your Windows PC for gaming, you will need your controller and its USB connectivity and charging cable to process a wired connection or your controller and a Bluetooth dongle that will Bluetooth enable your PC for wireless setup.
Preparing Your System
In the preparatory phase, whether you want to end up using your controller with the wire or wirelessly, you will need a wire to initially install all of the required drivers on your system. Once you have connected your controller to your PC with its wire and switched it on, install the following:
Your system may already have these installed. Thus, it is advised to first check whether these exist on your system before processing the installation. If your PC is running a version of Windows that is Windows 7 or older, then install the Xbox 360 Controller Driver on your system as well. It can be found at this link.
After successfully installing all of the required drivers and softwares, you can move forward with the next sections of the guide to install the SCP Driver Package or SCP Toolkit. Neither will function until you have the aforementioned softwares and drivers installed and functioning.
SCP Driver Package: Wired Configuration
- Keep your controller connected via USB from the prerequisite set up earlier.
- Visit this web page to download the “SCP DS Driver.” Download the zip file. Ensure that you are downloading and installing all three available zip files: latest version, latest update, and latest source.
- Find where you have downloaded the zip files and extract them into nearby folders.
- In the extracted contents, find the “ScpServer\bin” directory in the latest update folder. Copy all of its contents and paste them into the “ScpServer\bin” directory in the latest version folder. The latest version configuration is what will be used for the installation. Keep its unzipped contents and delete the remaining zipped files.
- In your latest version extracted contents, copy the bin folder from the “ScpServer” and paste it into a new folder that you will need to create in the C:\Program Files directory. Name this folder: “Scarlet.Crush Productions.” For copying things into the C directory, you will need to grant administrator privileges at different points. Click continue if prompted with administrative rights messages.
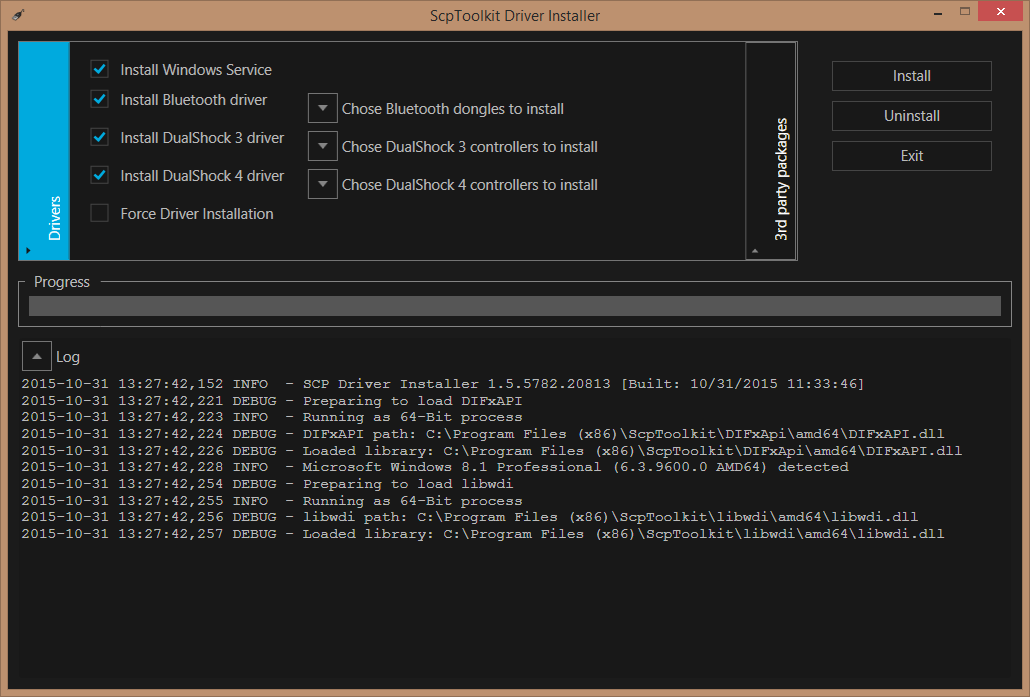
SCP Driver Package Interface. Image: GameTechWiki - In the folder that you have just created, run the “ScpDriver” application by right clicking it and clicking on Run as Administrator.
- Check the boxes for “Bluetooth Driver” and “Configure Service,” then click install. For versions of Windows that are Windows 7 and earlier, click on Force Install at this point. The Force installation installs a more comprehensive set of drivers which are lacking in Windows 7 and earlier versions. These are already configured in Windows 8 onwards and thus a Force Install in newer systems is not necessary.
- Once the installer completes, exit the window. Find the “ScpMonitor” application in your start menu and run it.
Since your controller was plugged in throughout this procedure, carrying on from the prerequisite setup and installations performed earlier, it should automatically be detected by the system. In case it is not, you can disconnect and reconnect it. If the controller indicated that it is charging then you don’t need to worry about the detection. This means that the controller has been recognized by the system. You can restart your system at this point and plug your controller back in after the restart to use it with your PC games which include Steam as well as individual emulator games.
SCP Driver Package: Wireless Configuration via Bluetooth
After carrying out the installation steps above, you will further need to configure a dongle to use your controller wirelessly through Bluetooth. The need for a dongle arises from the fact that your Play Station 3 controller requires a dedicated Bluetooth connection and the dongle will be configured to lock it just for your controller’s usage. To do this:
- Keep your controller connected to your system through its wire.
- Head into the bin folder in the “Scarlet.Crush Productions” folder you created in your Program Files directory. Run the executable file titled “Zadig”.
- Head into Device, then Load Preset Device, then “Bluetooth.cfg” from the configuration files available.
- Next, head into options and view all of the devices. Find your particular dongle in this list and select it.
- Select “Replace Driver.”
- Ensure that the SCP Monitor displays a “Host Address.” If a host address is not visible then that means that the Bluetooth connectivity was not successful. This could either be due to a limitation on your system, your dongle, or a connectivity issue that may be remedied with a system restart. Throughout this entire process, ensure that your Sony Play Station 3 console is unplugged from power. Your controller naturally connects to the console and this can interfere in you PC connectivity setup. Ensure the following in your SCP Monitor:
-
- A visible Host Address
- A visible Pad One address
- A charging or Full indication
- HCI version = 6.1542
- LMP Version = 6.220E
-
- Note that the values do not need to match exactly. They should be in the same ballpark.
-
-
- Once your host address has been detected successfully, disconnect your controller from your PC and check to see Pad 1 shows “BTH” instead of “USB.” Usually, your connection will be successful at this point. If in case it is not, ensure the guidelines mentioned in Step 6 and follow the steps listed ahead for Customization, Calibration, and Troubleshooting.
SCP Toolkit
To configure your Play Station 3 controller with your PC through the SCP Toolkit, download it from the following link: SCPToolkit. Find the location of your download and run the executable file. An installation window will pop up. Process the installation till the end then carry out the following steps:
- Click on “Run Driver Installer” after your basic installation has completed.
- The next window will allow you to select the drivers you want to install:
-
- For Play Station 3 Controllers, click on “Install Dual Shock 3 Driver.”
- For Play Station 3 Controllers, click on “Install Dual Shock 3 Driver.”
- For Bluetooth connectivity, click on “Install Bluetooth Driver.” You will need to connect your dedicated dongle and select it from the list of available devices. As explained earlier, a dedicated dongle is required for wireless Bluetooth configuration of your Play Station controller.
-
- After selecting your required drivers, process the installation. Follow the onscreen instructions until the installation has completed.
- Head into your “SCPMonitor” and check that the values contain:
-
- A visible Host Address
- A visible Pad One address
- HCI version = 8.1000
- LMP Version = 8.1000
-
- Note that the values do not need to match exactly. They should be in the same ballpark.
-
-
Customization, Calibration, And Troubleshooting
To ensure once again that your configuration has been carried out successfully from the steps above, head into your Windows Settings and find your list of Bluetooth devices. You will need to head into “Bluetooth and Other Devices > Devices and Printers > Related Settings.” If you’re running on Windows 7 or earlier, your newly configured Play Station 3 controller will be showing up here as an Xbox 360 Controller due to the driver we used to process the installation.
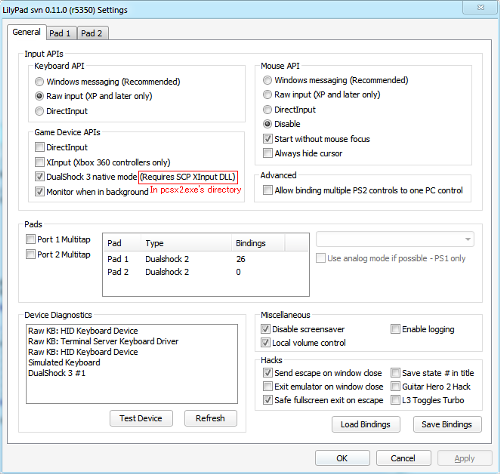
Here, you can right click on the controller and then click on “Game Controller Settings.” Head into the properties and tweak your axes or buttons as needed. You can test all of your controls from here to ensure that your controller is working properly. You can also perform tweaks of your controller configurations and customize them according to your gaming needs.
Final Thoughts
While Windows PCs have an easier setup laid out for their own Microsoft Xbox 360 and Xbox One controllers in built, configuring a Play Station 3 controller for your PC gaming is not an impossible task. It does require a lot more steps and some driver installations, but once you follow the guide above, your Play Station 3 controller should be configured concretely as if you configured a native Xbox controller with your Windows PC. You will be able to use this controller for stand-alone PC games as well as the Steam engine. Lastly, if in any case, the PS3 controller doesn’t ring your bells.


thank you so much for a simpler guide. however i was unable to conect it through bluetooth