How to Change your e-mail settings in Windows Live Mail
E-mail providers continually update things on their end, which can result in a mess on your end. Many of us are unaware of this and panic, even though there is no need to because the updates are primarily for our security. In the past, we had just one simple port, 25, for sending; later, SSL/TLS ports were introduced for message encryption. This practice was subsequently enforced and promoted to help avoid spam and hacking activities. Similarly, the receiving port, which was initially POP, was followed by the introduction of IMAP and variations of IMAP ports (143, 993).
The information I am giving you is not intended to complicate matters, but to provide a basic user with a general understanding. It is important to note that change is not constant; as technology updates, things change. If you’re seeking steps to modify existing email settings, then welcome aboard. Let’s continue without further ado.
Changing Settings in Windows Live Mail.
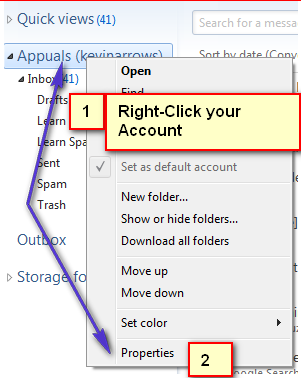
To change your SMTP settings in Windows Live Mail, right-click your account from the left pane and choose ‘Properties’.
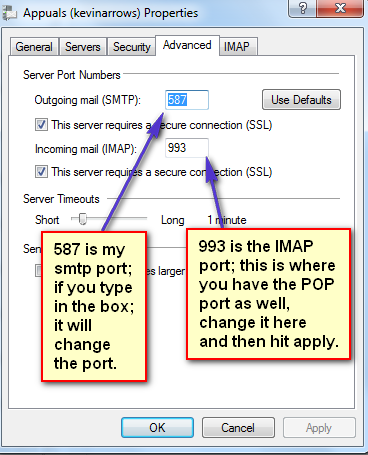
Once you see the Properties dialog, go to the Advanced tab. In the Advanced tab, you will see the options to change ports. You can modify SMTP, IMAP or POP ports here; you can also specify SSL settings. This is the main console for changing the settings.
The second important tab is the ‘Servers’ tab. From this tab, you can specify whether your outgoing server needs to be authenticated before sending. In fact, 99% of email providers require this authentication as part of their enforced policy. In most cases, if it’s unchecked, the email will halt with an error.
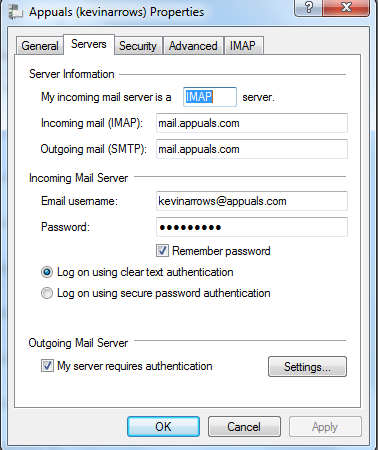
In the same tab, you can also change your IMAP and SMTP server addresses and password. Since, by default, the outgoing server uses the same password as the incoming server, in this tab you only need to update your incoming password for both. This is all that is needed to set up, change, or modify an email account.
Are there features in windows live mail ( gmail) to be able to copy an e-mail in order to send it as a reference in another e-mail? I am stuck
Thank you