How to Change Public Network to Private Network on Windows
When a Windows computer is connected to a network (regardless of whether it’s a wireless network or a wired network), it registers the network as either a public network or a private network. On a private network, a Windows computer is visible to all other Windows computers on the network and printer and file sharing is possible. On a public network, on the other hand, a Windows computer cannot be seen by other Windows computers on the network and printer and file sharing is not possible for the sake of privacy.
Private networks are basically intended to be your home and work networks – networks where you know all the other computers on the network and are alright with the idea of sharing printers and information with them. Public networks are any and all other networks – networks that you can’t necessarily trust and networks with computers you are not entirely comfortable sharing information and printers with. Windows can sometimes make mistakes detecting the kind of network it is being connected to, ending up registering the network as the wrong kind. In addition, you might also configure a specific network as a public network to maintain your privacy and security when you connect to it, but might want to convert it into a private network once you know it can be trusted or when you want to share information and/or printers with other computers on the network.
Thankfully, though, it is entirely possible to change a public network to a private network on a Windows computer, and users can do so on all versions of the Windows Operating System currently supported by Microsoft. However, turning a public network into a private network works a bit differently on different iterations of Windows. Without further ado, here’s how you can change a public network into a private network on a Windows computer and clear the path for printer and file sharing on the network:
On Windows 7
If you’re using a Windows 7 computer, you can change a public network you’re connected to into a private network if you simply:
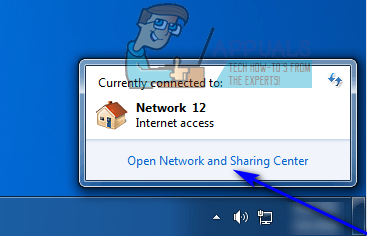
- Click on the Network icon in the Notification Area of your computer’s taskbar.
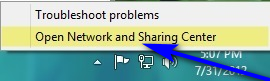
- Click on Open Network and Sharing Center.
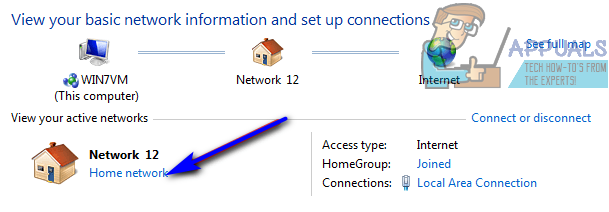
- Under the View your active networks section, you should see the name of the wired or wireless public network your computer is currently connected to, and underneath it will be a link that reads Public network. Click on Public network.
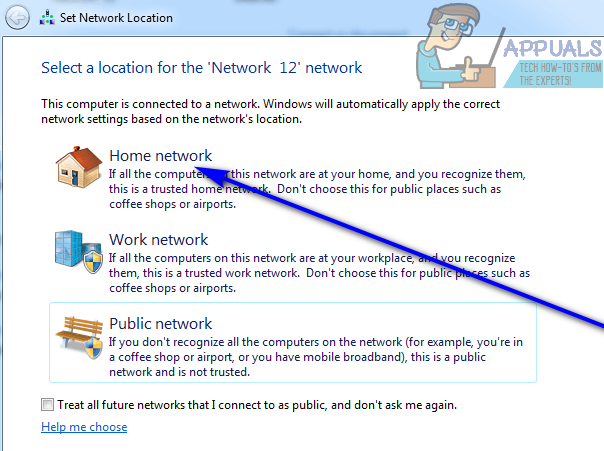
- Doing so will open the Set Network Location wizard, in which you can choose one of three different network location options for the selected network – Home network, Work network or Public network. Both Home network and Work network are private networks, so simply click on the one that best suits your requirements. As soon as you do so, the network location of the selected network will be changed from Public to whichever network location you chose.
On Windows 8
Changing a public network into a private network is a tad trickier on Windows 8 as you first need to ensure you have the right preferences configured for both public and private networks, especially if you’re switching network locations for a network on your computer for the first time. To make sure private networks and public networks are both configured correctly, you need to:
- Right-click on the Network icon in the Notification Area of your computer’s taskbar.
- Click on Open Network and Sharing Center.
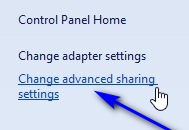
- You will be able to see the name of the public network you’re connected to and the fact that Windows has identified it as a Public network under the View your active networks section. Click on Change advanced sharing settings in the left pane.
- Expand the Private section and make sure that the following options are all enabled:
Turn on network discovery
Turn on file and printer sharing
Allow Windows to manage homegroup connections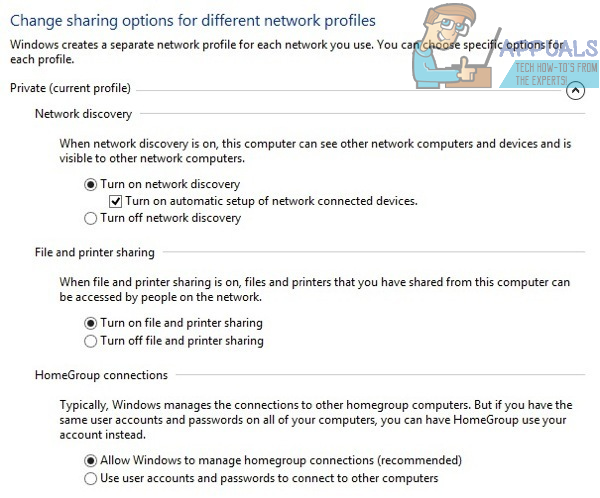
- Collapse the Private section, expand the Guest or Public section, and ensure that the following options are enabled:
Turn off network discovery
Turn off file and printer sharing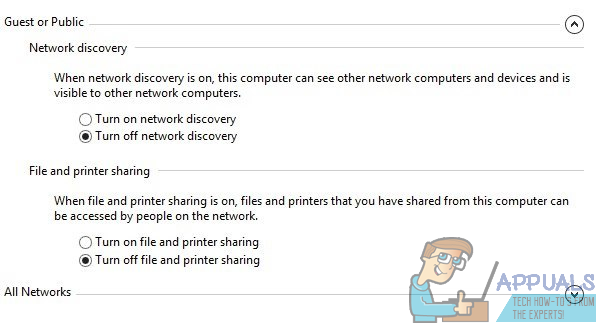
- Click on Save changes.
Once you have done so, you’ll be done configuring both network locations on your computer. Close the Advanced sharing settings window, and move on to actually changing the network location of the network you’re currently connected to from public to private. To do so, simply:
- Navigate to your computer’s Desktop.
- Open the Charms bar by pressing the Windows Logo key + C or simply hovering your mouse in the bottom-right corner of your Desktop.
- Click on Settings.
- Network.
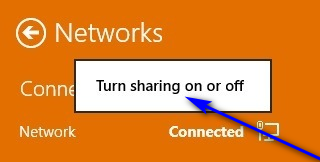
- Right-click on the network your computer is currently connected to and click on Turn sharing on or off.
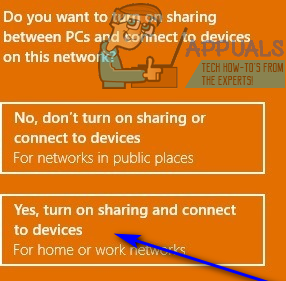
- Click on Yes, turn on sharing and connect to devices to change the network from public to private. The changes will be applied as soon as you do so, but don’t worry if the network still shows up as a Public network in the Network and Sharing Center – it will still function as a private network.
On Windows 8.1
Turning a public network into a private network on Windows 8.1 is much simpler than it was on its predecessor. To change the network location of a network on a Windows 8.1 computer from public to private, you need to:
- Open the Charms bar by pressing the Windows Logo key + C or by hovering your mouse in the bottom-right corner of your computer’s Desktop.
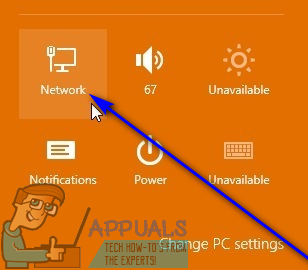
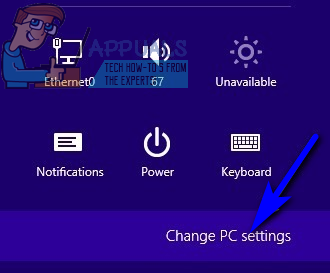
- Click on Change PC settings once the Charms bar appears.
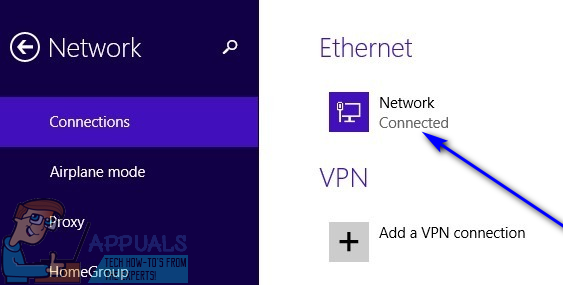
- Click on Network. You will now be taken to a screen with a list of all your computer’s network connections (both wired and wireless).
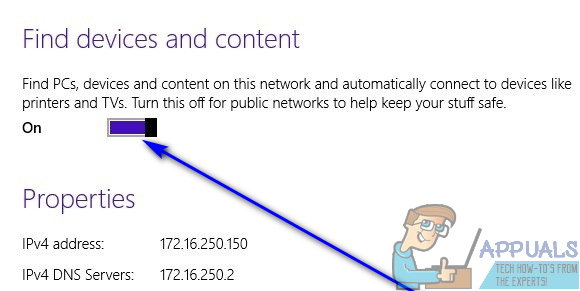
- Locate the toggle for the Find devices and content feature and turn it on. Turning this feature on results in other devices on the network your computer is a part of to not only see your computer as a part of the network but also communicate with it and share information and peripherals with it. This option is turned off by default for all public networks on Windows 8.1, so turning it on automatically turns a public network into a private network without you having to do anything else.
On Windows 10
The latest and greatest iteration of Windows aims to provide a user-friendly experience while simultaneously providing more features and possibilities than any of its predecessors. That being the case, turning a public network into a private network on Windows 10 is pretty easy. All you need to do is:
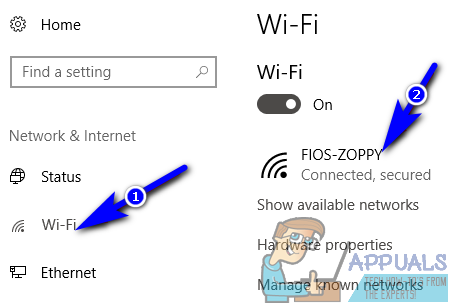
- Click on the Network icon in the Notification Area of your computer’s taskbar. This icon will either be a little computer (if your computer has an Ethernet connection) or a Wi-Fi icon (if your computer is connected to a network wirelessly).
- Click on Network & Internet settings.

- If your computer is connected to the network you want to change from a public network to a private network wirelessly, click on Wi-Fi in the left pane of the window. If your computer is connected to the network via an Ethernet cable, click on Ethernet in the left pane of the window.
- In the right pane of the window, click on the network your computer is currently connected to. This network will have the Connected status visible directly under it.
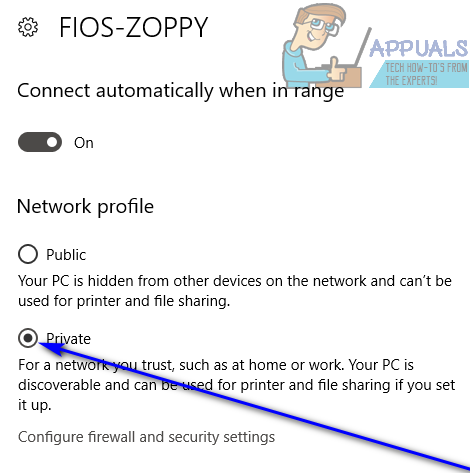
- Under the Network profile section for the selected network, click on the radio button next to Private to configure it as a private network. You’re all done!
If you were not able to change the network location of a network your computer is connected to using the conventional method, fear not – there is another, universal method that can be used to manually force a network location change on any version of the Windows OS. To turn a public network into a private network using this method, you need to:
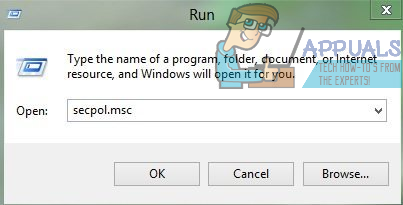
- Press the Windows Logo key + R to open a Run dialog.
- Type secpol.msc into the Run dialog and press Enter.
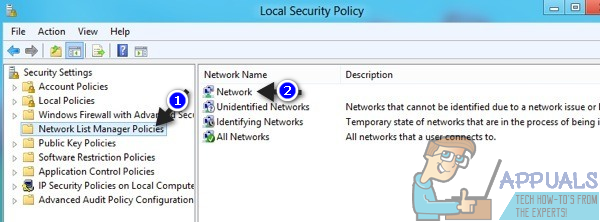
- In the left pane of the window that appears, click on Network List Manager Policies.
- In the right pane of the window, locate the listing that has nothing under its Description section – this listing might be named Network, or might be named something else depending on what network your computer is connected to. Double-click on this listing.
- Navigate to the Network Location tab of the Network Properties window that pops up.
- Under the Location type section, click on the radio button next to Private to select it.
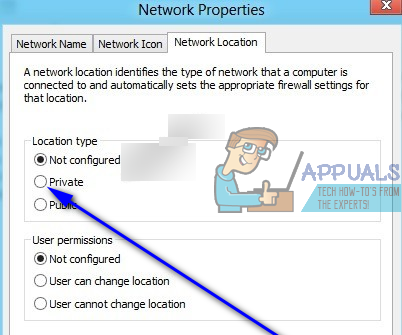
- Click on Apply and then on OK.
As soon as you do so, you will have successfully forced a location change for the network your computer is currently connected to from public to private.