Fix: High GPU Usage By Client Server Runtime and Desktop Window Manager
Windows users are currently scrambling for a fix to bring down the GPU usage of the Desktop Windows Manager (dwm.exe) and the Client Server Runtime (csrss.exe) processes after installing a pending update. This issue is confirmed to occur on both Windows 10 and Windows 11.

Commonly reported symptoms of this issue:
- When the user drags the browser ( Edge, IE, or any 3rd party browser) around, the GPU usage increases by as much as 50%. This occurs even with high-end GPUs that have plenty of processing power.
- When the user launches any application or game requiring rendering power, the GPU usage of Desktop Windows Manager and the Client Server Runtime processes increases to 100% and stays like this minutes after the application is closed.
After thoroughly investigating this issue, we realized that several different underlying culprits might be responsible for this behavior on Windows 10 and 11. Here’s a short list of culprits that you should be aware of:
- Outdated Windows version – The problem is pretty old at this point, and Microsoft has previously made several hotfixes to prevent Desktop Window Manager (dwm.exe) & Client Server Runtime Process (csrss.exe) processes from hogging all the available GPU resources. Install each update available from the WU component to fix the issue.
- Processes are set to High Priority – As it turns out, one of the most common reasons you can expect to see the Desktop Window Manager (dwm.exe) & Client Server Runtime (csrss.exe) processes consuming most of the available GPU resources is when both processes are set to High Priority. Several users dealing with this problem have confirmed that the issue was resolved once they used Task Manager to change their status to Efficiency mode.
- Outdated GPU drivers – It turns out that with Windows 10 and Windows 11, this kind of behavior can also be brought on by an out-of-date GPU driver or a missing physics package. The issue should be fixed by updating the physics module that manages in-game mechanics and the GPU drivers.
- Outdated Intel drivers – An expert on kernels claims that more than seven Intel-signed drivers may be responsible for this behavior. The easiest way to resolve the issue in this scenario is to launch the Intel Update Assistant and install the pending driver updates.
- Hardware acceleration is enabled – It turns out that forcing your GPU to do hardware-accelerated GPU scheduling might also lead to excessive GPU resource utilization. To fix this, disable hardware acceleration from the Settings menu of your Windows installation.
- Windows Transparency effects is enabled – You are experiencing unusually high GPU usage by Desktop Windows Manager and the Client Server Runtime processes is a Windows GUI option known as Windows Transparency effects. Several users dealing with the same issue have confirmed that they managed to reduce the GPU usage of the two processes by disabling the transparency effects.
- App are configured to Power saving – If you are using an Nvidia GPU and you are only experiencing this issue while running certain applications or games, you might be able to fix this issue by changing the behavior of the apps that cause the two processes (dwm.exe and csrss.exe) to hog the GPU bandwidth by utilizing the NVIDIA Control Panel.
- HDR and WCG are enabled – HDR might be the issue if the solutions above haven’t reduced your excessive GPU resource utilization. Partial HDR or WCG support on a low-end monitor may be indirectly causing this behavior. Fix this issue by disabling the two components.
- Undeclocked GPU frequencies – A potential reason you might experience this problem is a case where your GPU is underclocked to save power. In this case, you will notice that the base clock of your GPU is lower than what is advertised by the manufacturer. Fix this issue by reverting the GPU frequencies back to their default values.
- 3rd party interference – You can anticipate dealing with this problem due to an overly defensive security suite or a system optimizer program that ultimately impacts the GPU load. You can test this theory by performing a clean boot operation.
- System file corruption – If none of those mentioned above solutions resolved the situation where your GPU processing power is constantly monopolized by the two Desktop Windows Manager and the Client Server Runtime processes, you can assume an underlying system corruption brings on the problem. Attempt to fix this issue by performing a clean or repair install.
Now that we have gone over every potential cause of this issue, let’s go over a series of confirmed fixes that other Windows 10 and Windows 11 users have successfully deployed to bring down the GPU usage of the Desktop Window Manager (dwm.exe) & Client Server Runtime Process (csrss.exe) processes.
1. Install pending Windows Updates
The problem is pretty old at this point, and Microsoft has previously made several hotfixes to prevent Desktop Window Manager (dwm.exe) & Client Server Runtime Process (csrss.exe) processes from hogging all the available GPU resources. Install each update available from the WU component to fix the issue.
Many impacted users have stated that they could finally observe how the excessive GPU consumption went down exponentially after applying every pending Windows update.
By visiting the Windows Update component, ensure your copy of Windows 11 or 10 is up to date.
How to go about doing this:
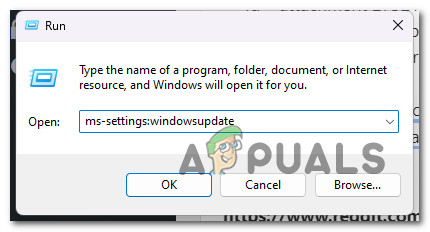
- The Run dialog box will appear when you press Windows + R.
- In the text box, enter “ms-settings:windowsupdate” to open the Windows Update tab of the Settings application.
Access the Windows Update menu - You could now get a User Account Control window requesting you to allow extra rights unless you fiddled with the default UAC settings. To provide admin access in this situation, select Yes.
- Next, choose to Check for Updates from the list on the right.

Check for new windows updates - After downloading the update locally, click Install Now to begin the installation process.
- Restart your computer to see if the problem has been resolved.
Try the following approach below if the Desktop Window Manager (dwm.exe) & Client Server Runtime (csrss.exe) processes still use many system resources.
2. Change Processes status to Efficiency Mode
One of the most common reasons you can expect to see the Desktop Window Manager (dwm.exe) & Client Server Runtime (csrss.exe) processes consuming most of the available GPU resources is when both processes are set to High Priority. This is typically an issue with low-end GPUs with little processing power.
Several users dealing with this problem have confirmed that the issue was resolved once they used Task Manager to change their status to Efficiency mode.
Follow the instructions for specific steps on how to change the Desktop Window Manager (dwm.exe) & Client Server Runtime (csrss.exe) processes to Efficiency Mode:
- Press Ctrl + Shift + Esc to open up Task Manager.
- Once you’re inside Task Manager, make sure you are using the Expert interface.
Note: If you are on Windows 10, click Show More details.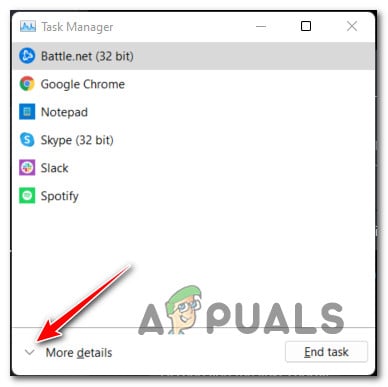
Show more details in Task Manager - Next, access the Processes tab and move down to the right-hand side of the screen.
- Scroll down the list of processes and locate Desktop Window Manager (dwm.exe).
- When you locate it, right-click on it and then click on Efficiency Mode from the context menu that just appeared.
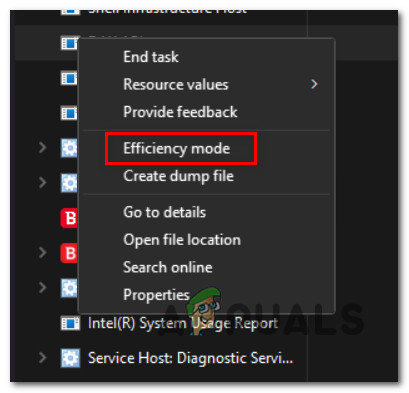
Set it to Efficiency Mode - Next, locate the Client Server Runtime (csrss.exe) process, right-click on it and click on Efficiency Mode once again.
- Once this change has been made, reboot your PC and see if the GPU usage goes down once the next startup is complete.
If the same issue is still occurring, move to the next method below.
3. Update GPU Drivers
With Windows 10 and Windows 11, this kind of behavior can also be brought on by an out-of-date GPU driver or a missing physics package.
Users who have experienced high GPU consumption by the Client Server Runtime (csrss.exe) and Desktop Window Manager (dwm.exe) processes have concurred that the problem was resolved after updating your GPU drivers to the most recent version.
The issue should be fixed by updating the physics module that manages in-game mechanics and the GPU drivers.
If this is the case for you and you haven’t recently updated your GPU drivers, use the following instructions to remove your old GPU drivers and install the most recent ones before trying to run the game once more:
- Press the Windows key + R to open the Run dialog box.
- Type the command “devmgmt.msc” into the execute text box and press the Enter key to open Device Manager.

Open Device Manager - After entering Device Manager, expand the drop-down box for Display Adapters by navigating through the list of installed devices at the bottom of the page.
- Right-click the GPU driver you want to update in the following menu and choose it from the context menu to update the driver.
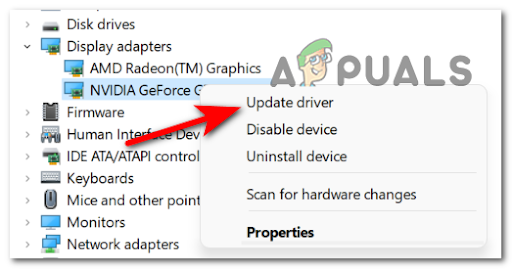
Update Driver - If your machine has both dedicated and integrated GPU drivers, you must update them both.
- From the following option, choose Search Automatically for New Driver Software.
- Follow the instructions to install the most recent GPU driver discovered when the first scan is complete.
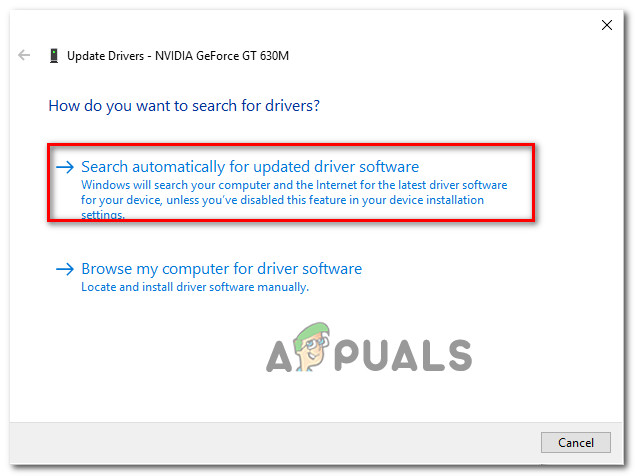
Updating the GPU drivers - Restart your computer when the operation is done to see if the two processes’ usage has decreased considerably.
Note: If Device Manager cannot locate a new GPU driver version, you must resort to the proprietary software your graphics card manufacturer provided to upgrade your current graphics drivers. The following software may be necessary, depending on the GPU manufacturer:
GeForce Experience – Nvidia
Adrenalin – AMD
Intel Driver – Intel
If the same issue is still present or your GPU drivers are already current, move on to the next procedure below.
4. Update Intel Drivers (if applicable)
Windows 11 is much more dependent on a group of firmware drivers from Intel. But to a lesser extent, the same can be said about Windows 10. An expert on kernels claims that more than seven Intel-signed drivers may be responsible for this behavior. The easiest way to resolve the issue in this scenario is to launch the Intel Update Assistant and install the pending driver updates.
More users who had seen the two programs’ extremely high GPU consumption (Desktop Windows Manager and Client Server Runtime) stated that usage significantly decreased after utilizing the Intel Driver Assistant to swap out the generic CPU, Bluetooth, and Wi-Fi Card drivers with Intel equivalents.
Listed below are the procedures to take if you want to attempt this repair as well:
- Use your default browser on your Windows 11 computer and navigate to the Intel Driver & Support Assistant web page.

Download the Intel support driver Note: Downloading the Intel support driver You will be asked to download and install a small piece of software that will check your system locally for out-of-date drivers and firmware if you’re using this tool for the first time. Install the local tool as instructed if asked.
- After the utility has been locally installed, wait until it has completed checking your system for out-of-date drivers. If any occurrences are found, choose Download All and watch as the program downloads all needed drivers.
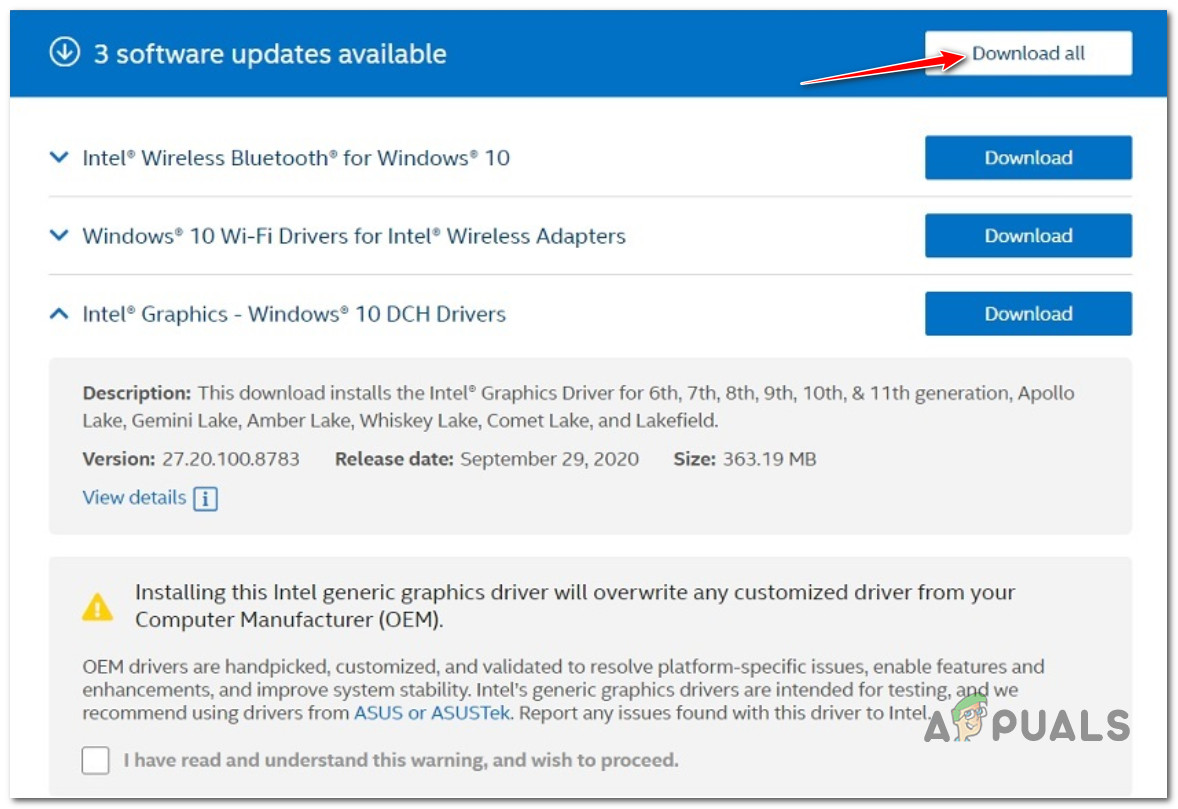
Downloading all drivers - Finally, choose to Install all to swap outdated generic drivers with Intel-specific alternatives.
- Restart your computer as instructed, then check to see whether the issue has been fixed following the next startup.
Try the next technique down if the error code is still occurring.
5. Disable Hardware acceleration
It turns out that forcing your GPU to do hardware-accelerated GPU scheduling might also lead to excessive GPU resource utilization.
This option will usually speed up rendering and make your computer look snappier, but an unforeseen result may be extremely high GPU use (especially with low and medium-end GPUs).
Whether hardware-accelerated GPU scheduling is active and you are having this difficulty with desktop applications, games, or Universal Windows Platform apps, follow the steps below to temporarily turn it off in the Settings app to see if the issue is resolved.
Here’s what you need to do:
Note: With a few minor GUI differences, these methods should work on both Windows 10 and Windows 11.
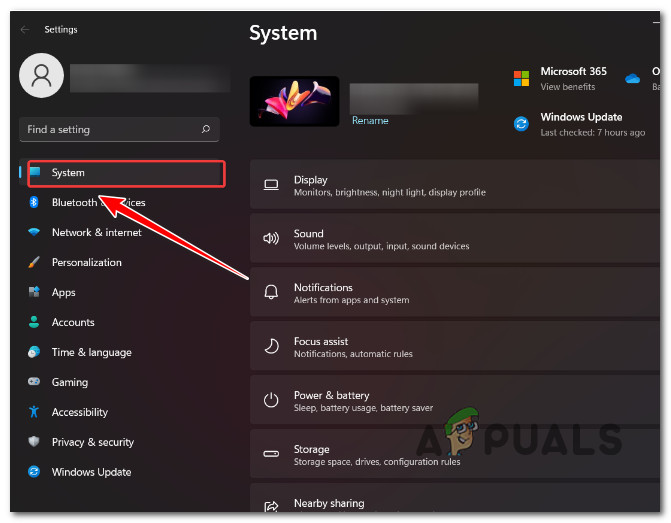
- To access the Settings menu, use the Windows key + I.
- From the vertical menu on the left side of the Settings menu, select System.
- After that, select Display from the menu on the right-hand side of the screen.
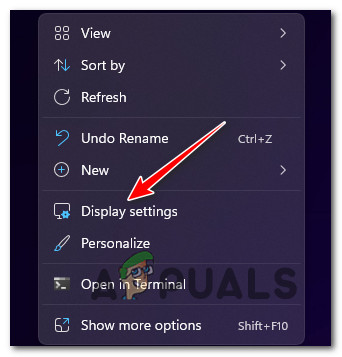
Access the Display Settings - Scroll down the list of choices under the Display settings and choose Graphics (under Related settings).

Access the Graphics settings - Click on Change default graphics settings from the next screen (under Default Settings).
- Disable the toggle for Hardware-accelerated GPU scheduling once you’re in the Default graphics settings.
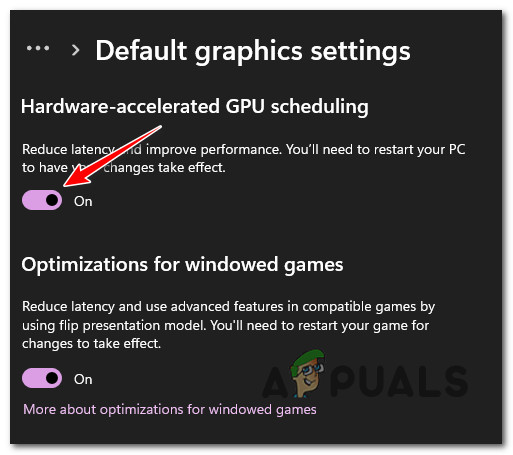
Disable the hardware-accelerated GPU scheduling - After disabling hardware acceleration, restart your computer and after the subsequent startup is complete, see if the high GPU usage problem has been resolved.
Move on to the technique below if the issue is still not resolved.
6. Disable Windows Transparency effects
One potential reason you are experiencing unusually high GPU usage by Desktop Windows Manager and the Client Server Runtime processes is a Windows GUI option known as Windows Transparency effects.
This option adds an elegant layer to the way your windows look, but it can also cause the use of a lot of available GPU resources if you are using a low-end GPU and you don’t have an integrated GPU to take the load off the dedicated equivalent.
Several users dealing with the same issue have confirmed that they managed to reduce the GPU usage of the two processes by disabling the transparency effects. This fix is confirmed to work on both Windows 10 and Windows 11.
Here’s what you need to do:
- Press Windows key + I to open up the Windows Settings screen.
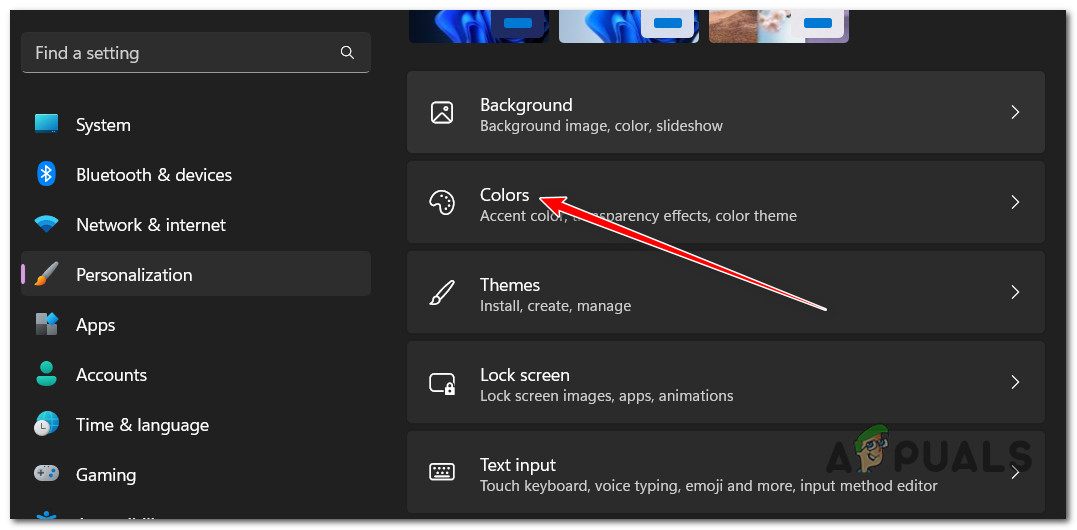
- Next, click on Personalisation (from the context menu on the left).
- Move to the right-hand side and click on Colors from the options list.
Access the colors tab - Finally, uncheck the box associated with Transparency Effects and reboot your PC once you’re inside the Colors tab.
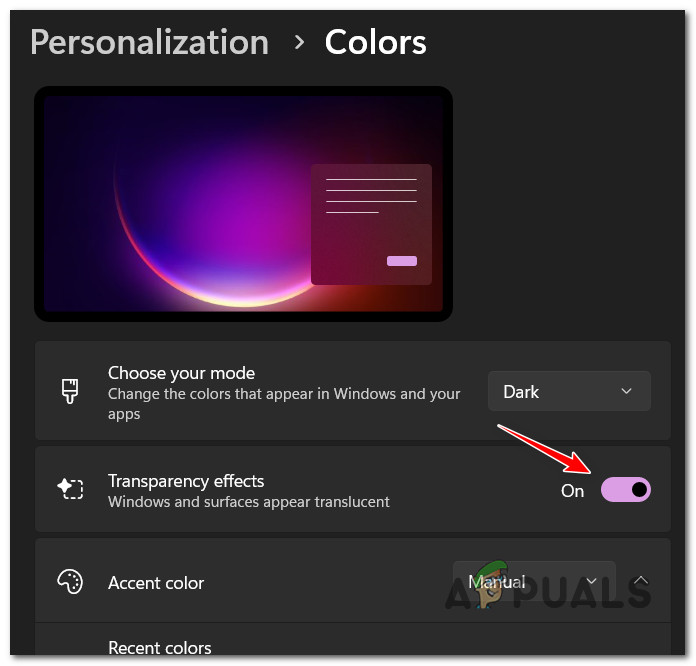
Disable transparency effects
Once your PC boots back up, see if your GPU usage has decreased. If the same issue is still occurring, move to the next method below.
7. Configure applications to Maximum Performance (Nvidia Only)
If you are using an Nvidia GPU and you are only experiencing this issue while running certain applications or games, you might be able to fix this issue by changing the behavior of the apps that cause the two processes (dwm.exe and csrss.exe) to hog the GPU bandwidth by utilizing the NVIDIA Control Panel.
Other users dealing with the same issue have managed to tone down their GPU usage by accessing Nvidia Control Panel and adjusting all the applications that exhibit this issue to Maximum Performance.
Follow the steps below for specific instructions on how to do this:
Note: This method only applies to systems with a dedicated Nvidia GPU.
- Right-click anywhere on your desktop and click on Nvidia Control Panel.
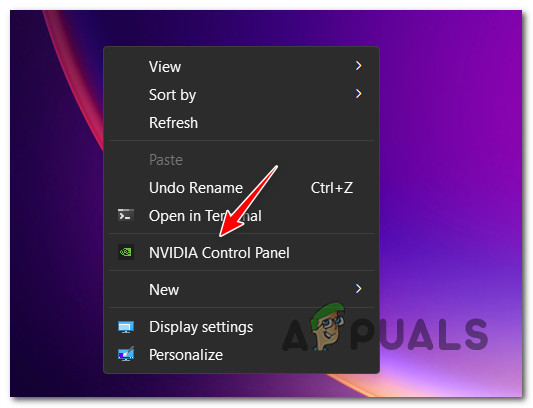
Access the Nvidia Control Panel Note: If you’re on windows 11, you must first click on Show more options to make this option available.
- Once inside Nvidia Control Panel, click on Manage 3D Settings from the left-hand side menu.
- Next, move over to the right-hand side pane and click on Global Settings.
- Scroll down through the list of Global Settings and change the Power Management mode to Prefer Maximum Performance.
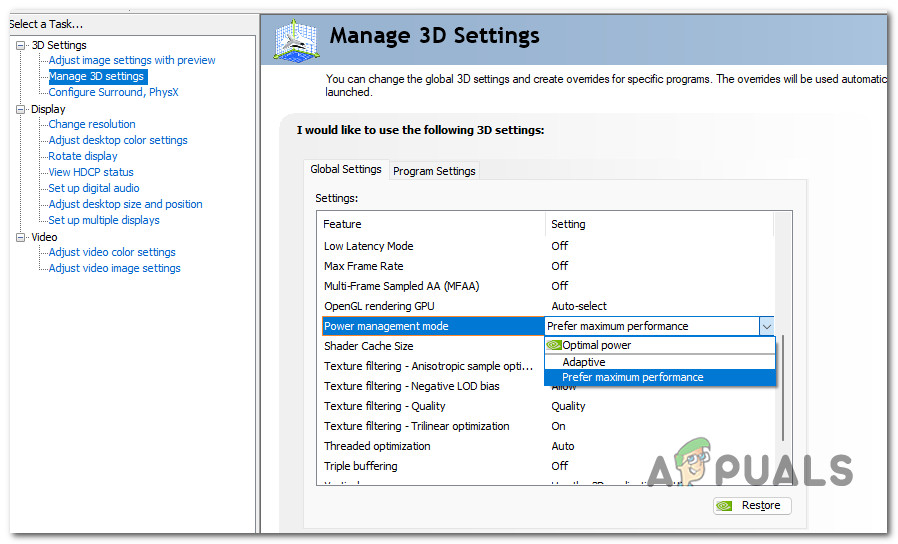
Set to Maximum Performance - Save the changes you just did, reboot your PC and see if the issue is now fixed.
If the two processes still consume many available system resources, move down to the next method below.
8. Disable HDR & WCG
HDR might be the issue if the solutions above haven’t reduced your excessive GPU resource utilization. Partial HDR support on a low-end monitor may be the issue’s root.
When HDR was off in the Settings menu, some users who were also experiencing this problem saw that the resource use had finally decreased.
HDR may occasionally affect the two processes (Desktop Windows Manager and Client Server Runtime). Depending on your GPU and monitor, this varies. If you suspect this is the issue, try turning off the HDR and check to see if GPU usage improves.
If you believe this situation applies to you and HDR is turned on, try the steps below to disable it to see if it stops the screen from flickering:
- Locate the Windows icon on your taskbar to get started.
- To access the Start menu, click it.
- Select Settings from the list of available choices on the following menu.
Access the Settings menu - You may get to the next page by selecting System from the side menu.
Access the System menu - Locate the System tab, then search the menu on the left side of the screen for the Display menu.

Access the Display tab - Finally, click HDR at the bottom of this screen after scrolling down.

Accessing the HDR screen - Change the option to OFF in the HDR menu, then save your changes.
- Remember to quit the Settings menu and restart your computer to check if these adjustments have reduced your GPU consumption.Note: If your display also supports WCG, disable that as well.
Move on to the next possible solution below if this one doesn’t work for you.
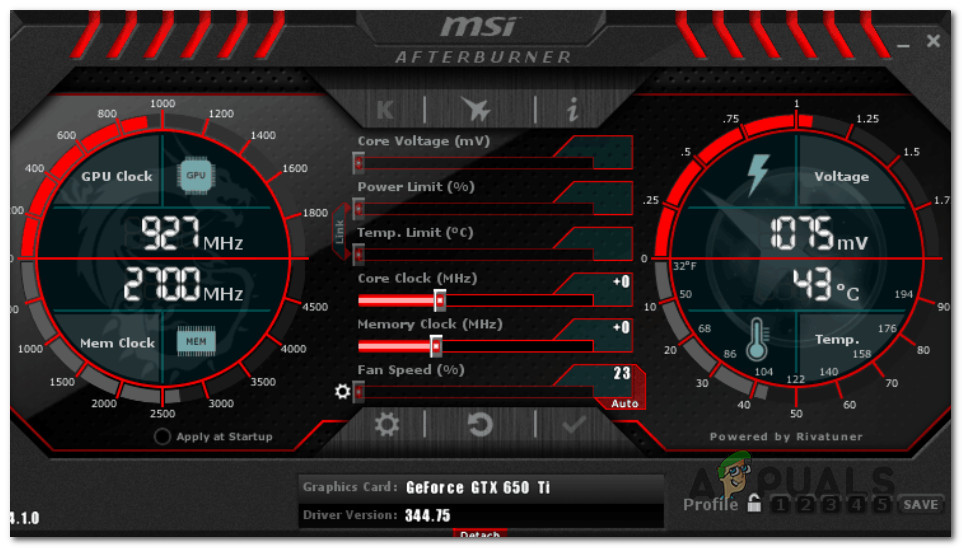
9. Revert underclocked frequencies
You might experience this problem is a case where your GPU is underclocked to save power. In this case, you will notice that the base clock of your GPU is lower than what is advertised by the manufacturer.
Note: Over and underclocking can cause unexpected restarts and impact your OS’s stability. Underclocking is done to extract more power from a weak PSU while overclocking is done to gain more power.
If you find yourself in this situation, you’ll probably keep tinkering with voltages until you discover a stable build that doesn’t overtax your GPU.
Note: If you are underclocked, we advise using a more powerful PSU because the system’s instability is likely to persist despite whatever adjustments you make.
Reverting all overclocking or underclocking modifications back to their normal settings is the best line of action (if it is feasible) if you have tried altering the numbers but are still experiencing GPU inconsistencies.
10. Perform a clean boot
If you’ve reached this point without finding a workable solution, you should start looking for a potential third-party offender who may be responsible for Windows 10 or Windows 11’s excessive GPU utilization.
You can anticipate dealing with this kind of problem as a result of an overly defensive security suite or a system optimizer program that ultimately impacts the GPU load, according to other afflicted customers.
Whether you frequently have this problem, you should clean boot your computer and see if the GPU utilization of the two Desktop Windows Manager and Client Server Runtime processes decreases significantly.
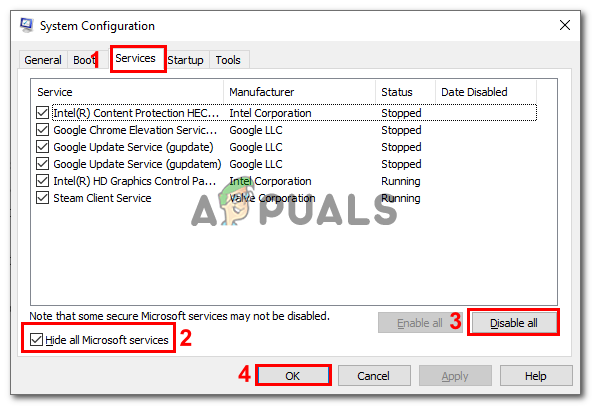
It is evident that a third-party processor starting service is the problem if you obtain a clean boot state and the error stops happening. Finding the problem is now just a question of progressively re-enabling every previously deactivated item until you see the error reoccurring.
On the other hand, proceed to the next potential cure below if the same type of problem persists even after a clean boot state.
11. Clean install or repair install
If none of the above solutions resolved the situation where your GPU processing power is constantly monopolized by the two Desktop Windows Manager and the Client Server Runtime processes, you can assume that an underlying system corruption problem brings on the problem.
Many users who reported experiencing the same issue said that it was resolved after executing a full system refresh. You may choose a clean install or repair install (in-place repair).
The biggest disadvantage of a clean installation is that, unless you first make a backup of everything, you won’t be able to save any of your personal data (apps, games, personal media, etc.). This process might take some time.
However, the biggest benefit of using the repair install (in-place repair) method is that you may save your personal information (including applications, games, personal material, and even specific user preferences). The procedure will take a bit longer, though.


