How to Hide Photos on iPhone on Any iOS Version
 Reviewed by Huzaifa Haroon
We all have some photos we’d rather keep private, or maybe never even see again ourselves. Sometimes you need to share your phone for a moment, and the last thing you want is someone scrolling through your photo library and accidentally coming across pictures you’d prefer to keep hidden.

Luckily, Apple offers a better solution than simply deleting these photos—you can hide them. This article explains how to hide your photos on an iPhone or an iPad. We’ll also go over other ways to secure your personal photos and how to unhide a picture if you need it again.
Hiding and Un-hiding Photos on an iPhone
Within iOS, there are several ways to hide your photos. The easiest and most direct way is by using the built-in Photos app. We’ll also show you how to do the same using Google Photos and the Notes app.
1. Using the Native Photos App
Hiding photos on an iPhone is pretty straightforward, though the process looks a little different if you’re using an older version of iOS. In the default Photos app, there’s a dedicated Hidden Album where all your hidden photos are stored.
The exact steps may vary slightly based on your iOS version, but you’re essentially doing the same thing.
⤷ iOS 16 or Newer
For devices running iOS 16 (like iPhone 7 and newer), here’s how you can hide photos or videos in the Photos app:
- Open the Photos app on your iPhone or iPad.
- Go to the “Library” section and select the photo you want to hide.
- Tap the circle with three dots in the top right corner.
- Select “Hide“.
- Tap “Hide Photo” again in the confirmation popup.
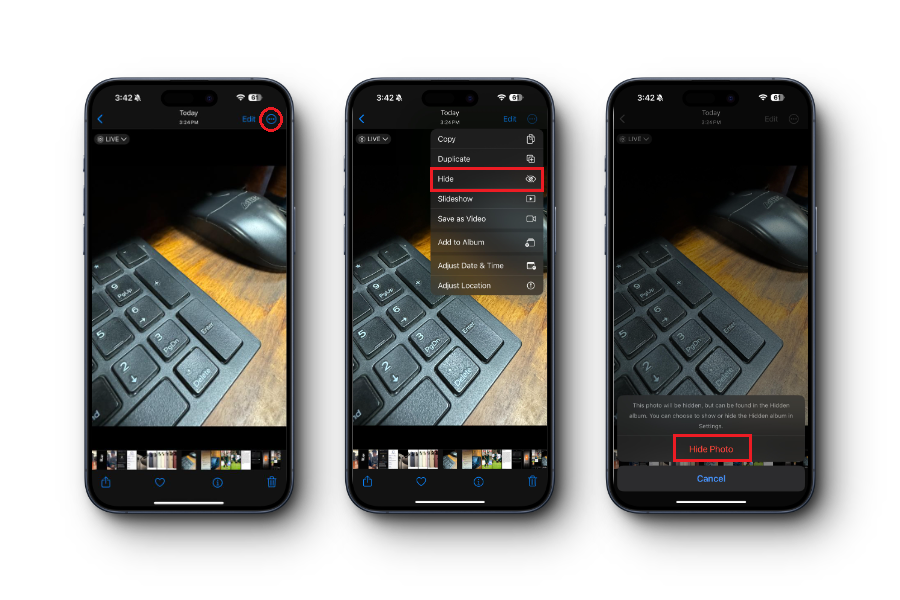
Your selected photos are now moved to the “Hidden” album. By default, this album is visible to anyone using your phone. While the hidden photos are removed from your Photo Library and search results, anyone who knows your passcode can still go to Photos > Albums > Utilities > Hidden Album to view them.
To hide the “Hidden” album itself, just do the following:
- Open Settings on your iPhone or iPad.
- Scroll down and tap “Photos“.
- Find “Hidden Album” and turn off the toggle.
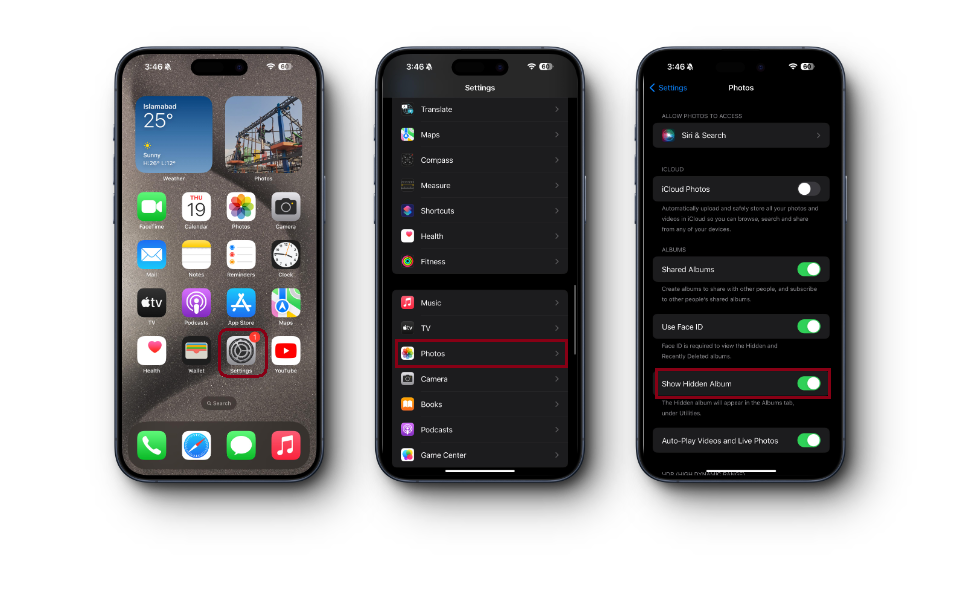
Turning off this option hides the “Hidden” album in the Photos app, making it invisible to anyone browsing your albums. When you want it to show up again, simply turn the toggle back on using the same steps.
⤷ iOS 15 or Older
If you’re using iOS 15 or older, follow these steps.
- Open the Photos app on your iPhone or iPad.
- Select the photos you want to hide.
- Tap the Share icon (a box with an arrow pointing up).
- Scroll down and tap “Hide“.
- Tap “Hide Photo” in the confirmation popup.
Unhide Photos from the “Hidden Album”
Once your photos are hidden, they’re safe in the Hidden Album. In case you want to unhide them.
- Make sure the Hidden Album is visible in your Photos app (see steps above to turn it on if needed).
- Go to Albums > Utilities > Hidden Album.
- Select the photos you want to unhide.
- Tap the circle with three dots at the top right.
- Select “Unhide“.
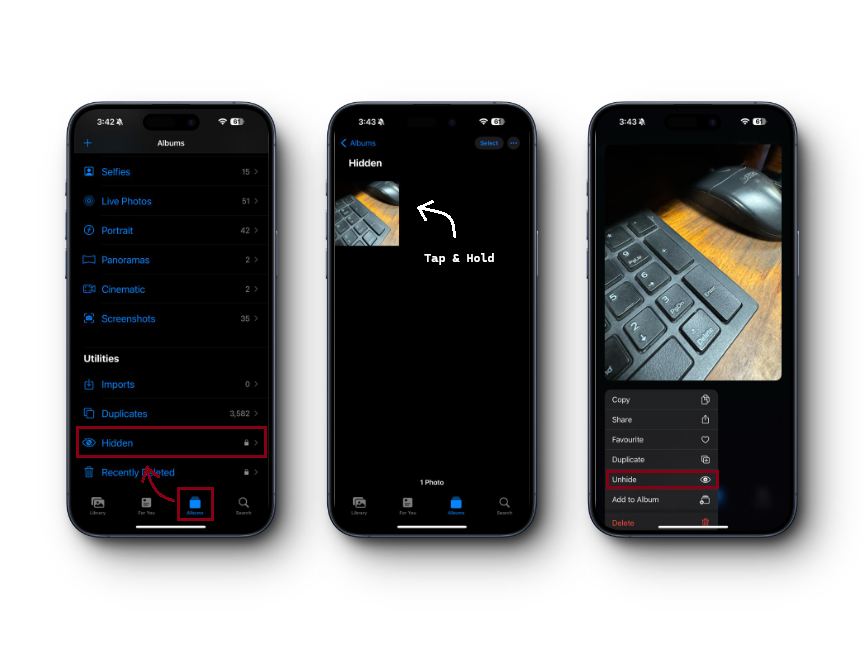
Those photos will now appear back in your main Photo Library.
2. Using Google Photos
If hiding your pictures in the Photos app feels too easy to find, you can do the same thing in Google Photos, although the process is a bit different. Google Photos offers a Locked Folder—this feature hides your photos by moving them out of your main gallery and into a protected area, making them invisible to anyone else using your device.
Photos in the Locked Folder are hidden so well, it’s like they never existed in your gallery. To move photos there, just follow these steps:
- Open Google Photos and tap “Library” at the bottom right.
- Select “Utilities“.
- Scroll down to find “Locked Folder” and tap it.
Unhide Photos from the Locked Folder in Google Photos
If you want to return hidden photos back to your gallery.
- Go to Google Photos > Library > Utilities > Locked Folder.
- Select the photo you want to unhide.
- Tap “Move” at the bottom left.
- When prompted, tap “Move” again.

3. Using the Notes App
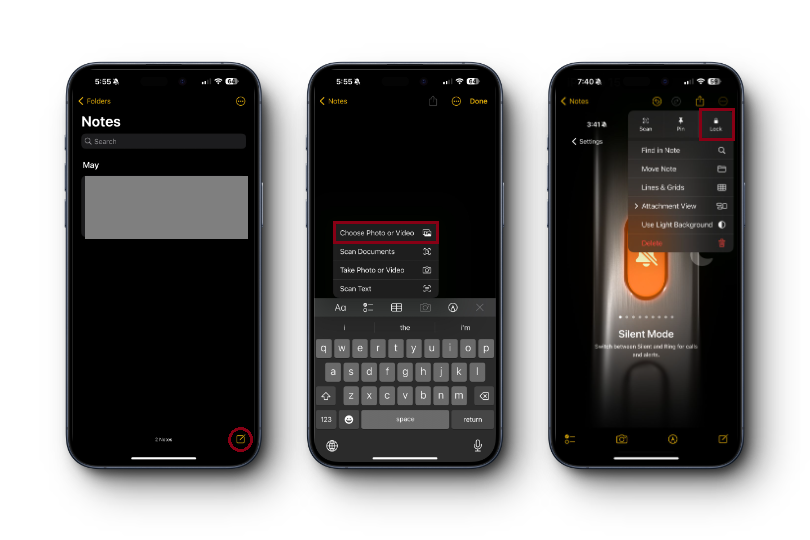
If you want to hide photos from your gallery apps and keep them in an even more secure spot, you can lock them inside a note in the Notes app.
- Open the Notes app and create a new note (or open an existing one).
- Tap the + icon and choose Take Photo or Choose Photo to add pictures to your note.
- Add any extra text or info you want.
- Tap the share icon at the top right, and select Lock Note.
- If you haven’t set up a password for Notes before, you’ll be asked to do it now.
 Reviewed by Huzaifa Haroon