How to Get the Old Photos Slideshow on Windows 11?
The way that Microsoft handled the slideshow functionality with Windows 11 is proof that not every new iteration is good. Windows 10 used to have an easy way to do a slideshow by selecting from multiple pictures, but that functionality is effectively removed from Windows 11.
Unfortunately, if you’re among those looking to bring this feature to Windows 11, there is no native way to do it. But the good news is that there are a few methods that will allow you to reconstruct or closely mimic the behavior of the old SlideShow feature from Windows 11.
Here are your options:
- Install Winaero Tweaker – This is a free app that lets you adjust secret Windows settings that are now hidden from the UI but can still be enforced. Among other things, this app will allow you to bring back the old slideshow functionality just the way you remember it from Windows 10.
- Use the basic Slideshow functionality on Windows 11 – Microsoft was kind enough to include some sort of slideshow functionality on Windows 11, but it’s so basic that it’s hardly worth mentioning. You can’t do custom photo selections and you can’t control the animation or the speed. However, it allows you to easily create slideshows, albeit very basic ones.
- Going the manual route – If you don’t want to use a 3rd party app to get this done, you can also enforce these changes yourself by doing some changes to your Windows 11 registry. This method is a bit more advanced, so stay away from it if you are not comfortable with Registry Editor and Command Prompt.
- Use a 3rd party app – If you don’t mind relying on a 3rd party app to get this done, there are plenty of apps to choose from that will help you create on-demand slideshows. However, don’t expect to get the same level of control out of them as you had on the native Windows 10 Slideshow functionality.
- Create a Windows Media Player Playlist replacement – This is by no means ideal as it takes a while until Windows Media Player builds the slideshow playlist for you. However, once you get it done, you can consider it a worthy replacement for the old Slideshow functionality that was present on Windows 10.
Now that we’ve walked through all the available options for restoring the old Slideshow functionality from Windows 10 to Windows 11, let’s explore each method in detail.
Use the basic Slideshow functionality on Windows 11
The new Photos app on Windows 11 allows you to create a slideshow, but only in a single shape and form.
You are very limited if you choose to do this from the Photos app since you can’t control the animation, the speed, or even the photo selection that you wish to compile the slideshow.
This is far less complex than the things you were able to do on the previous Windows version.
In any case, if you want to go this route, you can initiate a slideshow by doing the following:
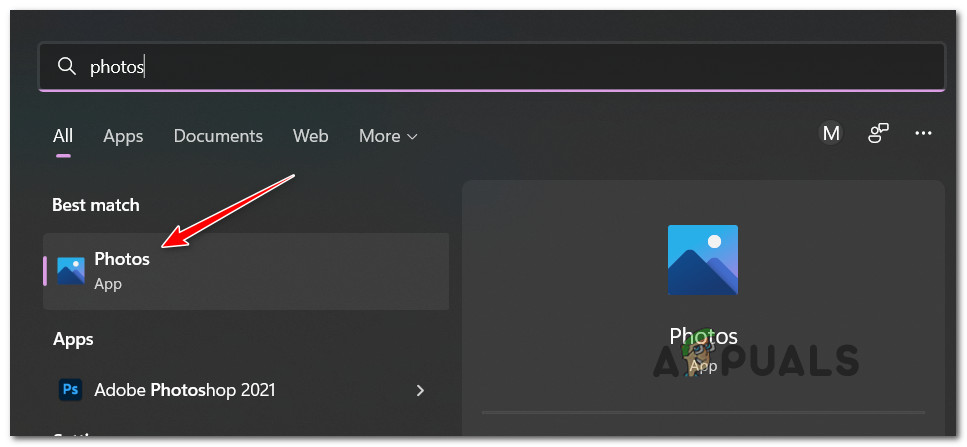
- Open the Photos app. You can do this by navigating by pressing on the Windows key, then typing photos in the search bar at the top.
- From the list of results, click on the Photos app.
Access the Photos app - Once you’re inside the main menu of the Photos app, click on Collection tab from the ribbon bar at the top.
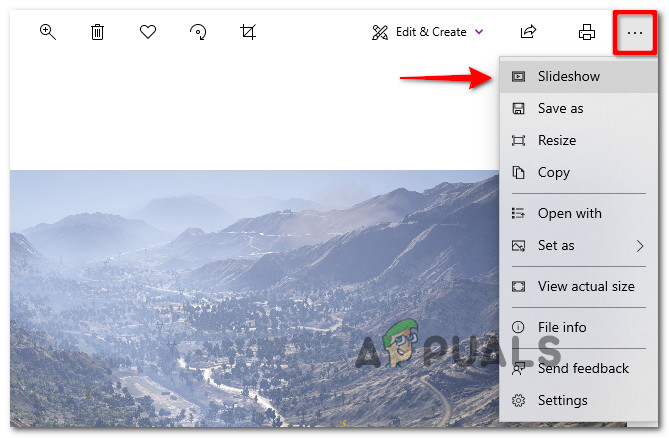
- With the Colection tab selected, click on the three-dot (action icon) in the top-right corner of the screen.
- From the context menu that just appeared, click on SlideShow.
Accessing the Slideshow app - That’s it. The Photos app will now start compiling a slideshow with all photos in this collection. But as I mentioned above, you can’t really control the speed or the selection of photos included in the slideshow.
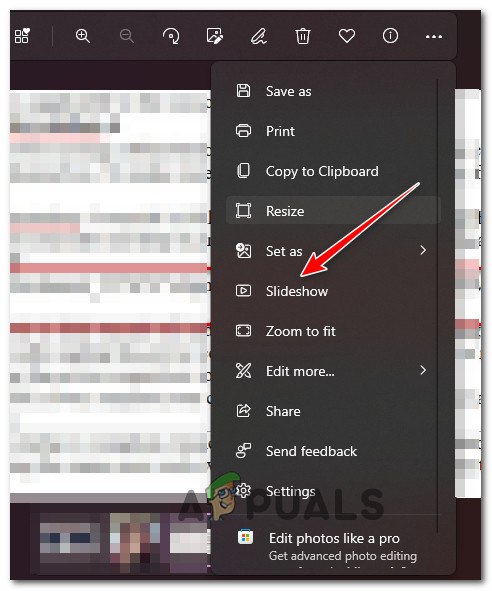
Note: Additionally, you can click on a photo from your collection and then choose to make that a sill slideshow from the context menu. Not much help since you can only set a still image as a slideshow, but it’s still a feature to consider.
If you’re looking for a more efficient way of bringing back the old Windows slideshow functionality, move down to the next method below.
Install Winaero Tweaker
The most efficient solution for bringing the old slideshow functionality to Windows 11 is to use a free tool called Winaero Tweaker.
This tool lets you adjust or tweak hidden settings that are no longer available via UI but can be enforced programmatically.
You can use Winaero Tweaker to enable ‘Classic Full Context Menus‘ and ‘Enable Ribbon‘ which will give you the ability to create slideshows from folders just as you were able to do on Windows 11.
You can download the latest version of Winaero Tweaker from here.
All you need to do is install it as a normal application, then cycle through the options on the left-hand side to enable the following:
- Classic Full Context Menus
- Enable Ribbon
Once you do this and the settings are enforced, reboot your PC to make the changes appear on your PC.
The next time you boot Windows 11, you will be able to deploy slideshows in the same fashion as you were able to on Windows 10.
If you’re looking for a different option, try the next method below.
Enforcing the old Reg Key
If you’re comfortable with using Command Prompt, the easiest way to get back the old functionality is to deploy a series of commands that will re-enable the classic interface of File Explorer.
Among other things, this change will allow you to deploy slideshows in the same way as you can on Windows 10.
Note: In order for this method to be effective, you’ll need to deploy these commands from an elevated CMD prompt.
Several users dealing with the same kind of issue have confirmed that once they re-enabled the classic interface of File Explorer, they were finally able to deploy slideshows with the same functionality and control as available on previous Windows Versions.
Here’s what you need to do:
- Press Windows key + R to open up a Run dialog box. Next, type ‘cmd’ and press Ctrl + Shift + Enter to open up an elevated Command Prompt with administrative privileges.
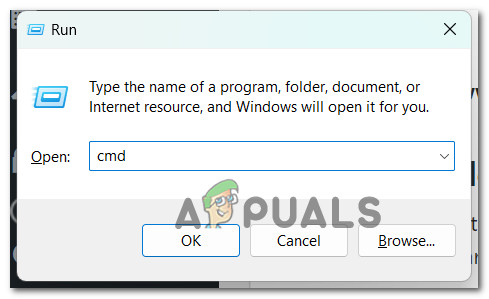
Open up an elevated CMD window - At the User Account Control (UAC) prompt, click Yes to grant admin access.
- Once you’ve opened the Command Prompt window with admin access, paste the following command and hit Enter in order to make the first change in regards to the functionality of File Explorer:
reg.exe add "HKLM\SOFTWARE\Microsoft\Windows\CurrentVersion\Shell Extensions\Blocked" /v "{e2bf9676-5f8f-435c-97eb-11607a5bedf7}" /t REG_SZ - After this command is processed successfully, we’ll need to restart File Explorer – to do this, Press Ctrl + Shift + Esc to open up Task Manager.
- Next, inside Task Manager, go to the Processes tab and locate Windows Explorer. Once you see it, right-click on it and click on Restart from the context menu that just appeared.
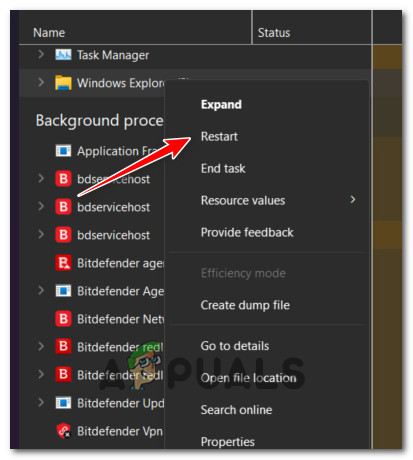
Restart Windows Explorer - After Windows Explorer has been restarted, you should already see the old ability to create slideshows reverted back inside File Manager.
If you want to stay away from this method, move down below.
Add to Windows Media Player Playlist
If you are prepared to settle for a less effective way of displaying slideshows on your Windows 11 computer, another way to go around solving the problem is to create a Windows Media Player playlist.
This will not give you the flexibility of the default Windows Slideshow functionality that was present on Windows 10, but it’s still an acceptable trade-off if you’re looking for a quick solution that won’t require you to do any registry changes or install a 3rd party app.
Follow the instructions below to deploy a slideshow via Windows Media Player:
- Open File Explorer and navigate to the location where you have prepared a folder with all the photos you want to use in your slideshow.
- Right-click on the folder containing the slideshow images and click on Show More Options from the context menu that just appeared.
- From the next context menu, click on Add to Windows Media Player Legacy list.
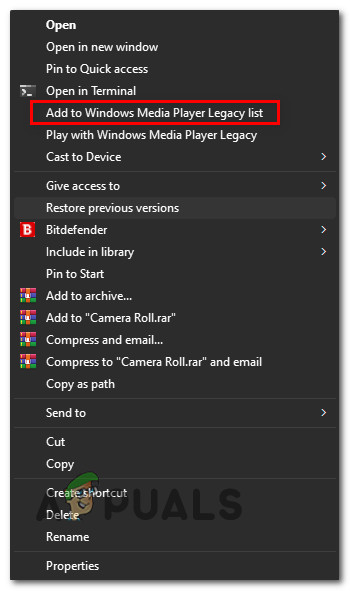
Add to Windows Media Player Playlist - Depending on the side of the photos folder, it will take a while until WMP builds the playlist.
- Eventually, you will see the slideshow displaying and you will have a few adjustments in regards to the speed and animations of the slideshow.
If this method wasn’t what you were looking for, move down to the next step below.
Use a 3rd party slideshow app
If none of the methods above have proven helpful in you’re case, there’s also the option of using a 3rd party app to create on-demand slideshows that you can easily mount on your Windows 10 computer.
To make matters easier for you, we’ve made a list of free slideshow software that you can use to replace the old functionality that was present on Windows 11:
- IceCream Slideshow – Icecream Slideshow Maker is a free program that lets you create beautiful slideshows with your photos. With the optional premium version, you get even more pro features, like the ability to add multiple audio files per slideshow, upload your slideshows to Google Drive, Dropbox, and YouTube directly from the program, and even burn DVDs with your slideshows.
- 4k Slideshow Maker – This free slideshow software can create videos in a variety of formats including AVI, FLV, MP4, and M4V. It also supports a variety of audio formats such as MP3, WAV, OGG, and M4A. Whether you want to create a video quickly and easily, this software has you covered.
- Proshow Gold – The app has some great integrated themes to use for your slideshow design. Proshow Gold also comes with a lot of royalty-free music tracks that would be great for a slideshow. There are plenty of automated features that would be appealing to beginners and pro-users; although you will only get access to these features for free for a limited time.
- Slidely – The slideshow maker is a modern web app with a sleek, contemporary interface that allows users to create presentations with powerful tools and features. Social media integration is a key part of the experience, making it easy to share slideshows on platforms like Facebook, Instagram, YouTube, and more.
- Kizoa – Kizoa is an easy-to-use slideshow maker with plenty of helpful pop-ups explaining how to use the software. You can either use pre-set templates grouped by categories or create your own slideshow from scratch.
- Google Slides – Google Slides is a great online tool for creating slideshows. With its highly intuitive interface and selection of 26 templates, it’s easy to get started. If you don’t select a preset template, you’ll have a selection of blank slides to which you can add text, images, videos, shapes, tables, charts, diagrams, lines, special characters, and animations.
- Canva – Music, charts, videos, and text all have their templates so you don’t need to google how to make a slideshow with music and pictures for free. You can be creative even if you’re just presenting a basic task.
In case you aren’t interested in using a 3rd part app to get the job done, move down below to try the ‘nuclear’ option.
Revert back to Windows 10
If none of the methods above seemed to help, the only thing you can do if you’re really dependent on the old Windows 10 slideshow functionality is to revert back to the previous Windows 10 where you were you we’re able to easily create slideshows.
However, keep in mind that depending on when you upgraded to Windows 11 from Windows 10, you might not be able to return.
For Windows 10, Microsoft only allows a 10-day roll-back period where you can easily return to the previous Windows installation without a clean installation.
If you’re still within this period, you can use this guide to easily roll back to Windows 10 from Windows 11 without losing any of your data.
However, if you’re beyond the 10-day roll-back period, this option won’t be available for you. In this case, the only option would be to perform a clean install procedure and revert back to Windows 10.


Hittin the reg key was great, thanks much! I spent a couple hours going nuts till I found this.