Game Pass Not Launching Your Games? Here’s How to Fix It
A lot of people have recently reported that they can’t launch games that are played with the Xbox Game Pass service. Some of them are not able to launch only a couple of the games, while others can’t launch any of the games they should be able to play as per their Game Pass membership. This error is only encountered on PC.
After many affected players have complained about this error, we dived in and inspected this Game Pass problem closely and come up with a shortlist of all the possible causes for it:
Now that you know all the possible causes of this error, here’s a list of all the potential fixes that will help you fix this Game Pass issue on Windows computers:
1. Close the Gaming Services from Task Manager
Before we move to more technical methods, the first thing you should try to fix this weird GamePass behavior is to close the Gaming Services process via Task Manager.
By doing this, you could reset the Gaming Service, and when you relaunch the game it should work in case the launch doesn’t happen due to the service being stuck in limbo.
This is the easiest fix out of the bunch presented in this article and it’s the ideal way to start troubleshooting this problem.
Here are the steps you need to follow in case you don’t know how to close the Gaming Services from the Task Manager:
- You first need to open the Task Manager. Press the CRTL + Shift + ESC keys to directly open the Task Manager, or you can use other ways if you want.
- After you are inside the Task Manager, search for the Gaming Services process and right-click on it, then click on End Task. By doing this you will end the Gaming Services task.
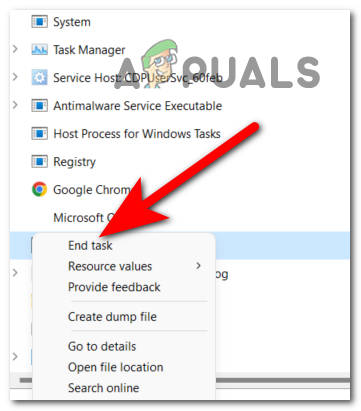
Ending the task - Once you’ve successfully ended the task, close the Task Manager and try to launch a game to see if the Game Pass not launching games error still appears.
If the problem is still not resolved, move down to the next method below.
2. Update your Windows version
The first potential fix for your problem is to see if there are any available Windows updates that you missing.
Most commonly, you’ll experience this problem in a situation where you are missing one or more Windows infrastructure updates. This can be an issue on both Windows 10 and Windows 11.
As it turns out, GamePass needs a key WU infrastructure update in order to validate certain first-party titles from Microsoft. If you’re missing those, chances are Game Pass will refuse to launch certain game titles like Gears of War, Forza Horizon, and more.
There are a lot of affected users that successfully managed to resolve the problem after they updated the Windows build to the latest.
If you don’t know how to update your Windows installation, follow these steps:
- Open a Run dialog box by pressing the Windows key + R, then type inside the search bar ‘ms-settings:’ and press Enter to open Settings.
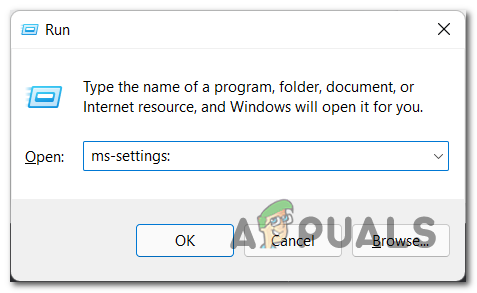
Accessing the Settings menu - Once you are inside the Settings, search for Windows Update on the left-hand menu and click on it.
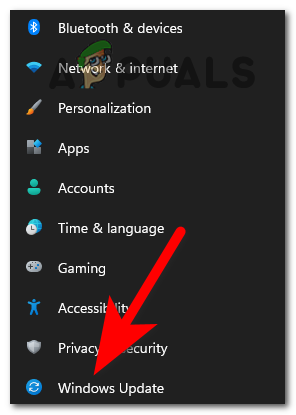
Accessing the Windows Update - After you’ve done that, install the updates that are pending if there are any. If not, click on Check for updates and wait until the check is complete.

Checking for updates - If there are available updates found, make sure to install them. Depending on how many updates are missing from your system, chances are you might need to install your computer multiple times.
- You could be requested to restart your PC to complete the installation of the updates. Make sure you reboot it.
- Once the PC is back up and running, launch any game to see if now you are able to play it.
In case you are still not able to launch any game, check the next method below.
3. Repair the Xbox App
The next thing that you can try is to repair the Xbox application from the settings of your computer.
This method will repair the vast majority of scenarios where you are unable to launch game-pass games due to some type of corruption issue.
You can do this by accessing the Apps & Features menu and triggering a Repair procedure from the Reset tab. This method was confirmed to work by both Windows 10 and Windows 11 users.
After the app will be repaired and restored, you will be able to play the games you want (if the problem is caused by some type of local corruption).
Follow the instructions below for specific instructions on repairing the Xbox app from the Apps & Features menu.
Note: The instructions below will work on both Windows 10 and Windows 11.
- You need to access the Apps & features. To get there quickly, open a Run dialog box and type ‘ms-settings:appsfeatures’ inside the search bar.
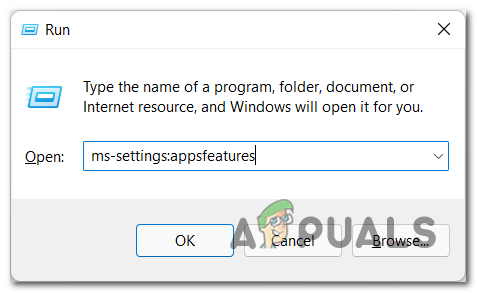
Accessing the Apps and Features menu - Once you’ve done that, search through the list for the Xbox Game Pass app.
- After you find it, click on Advanced options and scroll down until you find Repair, then click on the button to begin the process.
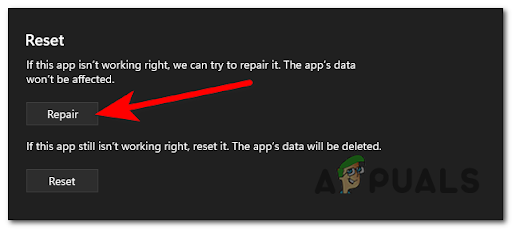
Repair the Game Pass installation - When the process is done, you need to do exactly the same thing with the Xbox application.
- Once you are done with that, you can close the settings and test to see if the games are still not launching.
In case the Game Pass is still not launching games even after you repaired the application, go to the next method below.
4. Force-reinstall the Gaming Services app via PowerShell
If none of the methods so far have addressed the Game Pass issue in your case, another thing that a lot of PC-based affected Game Pass subscribers recommend is to delete the Gaming Services using a PowerShell command.
Note: This operation will resolve a more advanced corruption problem that can not be addressed with a simple repair procedure. Force-reinstalling also means that every cache file currently stored by the app will be deleted too.
After the Gaming Services is deleted via the Powershell command, you will need to open the Xbox Game Pass app to reinstall the Gaming Services – you’ll be prompted to do so right after you open the application for the first time after the force-reinstall.
Here are the steps you need to follow in order to force-reinstall the GamePass Gaming Services:
- You first need to open a Run dialog box by pressing the Windows key + R and typing ‘powershell’ inside the search bar.
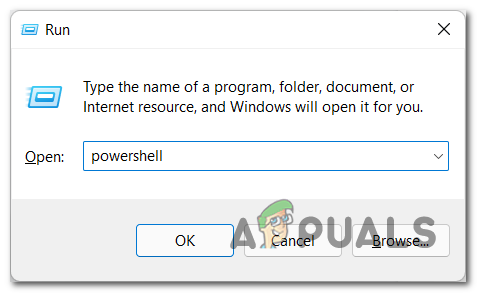
Opening an elevated Powershell window - Press Ctrl + Shift + Enter to open Powershell with admin access.
- At the User Account Control, click Yes to grant admin access.
- Now that you are inside the elevated PowerShell window, type the following command and press Enter to start the process:
get-appxpackage Microsoft.GamingServices | remove-Appxpackage –allusers
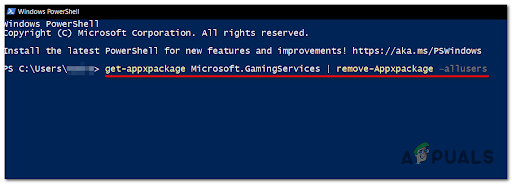
Force-reinstalling the Gaming Services from GamePass - Wait until the removing process is done.
Note: Depending on if you’re using an SSD or HDD, this operation might take several minutes. - Once the process is done, close the elevated PowerShell window and reboot your computer.
- After the gaming services are installed again, try to launch any game to see if now you can play them.
If the same problem is still occurring, move down to the next potential fix below.
5. Sync your date and time
Some players have managed to fix this odd behavior where Game Pass was not launching games by changing the date and time.
As it turns out, you can expect this to be a problem because the GamePass service ends up cross-checking the system dater against the server date and terminates the launch of the game if it discovers a mismatch.
If this scenario looks like it could be applicable, you can fix the problem by syncing the date and time from the dedicated Date and Time menu. After doing this, you should be able to launch any game using the Game Pass.
Important: After unchecking the box next to the Set the time automatically option, you need to manually set the correct date and time.
In case you don’t know how to manually sync the date and time, here is a guide that will guide you through it:
Note: The instructions below will work on both Windows 10 and Windows 11.
- First, press the Windows key + R to open up a Run dialog box.
- Next, type ‘ms-settings:’ inside the text box and press Enter to open up the Date & Time menu.

Accessing the Settings menu - Once you’re inside the Settings menu, you need to go to click on the Date & time section from the left-hand side menu.
Note: Additionally, you can access the same settings by right-clicking on the date on the right side of the taskbar, then clicking on Adjust date and time.
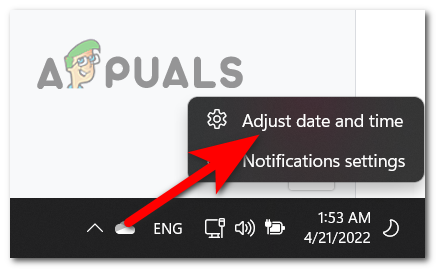
Adjust the Date & Time menu - Once you are inside the Date & Time, click on the toggle button next to Set time automatically to turn off the option.

Setting the time automatically - Now click on the Change button next to where it says Set the date and time manually. Change the date and time as it is at this moment.
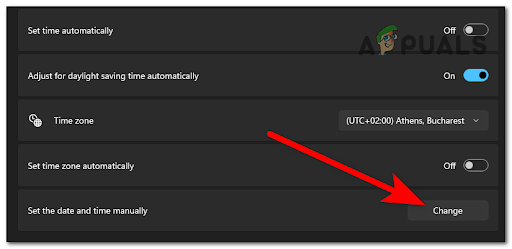
Set Date and Time manually - When you are done with that, try to launch any game to see if it will now work for you.
In case your Game Pass is still showing the same problems, try the next method below.
6. Delete the Gaming Services via Registry Editor
If the method above didn’t produce the results you were after, you can also try getting rid of the potentially corrupted Gaming Services infrastructure via Registry Editor – only attempt this if the Powershell method above has failed.
Important: After you delete the Gaming Services via Registry Editor, you need to go to the Apps & features section and repair the Gaming Services, as well as the App Installer – This is required in order to re-generate the Registry keys that you’ve just eliminated.
A lot of Windows 10 GamePass subscribers have used this method to finally launch the games they were entitled to after the conventional method failed.
Here are the steps that you need to follow to delete the Gaming Services via Registry Editor:
- Press the Windows key + R to open a Run dialog box, then type inside the search bar ‘regedit’ and press Enter to open the Registry Editor.
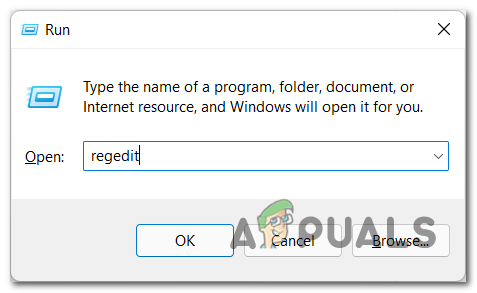
Accessing the Regedit utility - Now that you are inside the Registry Editor, make sure to delete the following services:
[HKEY_LOCAL_MACHINE\SYSTEM\CurrentControlSet\Services\GamingServices]
[HKEY_LOCAL_MACHINE\SYSTEM\CurrentControlSet\Services\GamingServicesNet]
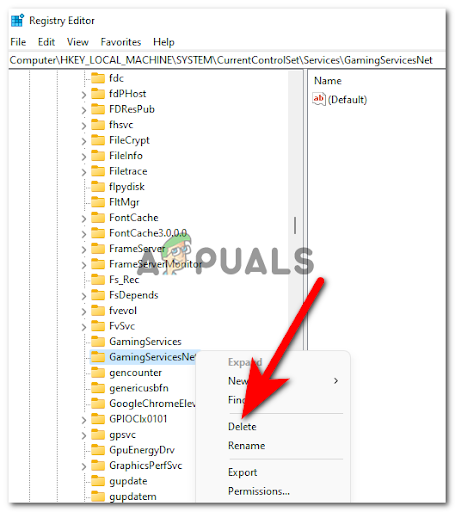
Deleting th4e Gaming services - After you delete both of the services, you can close the Registry Editor.
- Now you need to press the Windows key + R to open a Run dialog box, then type ‘ms-settings:appsfeatures’ inside the search bar and press Enter to open the Apps & features.
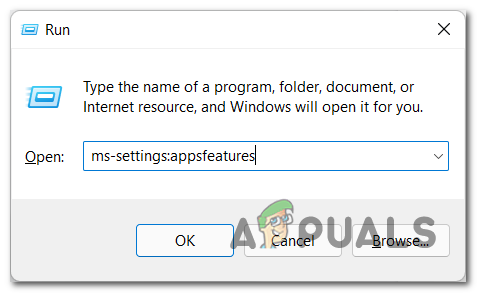
Accessing the Apps Features menu - Once you are done with that, access the Advanced options of Gaming Services, then click on Reset.

Reset Gaming Services - Now you need to repeat the process with the App Installer.
- After that, you can close the Apps & features and try to see if the Game Pass error still occurs.
In case this error still appears, go check below the next method.
7. Enable the offline permissions
Another reason why you might experience this issue is when GamePass is not permitted to launch games while your PC is not connected to the internet. In order to be able to do this, the app needs offline permissions.
A few affected users have managed to fix this Game Pass issue by enabling offline permission to their Xbox accounts.
You can do this from the App Settings of your account, on the Microsoft Store app. This process is easy to do and will allow you to fix your issue if this scenario is applicable.
Here’s how you can enable the offline permissions in case you don’t know the steps:
- Open the Microsoft Store and click on your profile, then access the App settings.
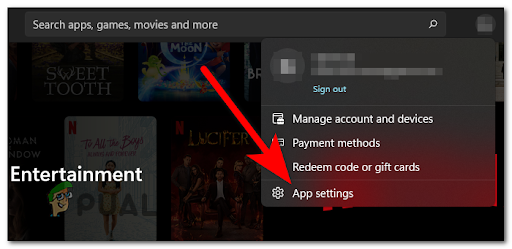
Accessing the App Settings menu - Once you are inside the App settings, click on the toggle next to Offline permissions to enable the option.
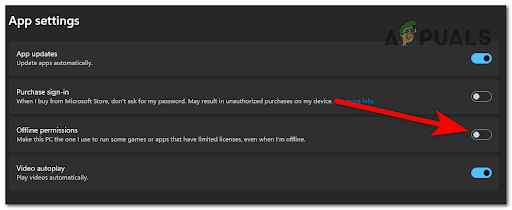
Accessing the Offline Permissions - Now that the option is enabled, you should be able to launch the games without problems. Test the games to see if you are now able to play them.
If none of the methods below have helped you fix this Game Pass Not Launching error, check up on the last method from this list.


