Solved: Not currently using a display attached to NVIDIA GPU
Newer laptops are increasing sporting dedicated graphics processing units (GPU) beside the integrated GPU. Desktop computer users have also fallen in love with NVidia GPUs and use them for graphic intensive tasks like gaming, animation and video editing among others. However, it is not all smooth sailing. Setting up an NVidia GPU can be a nightmare if you are not sure what is going on. The problem mentioned here has particularly frustrated a lot of users.
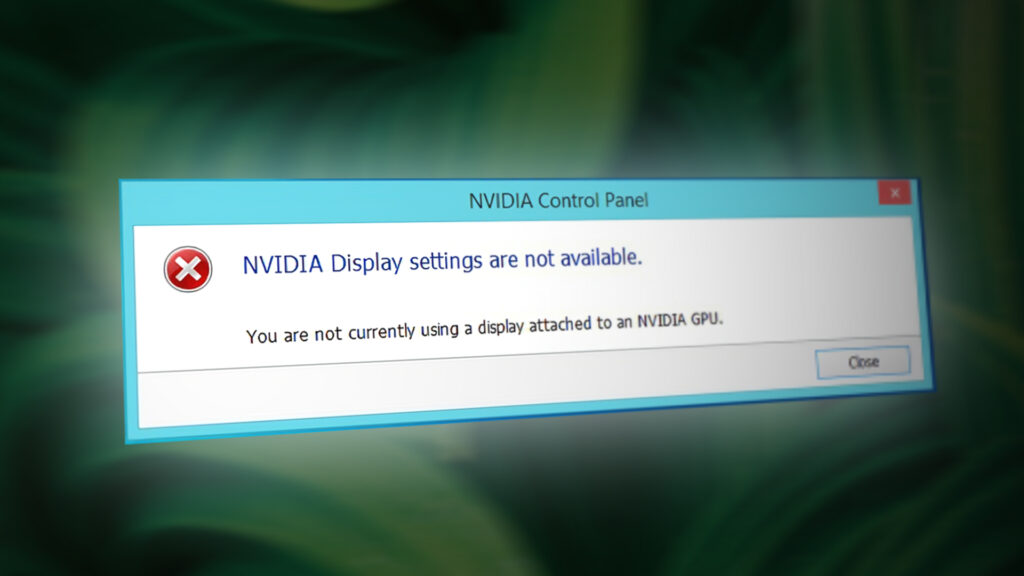
A lot of users have been complaining that whenever they try to access the NVidia control panel, they get a message stating ‘You are not currently using a display connected to an NVidia GPU’ with the heading ‘NVidia display settings are not available’. This robs the users of the capacity to tweak their NVidia GPU to enhance its performance, resolution or speed among other things. The problem occurs in both desktop and dedicated NVidia GPU laptops. Despite this message a lot of users running a dedicated NVidia laptop (there is usually an integrated Intel GPU) indicate that the NVidia GPU seems to come online whenever graphic intensive tasks are run. For others, disabling the integrated GPU in device manager turns the screen blank, and a restart will boot into a VGA (800X600) display. Strangely enough, a lot of users report that whenever they are plugged into the HDMI instead of a VGA port, this message does not come up and they are able to access the NVidia settings. Why does this occur, and how can it be fixed? This article covers this problem and gives you the solutions to it.
Why you cannot access your NVidia GPU settings
Laptops that run Intel with NVidia dedicated graphics usually save power by reverting to the Intel GPU when displaying graphics that do not need a lot of GPU processing power. This is usually known as the NVidia Optimus. When you launch a game or Photoshop, or animation software or other apps that demand a lot of GPU power, the NVidia kicks in. you will usually see a light that turns on the top or on the side of your laptop. Earlier laptops could let you switch between the GPUs by pressing a button. On the other hand, desktop users always deploy the NVidia GPU via an expandable slot at the back.
As the error message says, your NVidia will not work because the system is not able to detect it as the GPU that is currently displaying your screen. This simply means that for your desktop computer, your monitor is plugged into the wrong port at the back; hence your NVidia GPU is not active/online. This is why some users say that the problem is resolved when they plug into the HDMI port, but they are likely plugging into the correct NVidia GPU port. Also in most laptops, the NVidia GPU drives the HDMI and other external monitor ports.
For laptops; at low power, your computer uses the Integrated Intel GPU. When you access the NVidia GPU control panel, it should be able to switch and bring the dedicated NVidia GPU online and allow you to access the GPU’s settings. However, if you have the wrong drivers – it does not matter how up to date they installed drivers are – then your laptop will not be able to make this switch. This is the reason why all users that have this problem insist that updating the drivers does not solve the problem. The reason is that they are installing generic drivers from the Intel website or from the NVidia website. Your laptop manufacturer will always add some elements into these generic drivers so as to tell your PC when to switch between the two GPUs. These drivers are known as the OEM drivers and this problem is one of the reasons why manufacturers insist on installing OEM (Original Equipment Manufacturer) drivers that come with your computer CD or those that can be found on their website using your service tag.
Method 1: Plug your monitor into the NVidia GPU port
If you have a desktop computer, it is likely that you are plugged into the wrong port at the back of your PC. You should be plugged into the NVidia GPU port and not the port that comes integrated to your motherboard. The NVidia GPU is plugged into the extension slots marked as 8 in the image below. Your NVidia GPU should look like the one marked as 9.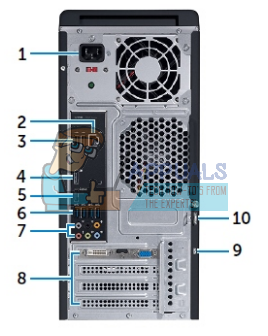
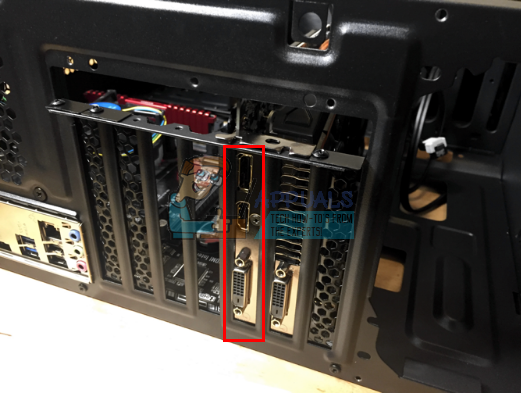
It is easy to miss this port because it is usually plugged with dust covers and nubs. Simply pry off the dust covers and plug in your HDMI or DVI cable that connects to your monitor and the NVidia control panel should now work.
Method 2: Uninstall your drivers and Install the OEM drivers for your Intel and NVidia GPUs
Notebooks and laptops use NVidia Optimus that switches between the Intel and NVidia GPUs depending on the graphic demands. It knows when the NVidia GPU should kick in and when to revert to the low power Intel GPU. However, only the laptop manufacturer drivers can implement this and not the generic drivers from Intel or NVidia. To install OEM drivers:
Step 1: Uninstall graphics drivers
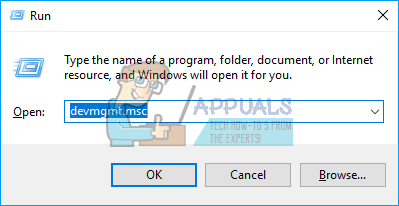
- Press Windows Key + R to open Run
- Type devmgmt.msc and hit enter to open device manager
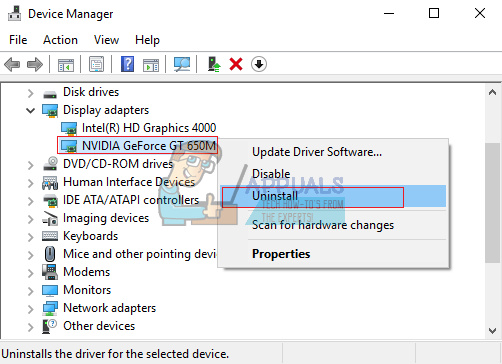
- Expand the ‘Display adapters’ section
- Right click on your Nvidia Graphics drivers and select ‘Uninstall Device’
- In the confirmation message that comes up, click Yes/Uninstall to uninstall your drivers.
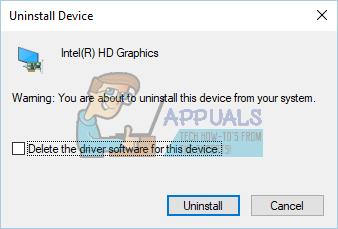
- Right click on your Intel Graphics drivers and select ‘Uninstall Device’
- In the confirmation message that comes up, click Yes/Uninstall to uninstall your drivers. Your screen will have a very low resolution after this. Do not worry, that is supposed to happen.
- Restart your PC
Step 2: Download and install the correct drivers
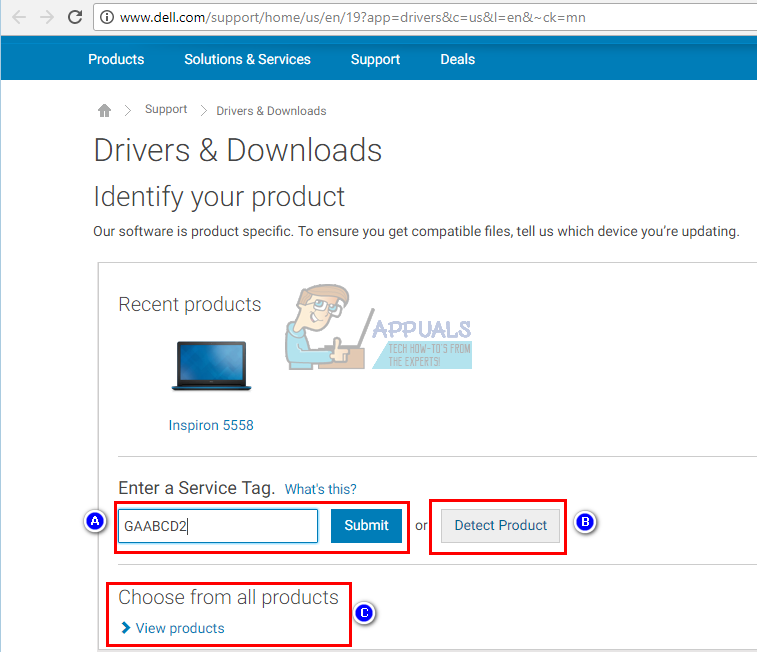
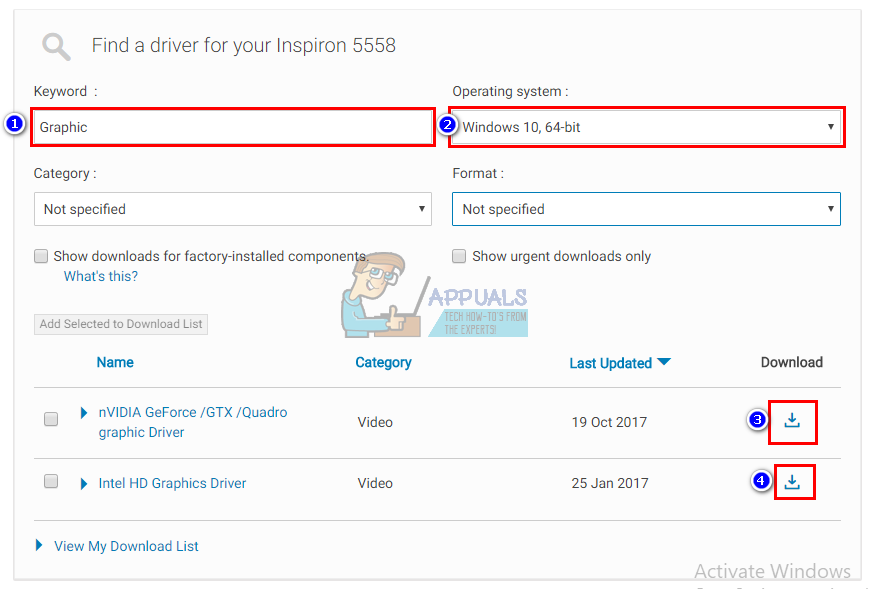
- Go to your laptop manufacturer website. Dell users can go here, hp users can go here, Toshiba users can go here, Acer users can go here, while Lenovo users can go here.
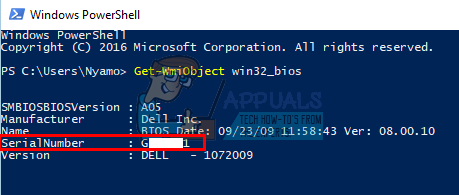
- You will likely be asked for your service tag or serial number. You can find this on a sticker at the bottom of your laptop. If the sticker is damaged you can find the service tag using cmdlets that read your BIOS. Click start > type PowerShell > Open PowerShell > Type “Get-WmiObject win32_bios” (without the quotes) and press enter. You will be shown your Serial Number/Service Tag.
- Type in your service tag and submit it. Your manufacturer will find your laptop model for you and present you with the updates and drivers.You can also choose to search for your laptop manually or use an auto-detect service.
- Search for your graphics drivers that are meant for your OS (Windows 10, 8, 7 64 bit or 32 bit) and download both of them (NVidia and Intel). These drivers might be older than what you will find on the GeForce or Intel website, but they will work. Do nor download BETA drivers since these are not stable.
- Install the downloaded Intel graphics drivers first
- Install the NVidia drivers by opening the downloaded file. Make sure you perform a clean install by checking ‘Perform clean install’ in the NVidia installation window.

- Restart your PC
Step 3: Hopefully Windows 10 will not update your drivers to wrong drivers. If you notice this behavior, prevent automatics updating of drivers by:
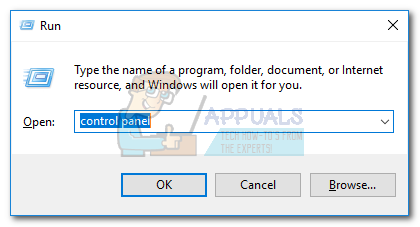
- Press Windows Key + R to open Run
- Type in ‘Control Panel’ and hit enter to open the control panel
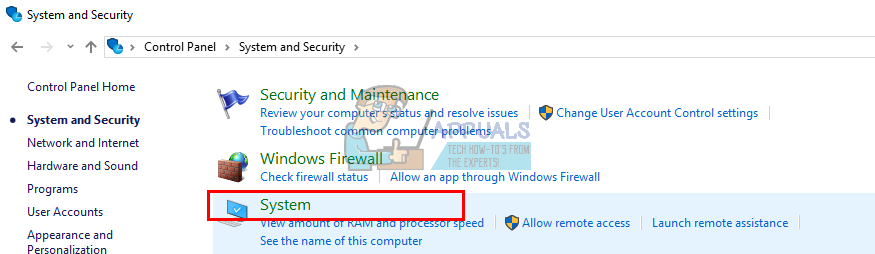
- Click on ‘System and Security’

- Click on System
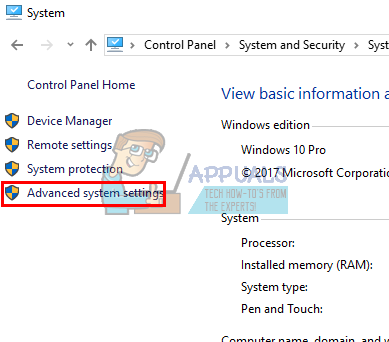
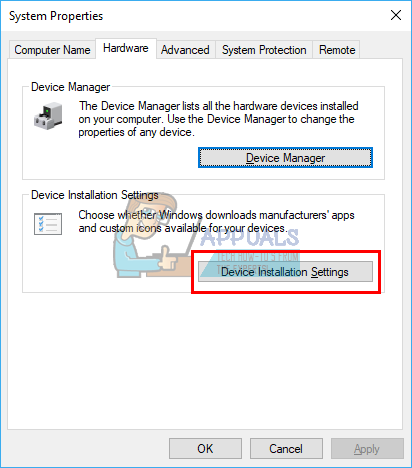
- Click ‘Advanced system settings’ from the left sidebar.
- Click on the hardware tab and click on the Device Installation Settings button.
- In the that pops up, select ‘No (your device might not work as expected)’ and then click on ‘Save Changes’
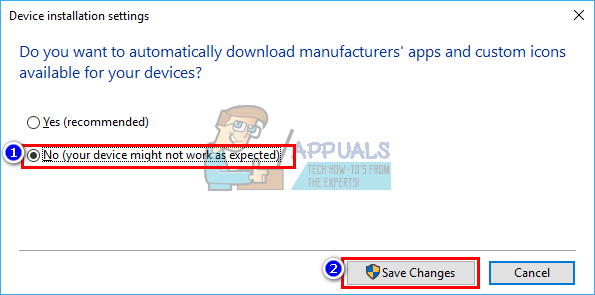
- You might need to restart your PC for effect to take place
Method 3: Update your GeForce/NVidia Drivers
For desktop user, the NVidia GPU is independent of the Intel GPU. If your drivers are faulty, you can download the correct drivers from GeForce.
- Go to GeForce driver download center here
- You can find for your drivers by manually searching for them, or using the ‘Auto-detect your GPU feature’ or the GeForce experience software to detect and update your GPU drivers.
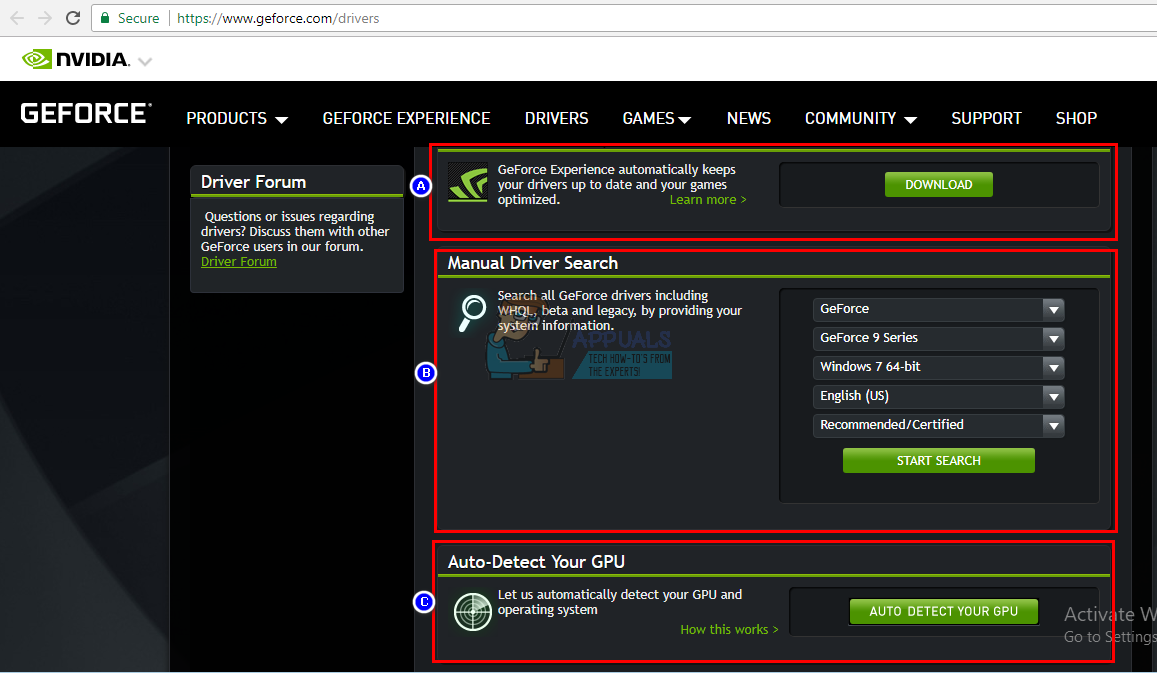
- When searching manually, don’t forget to select your OS e.g. Windows 10 64 bit and also filter your search to include only ‘Recommended/Certified’ drivers because beta drivers are usually faulty.
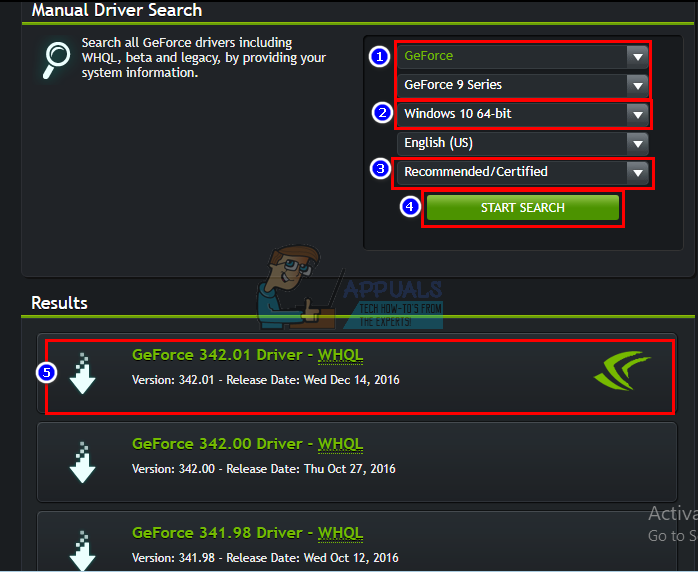
- Download the latest driver (the one at the top of the list)
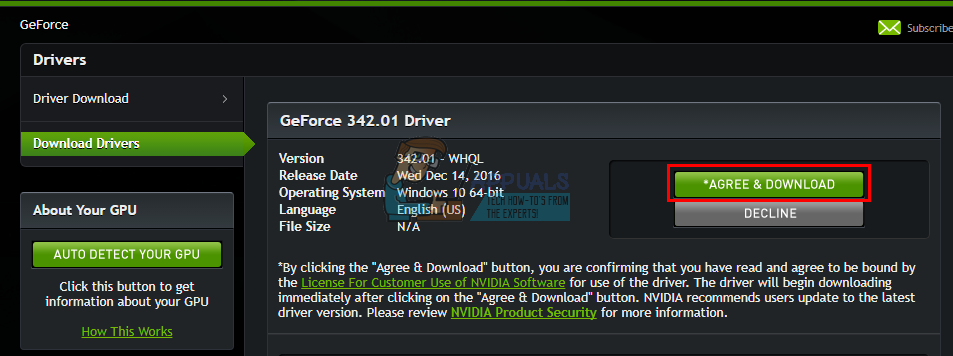
- Run it to install it. Make sure you perform a clean install by checking ‘Perform clean install’ in the NVidia installation window.
Method 4: Uninstall and reinstall your drivers
If your computer previously worked with known drivers, then there is a possibility your drivers are corrupt and you will need to uninstall and reinstall them. You can use DDU (Display Driver Uninstaller) from here or:
- Press Windows Key + R to open Run
- Type devmgmt.msc and hit enter to open device manager
- Expand the ‘Display adapters’ section
- Right click on your NVidia Graphics drivers and select ‘Uninstall Driver’
- In the confirmation message that comes up, click Yes/Uninstall to uninstall your drivers. Your screen will have a very low resolution after this. Do not worry, that is supposed to happen.
- Now install the drivers again. If you do not have the drivers with you, use method 2: Step 2 above to find the drivers for your laptop, or method 3 to find the drivers for your desktop computer.
Good article. Not sure if any of the options will work for me yet but it’s well laid out and fingers crossed something will work for me 🙂