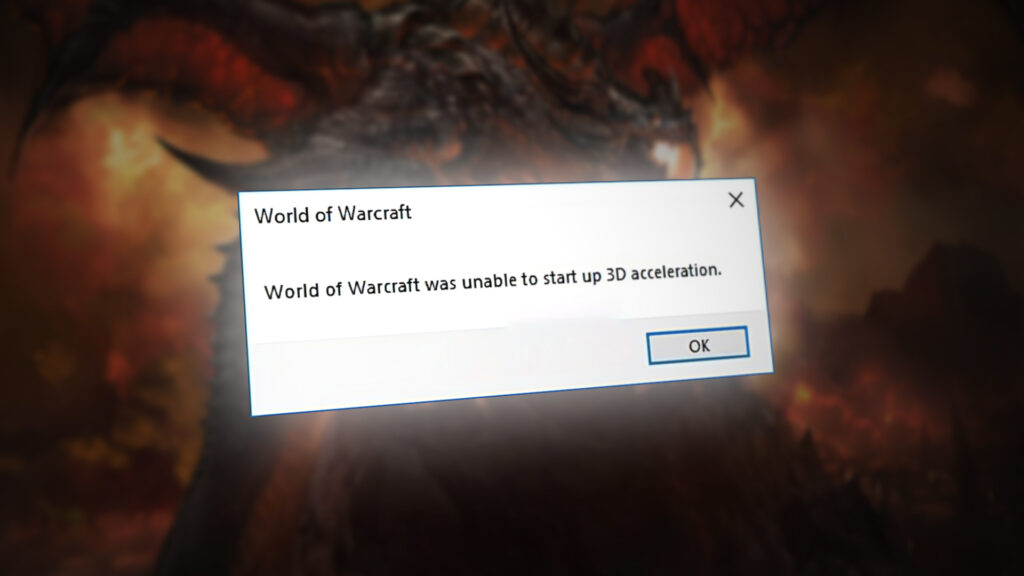
World of Warcraft was unable to start up (Here’s how to fix it)
World of Warcraft is a massive multiplayer online (MMO) video game and it’s one of the most famous video games of all time. The “World of Warcraft was unable to start up 3D acceleration” is an error that appears when users are trying to launch this game and it prevents them from playing.
It’s usually related to graphical settings or drivers on your computer but there are other culprits as well. Follow the steps below in order to get rid of this problem on your Windows PC. Good luck!
Solution 1: Disable Fullscreen Optimizations
Disabling certain graphic settings is the proper way to handle this problem and that is something which can be deduced from the error message. This method has resolved the problem for countless users on the World of Warcraft forum and we hope that you fill benefit from it as well.
- Navigate to the World of Warcraft’s installation folder. If you haven’t made any changes during the process of installation regarding the installation folder, it should be Local Disk >> Program Files or Program Files (x86).
- However, if you have the WoW shortcut on the desktop, you can simply right-click on it and choose Open file location from the context menu which will appear. The same option is available in the Shortcut tab under Properties.
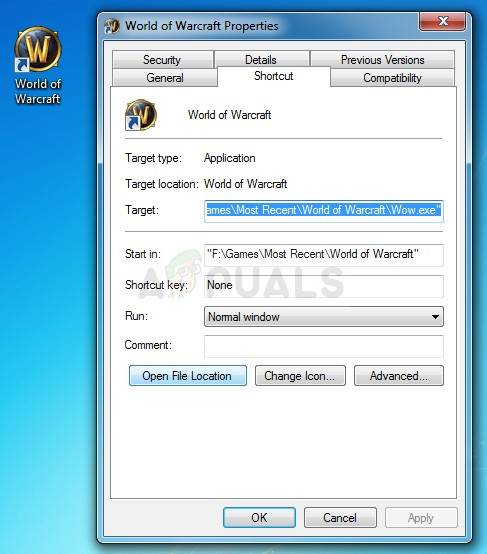
- Select the WoW.exe or the Wow-64.exe file in the folder (depending on the architecture of the Windows operating system you have installed), right-click on it and choose the Properties option from the menu.
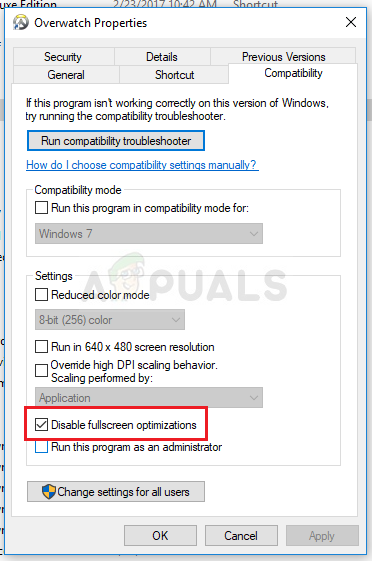
- Navigate to the Compatibility tab in the Properties window by clicking on it and uncheck the box next to the “Disable Fullscreen Optimizations” option inside.
- Apply the changes you have made right now, restart your computer and check to see if you are able to launch World of Warcraft now.
Solution 2: Run the Repair Tool from Within the Blizzard Battle.net Desktop App
Luckily, Blizzard has made a repair service which can be used to automatically solve minor errors such as this one and this tool was able to solve the problem for plenty of users. It can be run easily and it shows results. Sometimes it might appear slow but the patience will pay off.
- Launch the Battle.net app from where you usually open it on your PC (a desktop icon or searching for it in the Start menu) and navigate to the World of Warcraft pane.
- Click on Options and locate the Scan and Repair button in order to begin with the process.
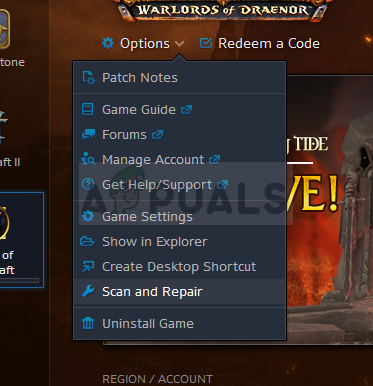
- Click on it and confirm your choice by clicking the Begin Scan option.
- It’s quite possible that some files will have to be downloaded again and installed during this process which will occur and the end of the Scan and Repair task.
- After the process is over, you should reopen World of Warcraft and try again to see if the error code still appears.
Solution 3: Update or Roll Back Your Graphics Card Driver
One of the most popular troubleshooting methods can be applied in this scenario as well since there are plenty of World of Warcraft players who were desperate for a solution but they didn’t think of updating their video card driver. Follow the steps below in order to install the latest one from your manufacturer’s website or to roll back to the previous one if a recent update is causing the problem.
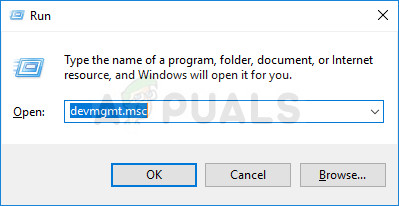
- Click on the Start menu, type in “Device Manager” with Start menu open, and select it from the list of available results by simply clicking on the first result. You can also use the Windows Key + R key combo in order to open the Run dialog box. Type in “devmgmt.msc” in the box and click OK in order to run it.
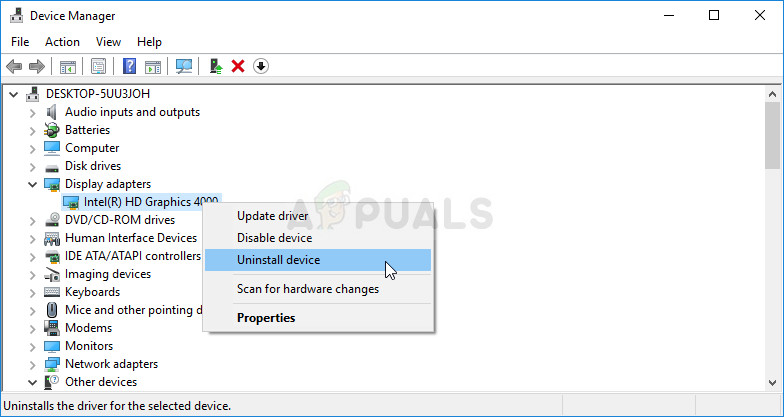
- Since it’s the video card driver we want to update on your computer, expand the Display adapters category, right click on your video card and select the Uninstall Device option.
- Confirm any dialogues which may ask you to confirm the uninstallation of the current device driver and wait for the process to finish.
- Look for your graphics card driver on the card’s manufacturer’s website and follow their instructions which should be available on the site. Save the installation file on your computer and run it from there. Your computer may restart several times during the installation. You should also gather some basic information about your computer in order to download the proper driver. Try running World of Warcraft and check to see if the error still appears.
Nvidia Drivers — Click Here!
AMD Drivers — Click Here!
Rolling Back the Driver:
If you have recently updated your graphics card driver and if it’s causing the issue on your computer, you should be able to revert to the one you had installed before. This way you can use your old driver until your card’s manufacturer releases a better update.
- Right click on the graphics card driver you want to roll back and select Properties. After the Properties window opens, navigate to the Driver tab and locate the Roll Back Driver button at the bottom.
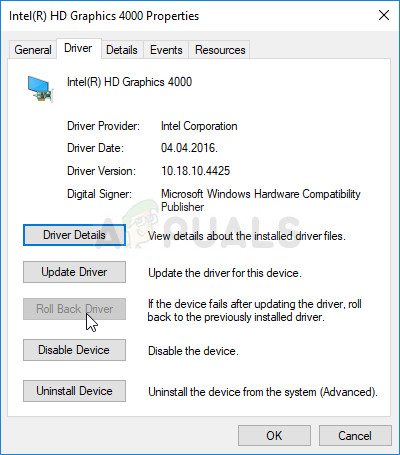
- If the option is grayed out, it means that the device wasn’t updated in the near future as it has no backup files recalling the old driver. This also means that the recent driver update is probably not the cause of your problem.
- If the option is available to click on, click on it and follow the instructions on-screen to proceed with the process. Restart the computer and check to see if the problem still occurs when running World of Warcraft.
Solution 4: Disable SLI on Your NVIDIA Graphics Card
Scalable Link Interface (SLI) is a name for the GPU technology made by Nvidia for combining two or more video cards together to produce a single output. SLI is a parallel processing algorithm for video, meant to increase the available processing power.
However, the World of Warcraft game doesn’t appear to support this feature and you should turn it off while playing the game. Certain users have reported that disabling this option for the game has prevented the “World of Warcraft was unable to start up 3D acceleration” error.
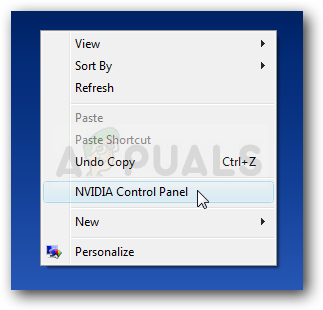
- Right-click on your desktop screen and select the NVIDIA Control Panel entry from the context menu or double-click the NVIDIA icon in the system tray. NVIDIA Control Panel can also be located in the regular Control Panel.
- Once you’ve opened the NVIDIA Control Panel, navigate to the 3D settings menu at the left side navigation pane and click the Set SLI configuration option.

- Finally, select the Do not use SLI technology option and click on Apply to confirm the changes. Open World of Warcraft and check to see if the same error still appears.
Solution 5: Setup World of Warcraft in NVIDIA Control Panel
Sometimes a Windows Update or other major process on your computer can mess up certain settings and you might need to set them up manually in order to solve the problem and continue playing World of Warcraft properly. This one is related to assigning you NVIDIA graphics card (if you are using one) to the preferred processor to run for World of Warcraft.
- Right-click on the desktop and select the NVIDIA Control Panel entry from the drop-down menu or double-click the NVIDIA icon in the tray. The NVIDIA Control Panel is also available in Control Panel on Windows.
- Under the 3D settings part at the left navigation pane, click on the Adjust image settings with preview entry. At the new screen, check the radio button related to the “Use the advanced 3D image settings” option and click on Apply.
- After that, click on Manage 3D settings at the left side pane and navigate to the Program Settings tab.
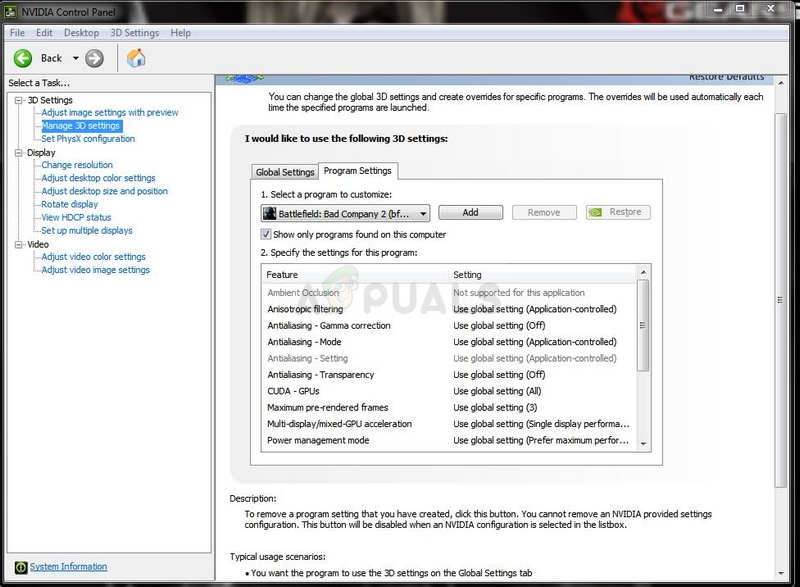
- Click on Add and make sure you browse your computer for the Wow.exe executable which can be found in the installation folder of World of Warcraft. The easiest way would be to right-click on a World of Warcraft shortcut and choose the Open file location option from the context menu.
- You can also browse manually if you know where you the game is installed. It is installed to C >> Program Files by default. After selecting the game, from the dropdown menu under the “Select the preferred graphics processor for this program” option, select “High-performance NVIDIA processor” and click on Apply.
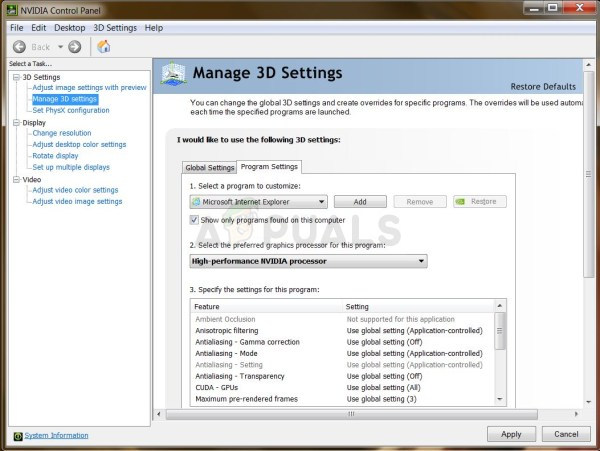
- Check to see if the WoW problem has disappeared after you restart your computer.
Solution 6: Start Using a Different Version of DirectX
The latest installments of the game are using DirectX 12 but it appears that even users who should be able to support this technology are struggling with going through it. The best bet is to either use DirectX 11 or DirectX 9. You can do so easily and without opening the game by following the steps below.
- Navigate to the World of Warcraft’s installation folder. If you haven’t made any changes during the process of installation regarding the installation folder, it should be Local Disk >> Program Files or Program Files (x86).
- However, if you have the WoW shortcut on the desktop, you can simply right-click on it and choose Open file location from the context menu which will appear.The same option is available in the Shortcut tab under Properties.
- Open the WTF folder, locate the file named “config”, right-click on it and choose to Open it with Notepad.
- Locate the “Set gxapi d3d12” line and simply delete it if you don’t want the game to use DirectX 12 technology. If you want to use DirectX 9, you should also delete the “Set gxapi d3d11” line in the config folder. Use the Ctrl + S key combination in order to save the changes and exit.
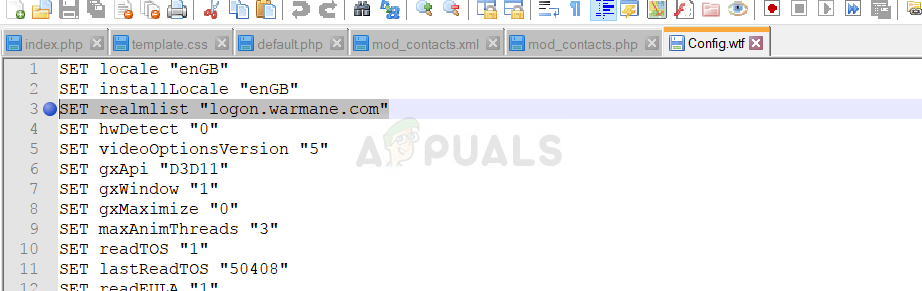
- Check to see if the error still appears when opening WoW.
Solution 7: Update Windows Fully
Blizzard officials have once mentioned that they always require fully updated operating systems if you want to run the game properly and it seems that they were not joking as plenty of users were able to solve the problem simply by installing the latest updates on their Windows computers. Follow the steps below in order to do so no matter which OS you are using.
Windows 10 users may notice that the updates are carried out almost automatically as Windows always checks for them. Still, if you think the process is broken, you can check for updates manually.
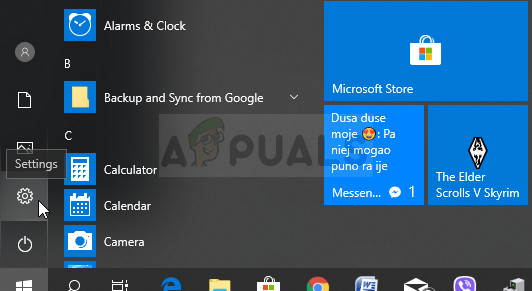
- Use the Windows Key + I combination to open Settings on your Windows 10 PC. Alternatively, you can search for “Settings” in Start menu or the search bar or simply click the gear-like icon in the Start menu.
- Locate and tap the “Update & security” sub-section in the Settings utility.
- Stay in the Windows Update tab and click on the Check for updates button under the Update status section in order to check whether there is a new build of Windows available.
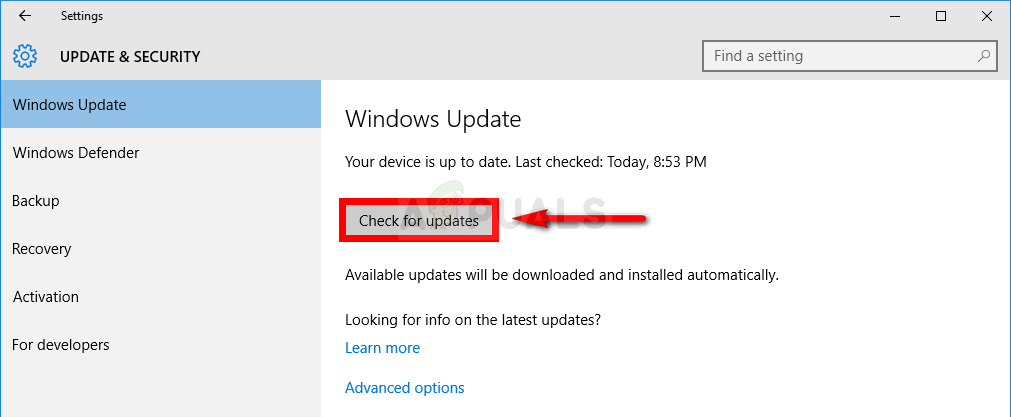
- If one is available, Windows should start with the download process immediately and the update should be installed as soon as you are available to do a restart.
If you are using an older version of Windows, it should be important to state that the automatic updating process can be easily disabled when compared to Windows 10.. Either way, a simple command may be able to install the latest updates on any version of Windows.
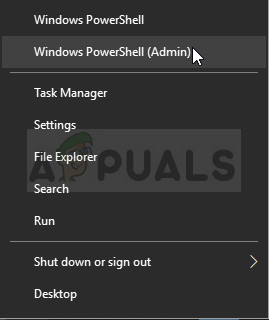
- Open the PowerShell utility by right-clicking the Start menu button and clicking on the Windows PowerShell (Admin) option at the context menu.
- If you see Command Prompt instead of PowerShell at that spot, you can also search for it in the Start menu or the search bar next to it. This time, make sure you right-click on the first result and choose Run as administrator.
- In the Powershell console, type in “cmd” and stay patient for Powershell to switch to the cmd-like window which might appear more natural to Command Prompt users.
- In the “cmd”-like console, type in the command shown below and make sure you click Enter afterwards:
wuauclt.exe /updatenow
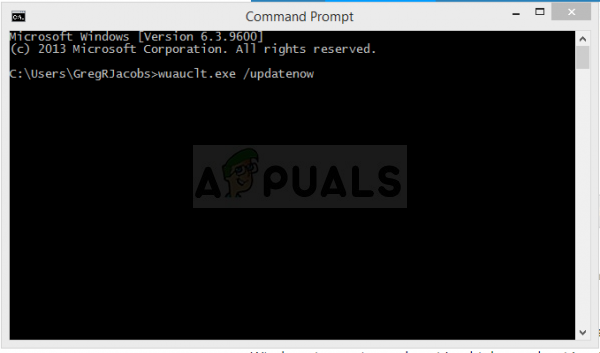
- Let this command do its thing for at least an hour and check back to see if any updates were found and installed without issues. This method can be applied to all Windows operating systems, including Windows 10.
Solution 8: Disable Nvidia Overlay
In some cases, the issue might be triggered due to a conflict the Nvidia Overlay which prevents certain components of the game from loading properly. Therefore, in this step, we will be disabling the Nvidia Overlay. For that:
- Click on the “System Tray” and then right-click on the “Nvidia” icon.
- Select “Geforce Experience” and then click on the “Settings” cog.
- Click on the toggle in front of “In-Game Overlay” to turn it off.
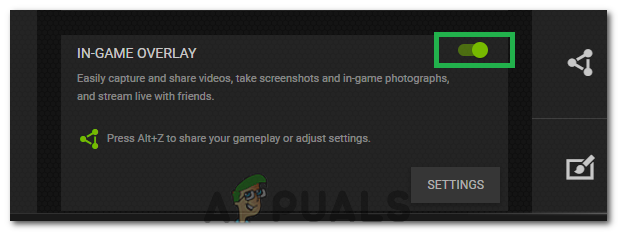
Turning Off In-game Overlay - Check to see if the issue persists.


Easiest fix: Check the “Run this program in compatibility mode for: Windows 8” box.