Fix: Windows Update Error 0x80240034
0x80240034 is a Windows Update Error which is seen in the Windows Update pane when an update fails to install.
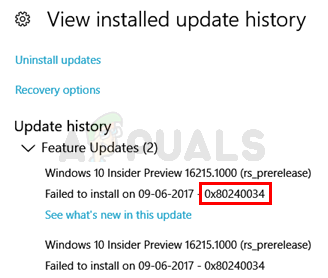
You might see the error 0x80240034 when trying to update your Windows 10. Your Windows Update will get stuck at 1% and it will fail after a while. If you then click on the View Installed Update History, you’ll see the error code 0x80240034 for the failed updates. This will keep happening every time you try to update your Windows. Also, keep in mind that this isn’t happening for a specific version of the Windows Update. People are experiencing this problem on various different Windows builds. Another thing worth mentioning is that some users are seeing a different error code when their Windows Update fails but they still see the error code 0x80240034 when checking the Windows Update history.
Although we aren’t 100% sure of what causes this error but the most likely cause of this problem is corrupted update files. That is why the most common solution for this problem is a reset of the Windows update cache. We have also noticed that a lot of people solved the issue by using the ISO and selecting the Do not keep previous settings option during the update. So it might have to do something with transferring previous settings via the update client.
Method 1: Clear Windows Update Cache/Distribution Folder
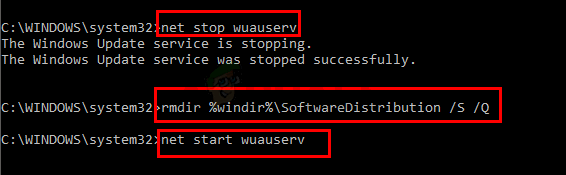
Clearing the Windows Update cache has worked for plenty of users. You can clear the Windows Update cache by deleting the contents of the Windows SoftwareDistribution folder. Apparently, Windows cannot clear and re-download the update contents once they are corrupted. So, clearing this folder will make Windows re-download the contents and resolve the issue.
So, follow the steps given below
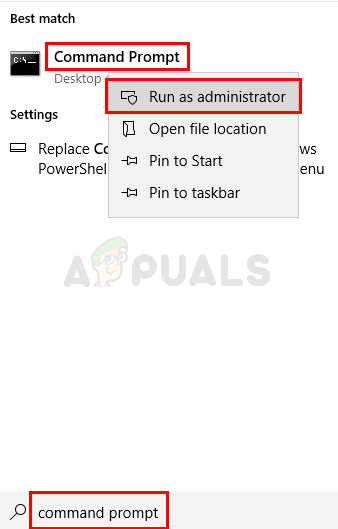
- Press Windows key once
- Type command prompt in the Windows Start Search
- Right click Command Prompt from the search results and select Run as administrator
- Type net stop wuauserv and press Enter
- Type rmdir %windir%\SoftwareDistribution /S /Q and press Enter
- Type net start wuauserv and press Enter
Once done, try to update the Windows and it should work fine.
Method 2: Update via ISO File
If method 1 didn’t solve your issue then it’s time to use a Windows ISO. This means that you will create a Windows 10 bootable media and use that install the latest version of Windows 10. A lot of the users solved the issue by using this method. The reason why this works has something to do with the Windows Update client. Windows Updates downloaded from regular Windows Update client seem to create issues like this but the issue doesn’t happen when the same Windows Updates are downloaded and installed via an ISO file.
Note: When you’ll use the Windows 10 ISO file, you’ll be asked to select what you want to do with your previous settings and apps. Unfortunately, majority of the users solved the issue by selecting Not to keep the old Windows settings. If you are one of those people who doesn’t want to lose their previous settings then our advice is to first try to update the Windows while keeping the old settings. If it works then that’s great, otherwise you can decide whether to install the latest version of Windows without keeping the settings or not.
Note: If you decide to do a clean install then don’t forget to backup your important data.
So, follow the steps given below to update Windows 10 via ISO file.
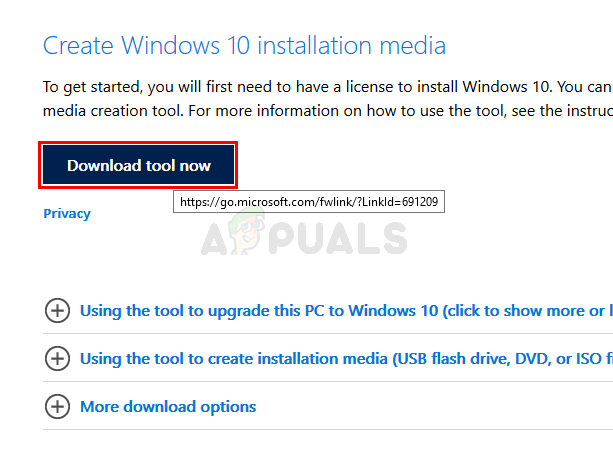
- Click here and click Download Tool Now
- Click the option Use the tool to create installation media (USB flash drive, DVD, or ISO file)… and follow the instructions given in that section

- Select the ISO file option in step 5 (since we will be using ISO to update Windows)
- You should have an ISO file once you are done
- Now, navigate to the location where you downloaded the ISO file
- Right click your Windows 10 ISO file and select Open with and then select File Explorer
- Double click setup.exe
Now follow the on-screen instructions. Select either Nothing (clean install) or Keep personal files only option when asked. DO NOT select Keep personal files, apps, and Windows settings because that hasn’t worked for anyone. Choosing not to keep any settings has solved the issue for majority of the users. You can then proceed and follow the on-screen instructions. Choose the options that suit you the best.
You should be able to update the windows with this methods.


How to grant access for removing the Download in SoftwareDistribution?? I try method 1 and I got Access Denied. Thanks in advance.