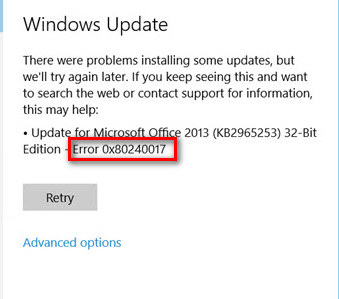
Fix: Windows Update Error 0x80240017
The 0x80240017 error typically appears after a failed update performed by WU (Windows Update) or after a failed installation of Visual C++ Redistributable Packages for Visual Studio. In some rare cases, the issue might also be produced by a 3rd party antivirus conflict.
Update: This issue is also reported to occur with certain printer drivers that fail to update via Windows Update.
If you’re currently encountering this particular issue, the methods below might help. We have managed to identify quite a few potential fixes that other users in a similar situation have used to resolve the issue. Please follow each potential fix in order until you discover a fix that resolves the 0x80240017 error on your machine.
Note: Before you follow any of the potential fixes below, please make sure that the issue is not caused by a 3rd party antivirus conflict. To test this theory, either disable the real-time protection of your external antivirus or uninstall it from your system temporarily.
Method 1: Using the Windows Update troubleshooter
Although the built-in Windows Update troubleshooter is notoriously known for being unhelpful, several users have confirmed that the utility has managed to actually fix the 0x80240017 error.
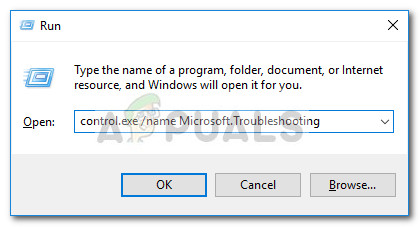
Here’s a quick guide to opening the Windows Update Troubleshooter and using it to fix the 0x80240017 error:
- Press Windows key + R to open up a Run box. Then, type “control.exe /name Microsoft.Troubleshooting” and hit Enter to open the Troubleshoot screen.
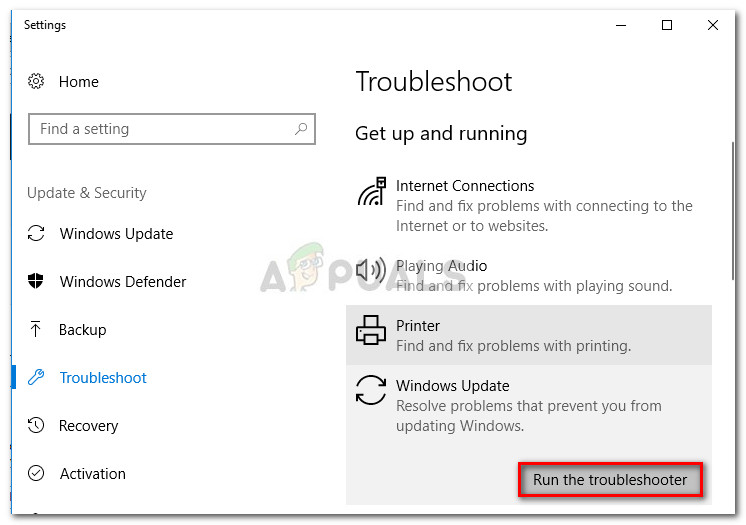
- Inside the Troubleshoot screen, click on Windows Update and then choose Run the troubleshooter.
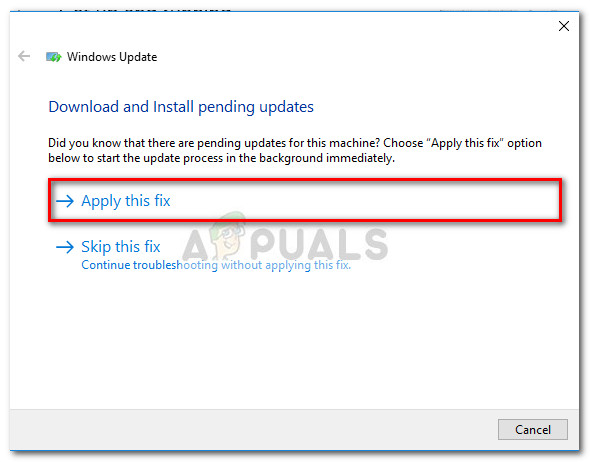
- Wait until the troubleshooter detects potential issues (if it does), then hit the Apply this fix button.
- Next, you’re in for another waiting period until Windows applies the automatic repair strategies. Wait until the process is complete, then you can safely close the Windows Update Troubleshooter.
Once the process is complete, attempt to perform the update/installation again and see if the 0x80240017 error has been resolved. If you’re still seeing the same symptoms, continue with Method 2.
Method 2: Resetting the Windows Update Components
Given the fact that this is primarily a Windows Update issue, it can typically be resolved by resetting the WU (Windows Update) components manually. From all the methods featured in this guide, this method had the highest degree of success in resolving the 0x80240017 error for other users encountering the same problem.
This method involves using an elevated command prompt to manually reset the Windows update components. Although it will require you to get quite technical, we offer guidance every step of the way. Here’s what you need to do:
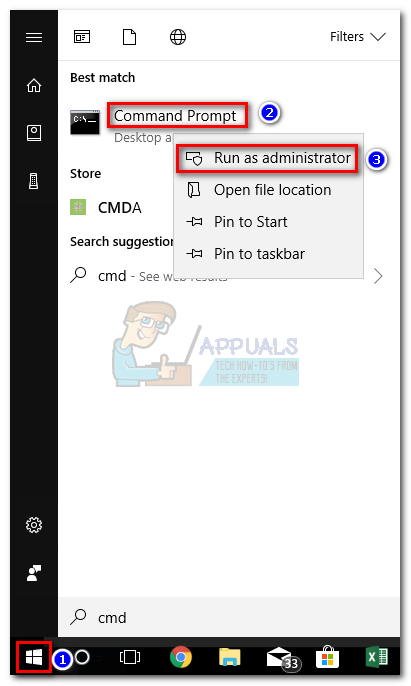
- Access the Windows Start bar in the bottom-left corner and search for “cmd“. Then, right-click on Command Prompt and click on Run as Administrator to open an elevated Command Prompt.
 Note: Performing the next steps in a regular Command Prompt window will not work since you won’t have the necessary permissions. Make sure the Command Prompt that you open is elevated.
 - In the elevated Command Prompt, insert the following commands and hit Enter. You can either paste them all at once or type and run each one individually.net stop wuauserv
net stop cryptSvc
net stop bits
net stop msiserver
ren C:\Windows\SoftwareDistribution SoftwareDistribution.old
ren C:\Windows\System32\catroot2 catroot2.old
net start wuauserv
net start cryptSvc
net start bits
net start msiserver
pause - Close the Command Prompt window and try to perform the update/installation again to see if the issue has been resolved.
If you’re still encountering the same issue, move over to Method 3.
Method 3: Installing the printer’s driver manually (if applicable)
Some users have reported that the 0x80240017 error might also occur whenever Windows Update fails to update a printer driver. This is quite a common occurrence with Canon and HP printers. Whenever this happens, a similar message will be displayed inside the Windows Update screen:
HP driver update for HP LaserJet M1530 MFP Series PCL 6 – Error 0x80240017
If you’re also encountering the 0x80240017 error due to a bad printer driver installation, the fix is quite simple. Most users encountering this particular scenario managed to solve the problem by manually installing the latest version of the driver. Here’s a quick guide to doing this:
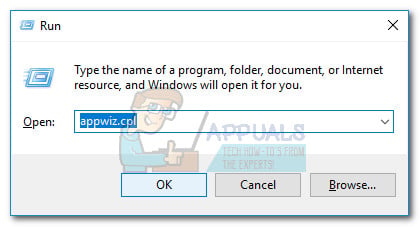
- First, let’s uninstall all components from your old printer driver. To do this, press Windows + R to open up a Run box, type “appwiz.cpl” and hit Enter to open Programs and Features.
- In Programs and Features, scroll through the application list and uninstall the driver suite associated with your printer manufacturer by right-clicking and choosing Uninstall.
- Follow the on-screen prompts to remove the driver suite from your system, then reboot your machine.
- Once your computer boots back up, visit your printer manufacturer website and download the latest driver version associated with your printer’s model.
- Open the installer and follow the prompts to install the latest printer driver, then reboot your computer again.
- Once your computer boots back up, the printer driver should function properly and the 0x80240017 error should no longer be displayed inside Windows Update.
If this method wasn’t successful or wasn’t applicable, move down to Method 4.
Method 4: Running an SFC scan and a DISM command
As some users have pointed out, the 0x80240017 error might also happen due to some underlying system file corruption. To test this theory, let’s use a Microsoft-developed tool to scan your system for any corruption occurrences and fix them.
System File Checker (SFC) is a built-in Windows tool that scans for corrupted system files that might be causing corruption-related issues. If any inconsistencies are found during this scan, the utility will automatically replace the corrupted files with new and healthy ones.
Here’s a quick guide to triggering an SFC scan with the hopes of fixing the 0x80240017 error.
Note: If these first steps don’t produce results, follow the steps directly below to deploy the DISM.
- Access the Windows Start bar (bottom-left corner) and search for “cmd“. Then, right-click on Command Prompt and click on Run as Administrator to open an elevated Command Prompt.
- In the elevated Command Prompt, type sfc/scannow and press Enter to start the scan.

- Wait until the process is complete. Keep in mind that depending on your system specifications and your hard disk space, this process might take a little under 20 minutes or well over it.
- Once the process is complete, check report to see if any inconsistencies have been addressed. But regardless of the outcome, reboot your computer to see if the issue has been resolved.
Note: Don’t worry too much if the final report doesn’t list any fixed inconsistencies. The SFC scan has a habit of fixing corrupted files without reporting it.
Once you’re computer boots back up, see whether the 0x80240017 error has been addressed. If you’re still seeing the same issues, proceed with the next steps of deploying the DISM.
The Deployment Image Servicing and Management (DISM) is yet another command-line utility capable of fixing system file corruption. Opposite to the SFC scan that uses a local backup to replace the corrupted files, DISM uses a WU component to download healty files from the internet. With this in mind, make sure your internet connection is stable before starting following the steps below:
- Click on the Windows Start bar (bottom-left corner) and search for “cmd” or “command prompt”. Then, right-click on Command Prompt and click on Run as Administrator to open an elevated Command Prompt.
- In the elevated Command Prompt, paste the following DISM command and press Enter:
DISM /Online /Cleanup-Image /ScanHealthNote What this command does is scan the currently used Windows image for any underlying corruption. - Once the audit process finishes, type to the following command and hit Enter:
DISM.exe /Online /Cleanup-image /RestorehealthNote This type of DISM scan will automatically perform repair strategies on any corruption-plagued file that it manages to find. - Once the process is finished, close the elevated Command Prompt and reboot your computer. Then, Check if the issue has been resolved when your computer boots back up.


Your DISM commands are incorrect
DISM /Online /Cleanup-Image /ScanHealthNote:
DISM.exe /Online /Cleanup-image /RestorehealthNote:
should be
DISM /Online /Cleanup-Image /ScanHealth
DISM.exe /Online /Cleanup-image /RestorehealthCheers!