4 Methods to Solve “Windows Setup could not configure” Error
There are quite a few error codes which will definitely annoy every user. However, this one differs from the rest as it won’t allow you to even install Windows on your computer in the first place, as can be understood from the error message.
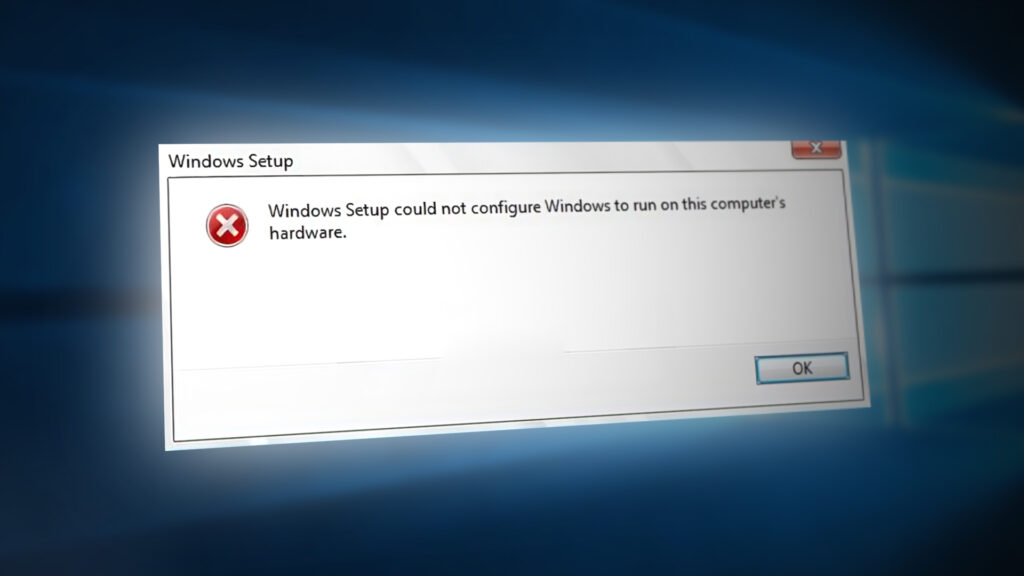
The error usually appears when trying to run Windows Setup and the process simply stops with the message above. This is a clear sign that something is wrong on your computer, especially if you own a PC which can support the version of Windows you are trying to install. Follow the steps below to try and solve the problem easily.
Solution 1: A Command Prompt Tweak
This tweak has proven itself useful to countless users who struggled with this error message for months and it’s amazing how the solution can turn out to be so easy yet so difficult to think off. The solution should be executed the first time you see the error when only starting the installation of Windows and you should be able to go through the installation process successfully.
- Once you receive the error message on your PC while the Windows installation media is still connected to your computer, use the Shift + F10 key combination in order to bring up a Command Prompt window.
- Type in the following commands and make sure you click Enter after each one:
CD C:\windows\system32\oobe
msoobe
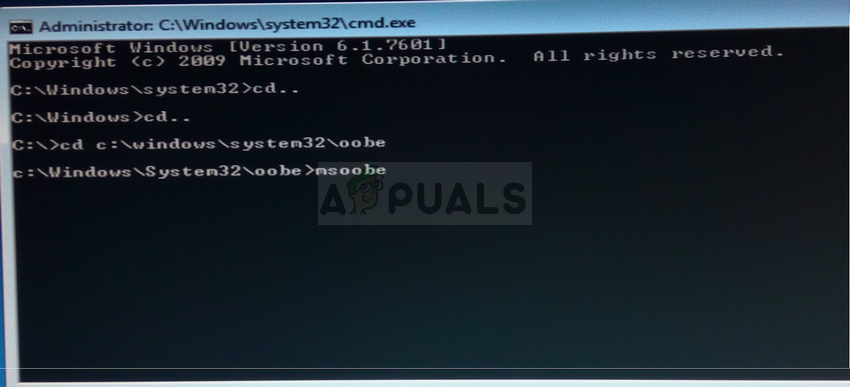
- Check to see if you are able to continue with the process once again.
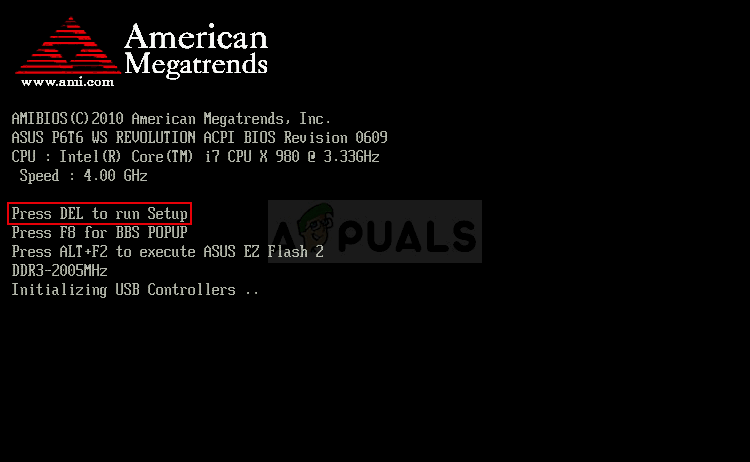
Solution 2: Change Some BIOS Settings
There are several caused for this problem, but one of them is definitely the fact that there are certain settings in BIOS which works great for older versions of the Windows operating system but they display poor execution on Windows 10 and it can often cause this error to occur. Follow the steps below in order to fix this.
- Turn off your computer by going to the Start Menu >> Power Button >> Shut down.
- Turn your PC on again and try to enter BIOS settigns by pressing the BIOS key while the system starts. The BIOS key is typically displayed on the boot screen, saying “Press ___ to enter Setup.” There are other common messages as wel. Common BIOS keys are F1, F2, Del, Esc and F10. Note that you will have to be quick about this as the message disappears pretty fast meaning you will need to restart to try again.
- The SATA option which you will need to change is located under various tabs on BIOS firmware tools made by different manufacturers and these is no general rule to where the setting should be located. It’s usually located under Onboard devices entry, Integrated Peripherals, or even simply under the Advanced tab. No matter what, the name of the option is SATA operation.
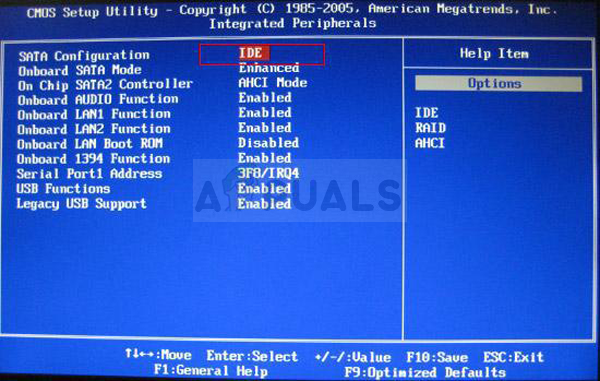
- Once you locate the correct settings, change it from AHCI or RAID, ATA, or IDE. ATA is the most reasonable option for the process of installing new updates or upgrading. Navigate to the Exit section and choose to Exit Saving Changes. This will proceed with the boot. Make sure you try to run the update again.
Note: If the setting was not AHCI to begin with, try changing it to something else no matter what as there are cases where any change produced great results! - Don’t forget to change the settings back to their original state after you have finished with the process and installed Windows 10 successfully on your computer.
Solution 3: Stop Overclocking Your CPU
Overclocking your processor usually causes these errors and it was confirmed by many users that the problem occurred when they started to overclock their PCs.
Overclocking is a process where you change the frequency and speed of your processor to a greater value and above the recommended factory settings. This can give your PC a significant speed advantage but you have to absolutely careful since there were situations where entire PCs went down in fire after users overclocked them too much or because they were careless.
Returning your CPU’s rate and frequency to its original state depends on which software you used to overclock in the first place. Intel and AMD have their own applications available to download which let users overclock their CPUs but there are dozens of programs available to choose from so use them to stop overclocking.
Stop overclocking your PC and check to see if the error appears again.
Solution 4: Having a Problem with a Certain Device
In order to be ready to apply this solution, first you will need to be sure that this is indeed causing the problem. You can check this by disconnecting or disabling various devices on your computer via Device Manager >> Right-click on device >> Disable Device. This way you can restart the process and check to see when the error does not appear -> that device is causing problems.
You should see the following message when you choose the install option if you are really having problems with your drivers in the first place:
“To continue installation, use the Load Driver option to install 32-bit and signed 64-bit drivers. Installing an unsigned 64-bit device driver is not supported and might result in an unusable windows installation”
This usually means that the driver for that specific device is not installing properly and you may need to load it manually. Follow the steps below in order to try and do it yourself.
- Download the driver for the device which is causing issues and extract it. You will need to end up with a .sys and a .inf file in order for the process to succeed.
- Copy these files to an external media device such as a USB driver, DVD, or CD, connect the device to your computer, and start the Windows setup by loading the Windows installation media and restarting your computer. This time, it’s important that you don’t choose install. Choose the Repair option and choose the Load driver option.
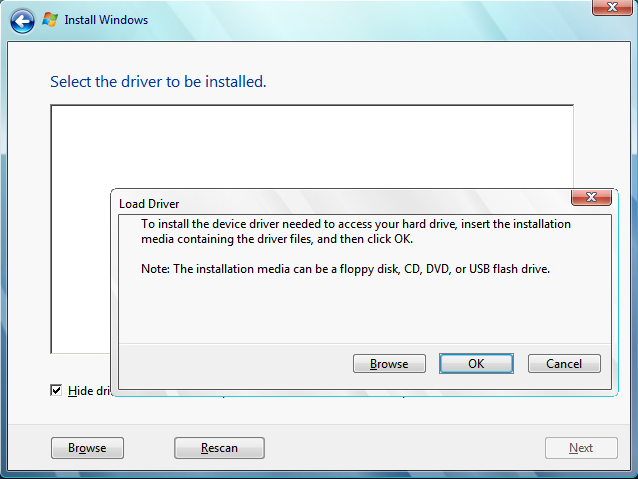
- Navigate to your unsigned driver which should be located at the root folder of the device you used to save the driver to. Wait for the scanner to locate the driver and click the x button in order to close the Repair window.
- Now you can choose the install option and proceed with the normal installation of Windows.


I have the same problem trying to install windows 10 on a MacBook Air, and I haven’t the slightest idea how to fix it.
Maybe you have any solution.
Thank you