3 Solutions to fix ‘Windows no longer detects a homegroup’
A HomeGroup is a collection of Windows computers connected to each other on a Local Area Network (LAN) that can, through the network, share printers and files with one another. Windows’ HomeGroup feature is extremely useful for people with more than one Windows computer at home as it makes sharing printers and files between computers a piece of cake. However, when trying to connect a Windows 10 computer to a HomeGroup that already exists on the network, Windows users have often reported the computer not being able to connect to the HomeGroup and instead displaying an error message that states:

“Windows no longer detects a HomeGroup on this network. To create a new HomeGroup, click OK, then open HomeGroup in Control Panel.”
In most cases, this problem is seen after upgrading all of the computers on an already existing HomeGroup to Windows 10 with the HomeGroup still active. If a user affected by this problem click on OK and navigates to HomeGroup in the Control Panel, they are not provided with any option to create a new HomeGroup – they only see an option to join the already existing HomeGroup. It is always better to decommission an existing HomeGroup before upgrading all the computers on the HomeGroup to Windows 10, but not everyone is privy to this knowledge while upgrading.
Thankfully, though, this problem can still be fixed post-Windows 10 upgrade, and the following are some of the absolute most effective solutions that a user affected by this issue can use to try and fix it:
Solution 1: Disable any and all antivirus and firewall programs on the affected computers
In many cases, what is preventing the affected computers from joining the existing HomeGroup in the first place can be something as trivial as an antivirus or firewall program – either stock or third-party. That being the case, the first possible solution any user affected by this specific issue should try is to disable any and all antivirus and firewall programs on every single one of the affected computers, and then try to have the computers join the HomeGroup. If you still see the “Windows no longer detects a HomeGroup on this network.” error message when trying to connect the affected computers to the HomeGroup, however, you should move on to some of the juicier solutions.
Solution 2: Leave the HomeGroup on the computer that created it and then create a new HomeGroup
- On the computer that was used to create the existing HomeGroup, quit/leave the HomeGroup. This should now allow for a new HomeGroup to be created on the network.
- Create a new HomeGroup on a computer other than the one you created the old HomeGroup on. While creating a new HomeGroup on the same computer as the one that was used to create the old HomeGroup works in most cases, it is still recommended that you use a different computer for the job.
- Make note of the HomeGroup password you get once the new HomeGroup has been created.
- One by one, on all of the other computers that are on the network, join the new HomeGroup using the new HomeGroup password, and they should connect to the new HomeGroup without fail.
Solution 3: Remove all traces of the old HomeGroup and create a new one
If neither of the solutions listed and described above worked for you or if you are simply not getting an option to quit or leave the old HomeGroup on the computer the old HomeGroup was created on, fear not – you still have one more shot at resolving this problem. Countless Windows 10 users who have been affected by this problem in the past have been able to resolve it by getting rid of every trace of the old HomeGroup and creating a new HomeGroup on a computer other than the one that was used to create the original HomeGroup. To apply this solution, you need to:
- On every single computer you wish to have connected on the new HomeGroup that you will create later on, navigate to the following directory and delete all of the PeerNetworking folder’s contents:
X:\Windows\ServiceProfiles\LocalService\AppData\Roaming\PeerNetworking
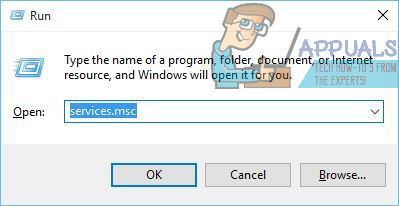
Note: Replace X in the directory described above with the drive letter corresponding to the partition of your computer’s hard drive that Windows is installed on. Also, the AppData folder is a hidden folder, so you are going to have to navigate to the View tab of Windows Explorer, click on Options, navigate to the View tab, scroll down and check the Show hidden files, folders and drives option, and click on Apply and then on OK to see the AppData folder. - On every single computer you want on the new HomeGroup, press the Windows Logo key + R to open a Run dialog, type services.msc into the Run dialog and press Enter to launch the Services manager, scroll down and locate the HomeGroup Provider service, right-click on it and click on Stop to stop it.


- Turn ALL of the computers connected to the network off.
- Turn on any one computer on the network that was NOT the computer the original HomeGroup was created on.
- The computer you turn on will not see any trace of an existing HomeGroup on the network, so it will allow you to create a new one. Go ahead and create a new HomeGroup on the network using this computer.
- Once the new HomeGroup has been created and you have the HomeGroup password, turn the other computers on the network on one by one and have them join the new HomeGroup – they should now be able to do so successfully.