Fix: Windows Installation Error 0x80070017
The error code 0x80070017 usually refers to bad install media. Typically, it will occur in one of two cases: when trying to install/reinstall Windows or when installing a Windows update. This error code can be encountered with any Windows version regardless of your system specifications.
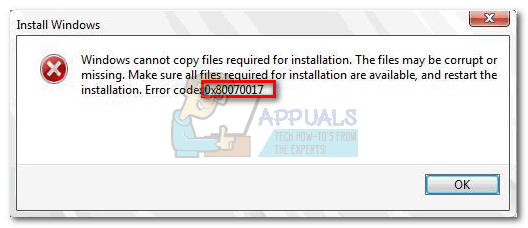
If you get this error while installing/reinstalling Windows, you’ll see it as follows:
Windows cannot copy files required for installation. The files may be corrupt or missing. Make sure all files required for installation are available and restart the installation. Error code 0x80070017.
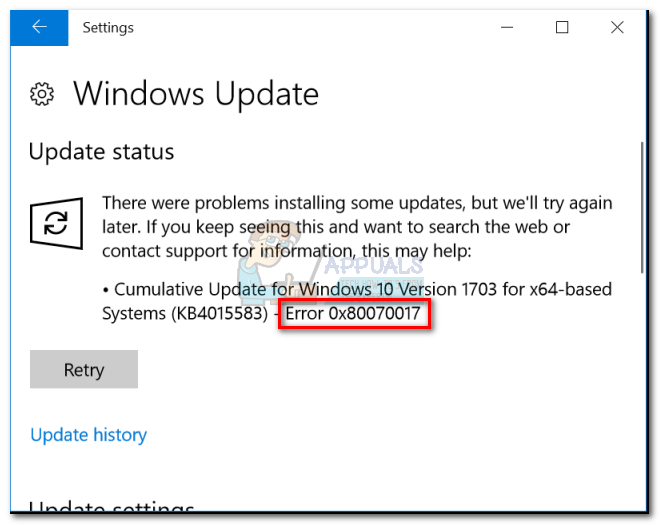
You might also encounter the 0x80070017 error after a Windows Update fails.
Essentially, the error 0x80070017 is signaling that the files that are being copied from the disk (or cloud) are not transitioning into your hard drive with the same structure. This could either mean that the original files are being modified, changed or corrupted while being copied to their destination. But most of the time, you’ll deal with corrupted files or bad sectors.
Because there are two different scenarios in which the error 0x80070017 can be encountered, we have created two separate troubleshooting guides. Please follow the methods appropriate to your situation. Use Method 1 and Method 2 if you’re seeing the error when installing / reinstalling Windows. If you’re seeing the error after a Windows update failed, follow Method 3 and Method 4.
The 0x80070017 error appears when installing / reinstalling Windows
The 0x80070017 error is one of the most common error codes encountered when users try to install a fresh copy of Windows. Although this can be a drive problem, most of the time it will be a bad disk. Since the error code is signaling an error during install or corrupted media installer, you should start your troubleshooting quest by making sure that the Windows ISO is optimal.
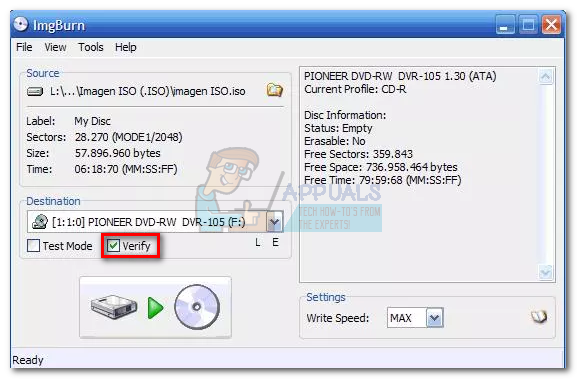
Method 1: Re-burn the ISO file optimally with integrity check
DVDs are prone to develop bad sectors over the years, so there’s a high chance that you’re dealing with a bad Windows installer DVD. If you have the means, start your troubleshooting quest by burning the ISO to a new disk. Then, do a clean re-install from it.
Note: Make sure you burn the DVD with a reliable burner such as ImgBurn at an optimal burning speed (4x, max 8x). If possible, instruct your burner software to verify the integrity of the DVD at the end of the writing cycle. In ImgBurn, this is done by checking the box next to Verify.
If you’re getting the same 0x80070017 error at the exact same place from the new disk, you might be dealing with a corrupted ISO file. In that case, re-download the ISO file and burn it to a new disk.
Note: If you have a viable Windows license, you can visit Microsoft’s website and insert your product key to receive the ISO file (for Windows 7) or use the Media Creation Tool (for Windows 8, 10) to download the ISO. You can use these links to fetch the official Windows installation ISO and then burn it to a new disk.
Method 2: Installing Windows from a flash stick
If Method 1 didn’t work, you should turn your attention towards your DVD drive. Although this is less common, the optical drive can go bad and trigger the 0x80070017 error while failing to read the contents of your Windows installation media disk. However, we can avoid using a faulty optical drive by transferring the Windows installation ISO to a flash disk and making it bootable.
Depending on your Windows version, the next steps will be different. Microsoft has developed a dedicated software capable of making your USB bootable for installation purposes, but it only works with Windows 8.1 and Windows 10. If you have an older Windows version follow the second guide.
1. Windows 8.1 and Windows 10
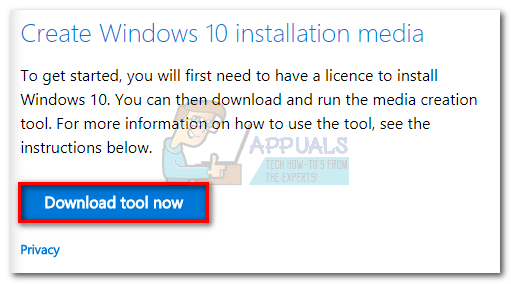
If you own a licensed copy of Windows 8.1 or Windows 10, you can use the Windows Media Creation tool to create a bootable USB. This way, you can avoid using your DVD drive when performing re-installing your OS. The setup is extremely easy, just make sure you have a working internet connection, sufficient data storage on your computer and a blank USB external drive of 8 GB or more. Here’s a quick guide to using the Media Creation Tool:
- Download the Media Creation Tool from Microsoft’s website.
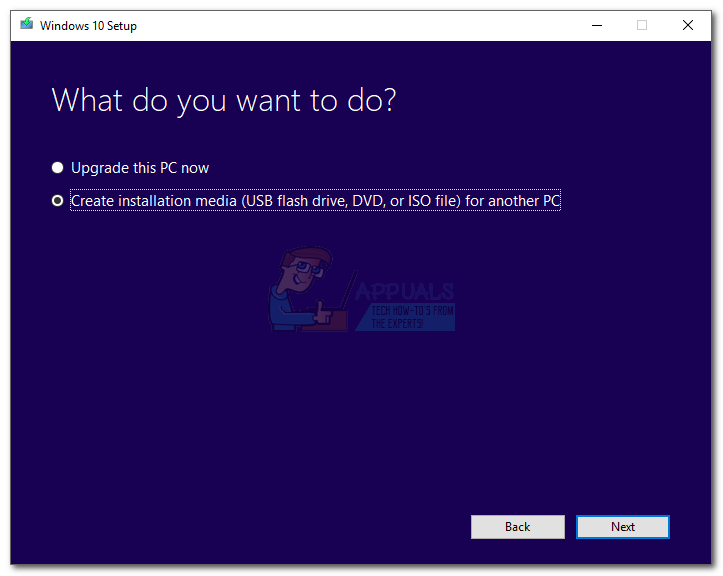
- Start the Media Creation Tool and hit Accept to agree to the license terms. Then select Create installation media for another PC and hit Next.
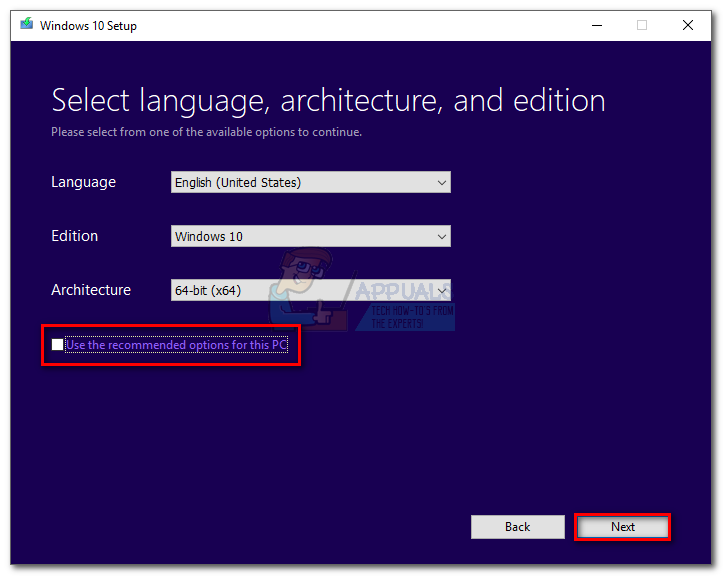
- In the next window, you’ll need to select your Language, Windows version, and Architecture. You can also automate the process by checking the box next to Use the recommended options for this PC. But keep in mind that this will automatically set the edition to Windows 10. If you have Windows 8, set it manually.
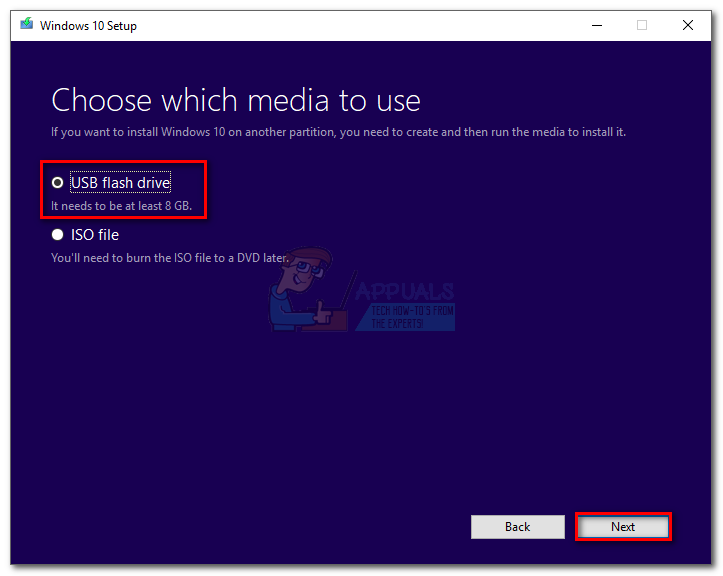
- Select USB flash drive an hit Next.
- Now insert your flash USB disk, select it inside the Media creation tool and hit Next to continue. You might need to hit refresh a few times until it becomes visible.
 Note: Keep in mind that the previous contents of your USB flash drive will be lost. If you have anything important on the drive, move it before using the Media creation tool with the flash drive.
 - The software will automatically format your flash drive, download the Windows image and make it bootable.

- At the end of the process, your flash drive should become bootable. Restart your device and re-install Windows from it.
Note: If it doesn’t boot up, enter your BIOS / UEFI settings and make the USB first on the boot priority list.
2. Windows XP, Windows Vista, Windows 7
Unfortunately, Microsoft has not officially provided the means of making Windows 7 or older bootable from a flash drive. Because of this, we are forced to use a 3rd party solution in order to keep things simple.
If you have a valid Windows license key but you don’t have the ISO file, you can visit this link and enter your Windows product key. You will then be able to download the official ISO file to your computer.
Once you have secured the ISO file, it’s time to make copy it to a flash drive and make it bootable. By far, the easiest and most reliable solution I was able to find is by using the Universal USB Installer. Here’s a quick guide to using it:
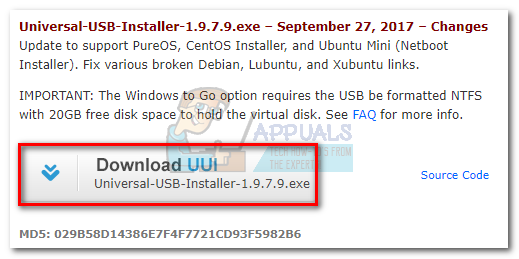
- Download the Universal USB installer from this link.
- Open Universal USB installer and access the drop-down menu under Step 1. Then, select the installer appropriate to your Windows version.
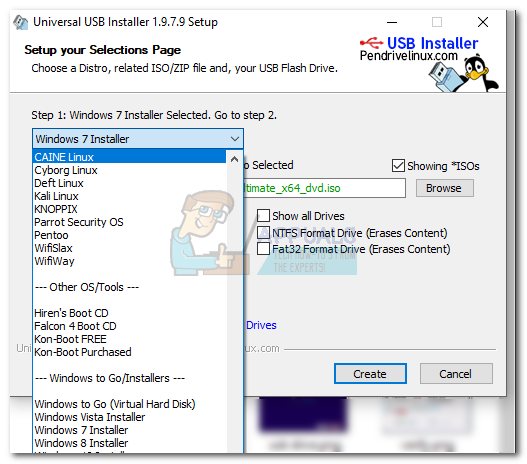
- Move down to Step 2 and hit the Browse button. Then, select your Windows ISO file and hit Open to load it into the Universal USB Installer.
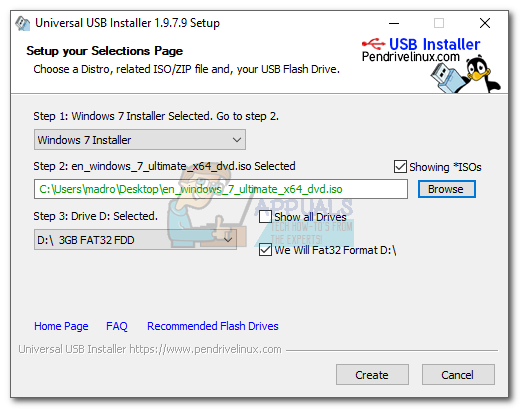
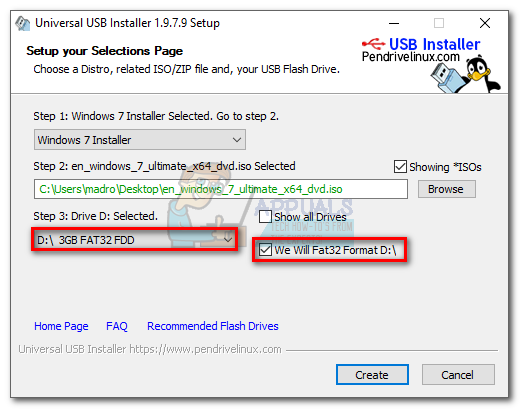
- At Step 3, use the drop-down menu to select your flash drive. Make sure it has enough space to accommodate the ISO image. Finally, check the box next to We Will Fat32 Format.
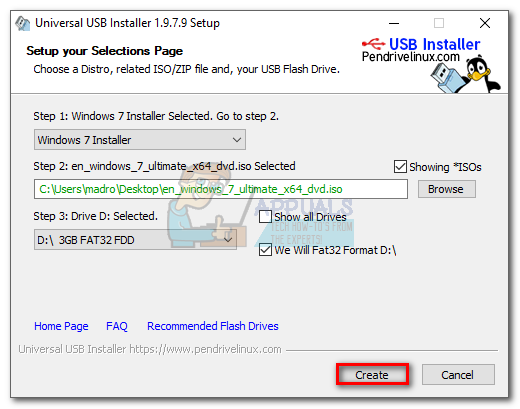
- Once everything is in order, click the Create button and wait for your flash drive to become bootable.
- Boot from your USB drive and install Windows that way. The installation should succeed without the 0x80070017 error.
The error 80070017 appears when Installing a Windows Update
If you’re seeing the error 80070017 after a Windows update fails, your computer is either having problems when fetching the update files or when it tries to install them on your system. In situations like this, the fault is usually on the Microsoft servers responsible for deploying the updates, but that’s not a given fact.
You have two ways forward: you either run the Windows update troubleshooter and hope that it fixes the issue automatically or apply the Windows update manually via the Windows Update Catalog.
Method 3: Running the Windows Update troubleshooter
Windows Update Troubleshooter is not particularly effective, but some users have reported that it managed to eliminate the 80070017 error. Before you use this tool, make sure your internet connection is functioning properly. Then, follow the steps below:
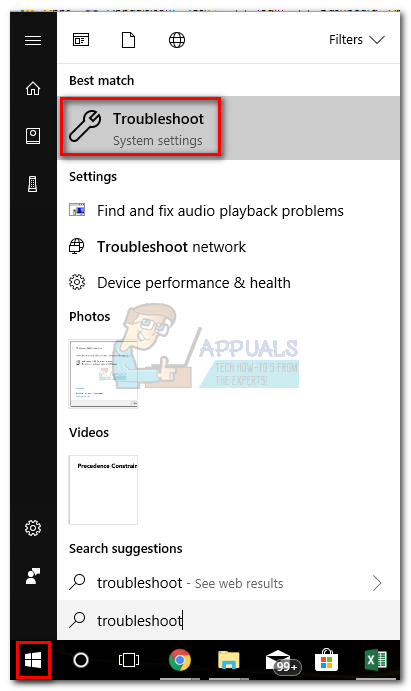
- Press the Windows start bar in the bottom-left corner, search for “troubleshoot” and access the Troubleshoot tool.
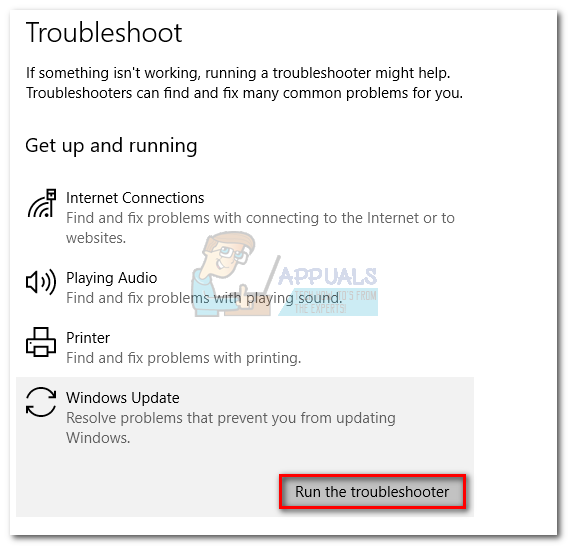
- Select Windows Update, then click on Run the troubleshooter.
- If the troubleshooter manages to find an underlying problem, you will be prompted to restart.
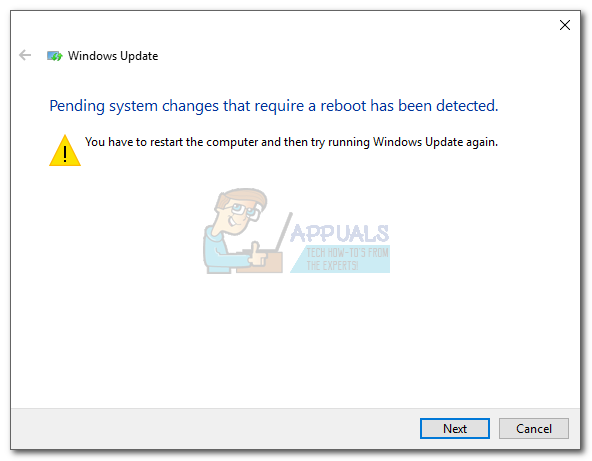
- After the restart, return to the Windows Update menu and attempt to re-apply the update.
Method 4: Update manually via Windows Update Catalog
If the Update troubleshooter didn’t solve the problem, you can download the Windows update files manually and install them on your system. You’ll need to access the Windows Update Catalog and search for that specific update by the kb number. Here’s a step-by-step guide on how to do this:
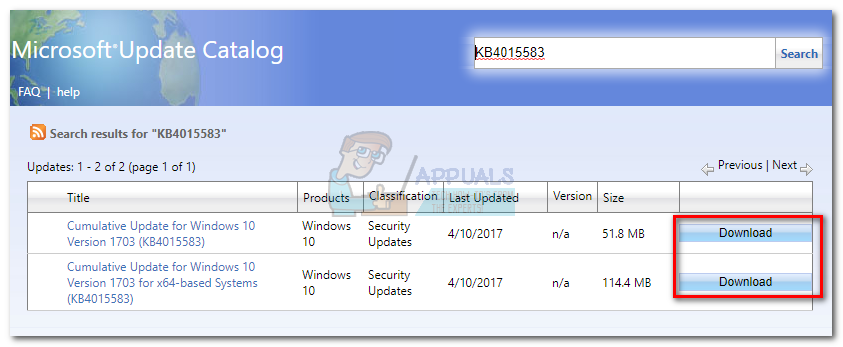
- First, go to Windows update and identify the update the is failing to install and copy the KB number. You’ll need later to query the Microsoft Update Catalog.

- Next, visit the Windows Update Catalog website and paste the KB number into the search bar.

- Now click the Download button associated with the architecture of your system. Do not download the x64 version if you have a 32-bit architecture because it will not install correctly.
 Note: If you disabled Internet Explorer on your system, the download will not start. Alternatively, you can open the link in Edge.
 - Once the .msu file is downloaded to your system, open it and follow the on-screen prompts to install it.
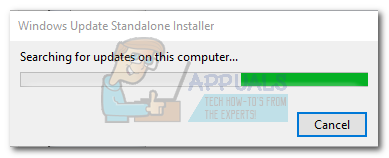
- Restart your system and return to Windows update to see if the update is applied.
after boot it whith a flash disk
my data will be saved?