Fix: Windows Hello isn’t available on this Device
Both smartphone and PC manufacturer are currently racing in order to come up with new security features for their products because of the simple fact that people are getting scammed and robbed more often than ever. The new increase is smartphone and PC usage let to people using their device without having much experience beforehand.
These people are usually the target of these attacks because they have never experienced these scams before. However, people are also being robbed of their mobile phones because of the fact that they are more expensive than the money that they carry in their pocket and they usually carry their phones in their hands, making it easier for thieves. Let’s find out about this issue regarding Windows 10 security.
“Windows Hello isn’t available on this device” Error on Windows 10
Windows Hello is a new features which made its debut in 2015 when Windows 10 was released. It enables the users to protect their Windows 10 devices using facial recognition, fingerprint scanning, etc. It’s a great way of protecting your device because no one but you has access to your computer and they can’t hack their way in using brutal force as they could with usual passwords.
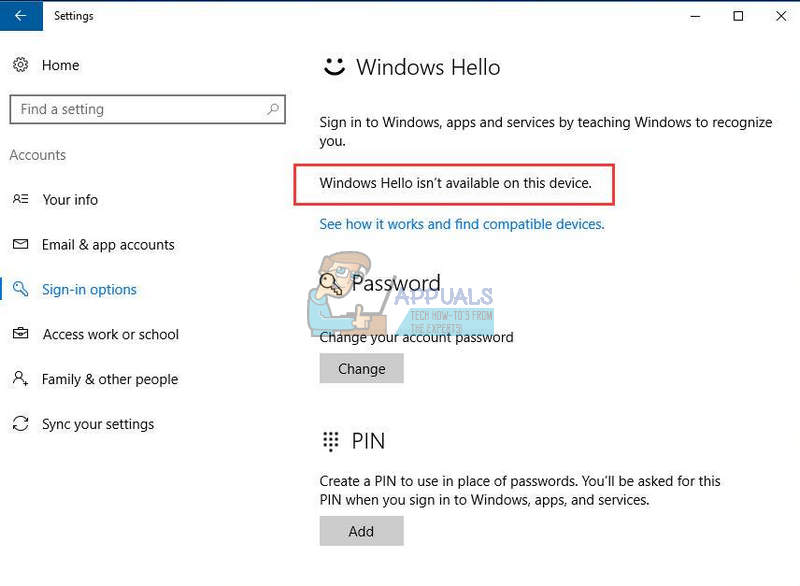
However, users started experiencing the issue after the Creators update where they couldn’t access their Windows Hello service after the update. Normally, your device needs to possess the device such as a fingerprint scanner to activate this service and it’s normal to expect the Windows Hello isn’t available on this device” message on devices which doesn’t support this feature.
Unfortunately, even devices which were running Windows Hello normally and which possess the required components started experiencing this issue. Find out how to fix this by following our simple guide.
Solution 1: Update Your PC To the Latest Version Available
First of all, you should check if your device is running the latest version of Windows 10 in order to start working on the issue. Usually the latest update released by Microsoft fixes these issues and it’s not difficult to get it working again after you install the latest Windows 10 build.
The updating process is quite simple on Windows 10 as the updates are installed automatically by default. However, you can check for updates manually by following the steps below:
- Use the Windows Key + I key combination in order to open Settings on your Windows PC. Alternatively, you can search for “Settings” by using the search bar located at the taskbar.
- Locate and open the “Update & security” section in the Settings app.
- Stay in the Windows Update tab and click on the Check for updates button under the Update status in order to check whether there is a new version of Windows available.
- If there is one, Windows should proceed with the download process automatically.

Alternatively, if your updating process is experiencing difficulties, Microsoft has enabled its users to download the updates manually from their Update Catalog site. Find out more below.
- Visit this site in order to find out just what the latest update is. It should be located at the top of the list at the left part of the site with the current Windows 10 version at the top.
- Copy the KB (Knowledge Base) number along with “KB” letters as well (e.g. KB4040724).
- Open Microsoft Update Catalog and search for the number you just copied.
- Click on the Download button to the left, choose the version of your OS (32bit or 64bit) and download the file.
- Run the file you just downloaded and follow the instructions on screen in order to complete the updating process.
- After the update has finished, restart your computer and check to see if your PC is running the latest version available.
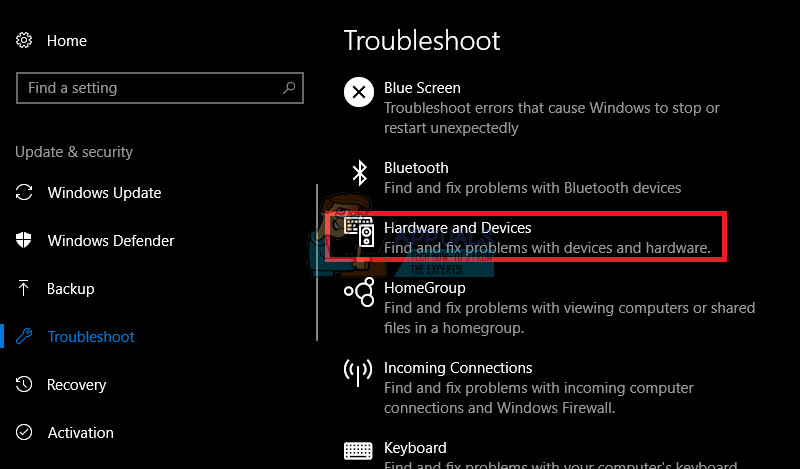
Solution 2: Run the Hardware and Devices Troubleshooter
Windows possesses several in-built troubleshooters which can fix some of the most common issues related to your hardware. This means that, if your fingerprint scanner or your webcam are experiencing some difficulties, this troubleshooter should be able to take care of them.
- Press Windows key from the keyboard, type Troubleshooting and select it.
- Click on view all option on the upper left corner of Troubleshooting window.
- Select the Hardware and Device options from the list.
- Click Next to run the Hardware and Device Troubleshooter.
Solution 3: Update the Bio-Metric Finger Print Reader in Device Manager
Drivers are a cause for many issues and users need to realize just how important it is to keep them up to date. New versions of Windows may run into conflicts with outdated drivers which will cause errors such as this one related to Windows Hello to appear. This time, you should worry about the Bio-Metric driver if the problem is related to the fingerprint scanner or some other driver if you are using some other form of security.
- Search for the “Device Manager” in the search bar located at the taskbar.
- Locate the Biometric devices option and expand by clicking on the arrow left to its name.
- Right-click on the device you are using to access Windows Hello (such as a fingerprint scanner) and select the Update Driver option.
- Restart your computer and check to see if Windows Hello is working again.
Note: If this doesn’t work for you, you can right-click on your Biometric device and select the Uninstall device option in order to remove the driver completely. After that, Google the name of the device and download the latest drivers from the manufacturer’s website.
Some people have also suggested that rolling back the driver fixed their issue. This option is also located at the context menu which appears after you right-click on the device.
Solution 4: Roll-Back Your Driver
Some people have also suggested that rolling back the driver fixed their issue. This option is also located at the context menu which appears after you right-click on the device. This solution is helpful because of the fact that this problem appeared after a certain update in most cases and rolling back the driver switches to the driver which was used before the problem even started.
- Open the Device Manager by searching for it in the Search bar.
- Navigate to your Biometric devices or Imaging devices if the problem is related to your webcam.
- Right-click on the device which is causing these issues and choose Properties.
- Click on the Roll Back Driver option under the Driver tab and follow the instructions on screen in order to switch to the previously installed driver.
- Restart your computer and check to see if Windows Hello is working again.
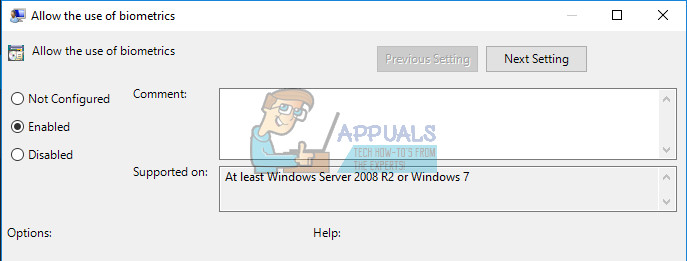
Solution 5: Check to See if Biometrics Are Enabled On Your Computer
Someone might have accidentally disabled biometrics on your computer or one of the programs you installed recently might have changed this without your permission. Either way, enable it by following the instructions below and check to see if Windows Hello is working again. Make sure you check this after you have tried all of the solutions above.
- Hold the Windows key and press the R button from your keyboard.
- Enter “gpedit.msc” in the Run dialog box, and press the OK button in order to open the Group Policy Editor.
- On the left section of Local Group Policy Editor, under Computer Configuration, double click on Administrative Templates, and navigate to the Windows Components >> Biometrics.
- Select the Biometrics folder, and navigate to its right side section.
- Double click on the “Allow the use of biometrics” policy option, check the box next to the “Enabled” option, and click Apply or the OK button to modify this setting.
- Finally, restart your computer in order to save these changes and check to see if Windows Hello is working again.
Solution 6: Reset the Fingerprint Device in BIOS Settings
Changing your BIOS settings is always a difficult step to casual users who are not so used to accessing this section simply because the interface is different from what they are used to. However, these settings are easy to change and you definitely won’t cause any damage as long as you don’t open any unknown settings and if you follow the instructions below carefully.
- Restart your computer and click the F8 button in order to open BIOS. It’s not necessarily the F8 key in all cases but make sure you click the button in the message at the bottom of the boot screen (the one where the logo and name of your PCs manufacturer is listed):
Press __ to run Setup
- BIOS settings are not the same for all manufacturers but make sure you are familiar with the controls because you are not able to use your mouse in BIOS.
- Navigate to the Security tab in BIOS nad click on the Fingerprint option.
- After it opens, navigate to the last option which should read “Reset Internal Fingerprint Data”.
- After a popup message appears saying “Reset Fingerprint data?”, choose Yes.
- Navigate to the Exit tab in BIOS and make sure you choose the Exist Saving Changes option since you will lose these changes if you exist in any other way.
- Wait for your computer to boot and check to see if the issue still persists.