Fix: Windows Hello is preventing some options from being shown
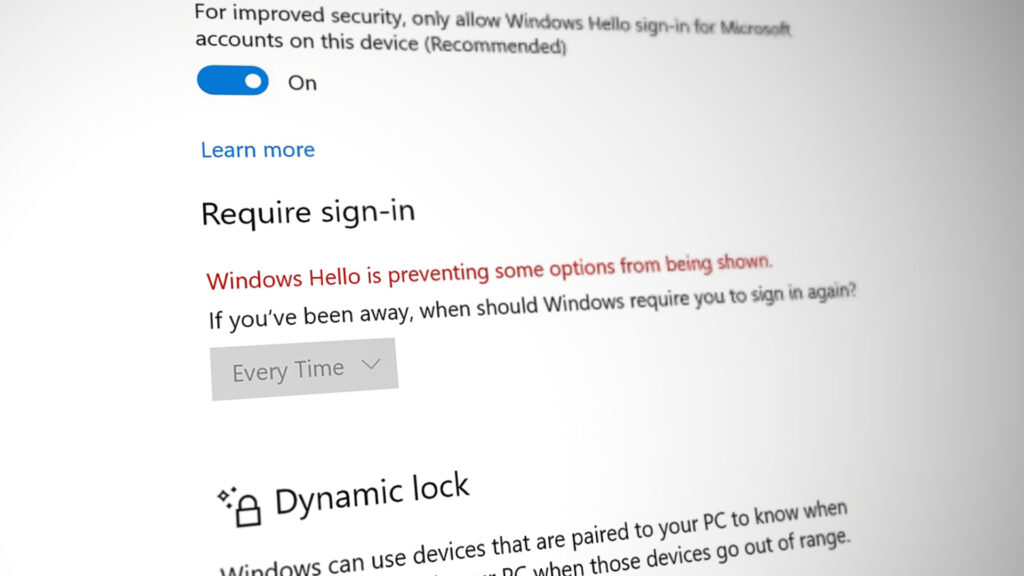
Some Windows 10 users report that they can no longer enable Windows Hello on their computer. Most of the time, the message that comes up is “Windows Hello is preventing some options from being shown”. This issue is most often reported by users who have recently upgraded to the Anniversary Edition or did a clean install to the equivalent build.

What is Windows Hello?
Windows Hello is a high-end way of signing into your Windows 10 devices. The technology facilitates enterprise-grade security without the use of traditional passwords. Depending on the Windows 10 device, you can use Windows hello to log-in with your face, fingerprint or iris.
What is causing the Windows Hello is preventing some options from being shown error?
We investigated this particular issue by looking at various user reports and the steps that they took to resolve the issue. From what we gathered, there are several reasons why this particular issue might occur:
- Windows Hello is managed differently starting with the Anniversary update – If you’re encountering the issue on a domain-joined computer, you should know that there have been some changes starting with the Anniversary update. Follow Method 2 for steps on resolving the issue for domain-joined computers.
- PIN Login is not authorized for the Domain user – A recent update forces the PIN Login feature to be authorized in order for Windows Hello to function properly. Follow Method 1 for steps on how to do so.
If you’re struggling to resolve this particular issue, this article will provide you with a list of troubleshooting steps. Below you have a list of verified methods that other users in a similar situation have used to fix or circumvent the issue. For the best results, follow the methods below in order until you stumble upon a fix that is effective in your particular situation.
Method 1: Authorising PIN Login via Registry Editor
Based on various user reports, it seems like starting with the Anniversary update, Microsoft has reverted the procedures behind using a PIN Logon for a Domain user back to how it was with Windows 8.
This means that PIN Logon for a Domain User needs to be authorized before Windows Hello can use it. Luckily, you can enable it quite easily by inserting a certain key in your Registry via Registry Editor.
Here’s a quick guide on what you need to do:
- Press Windows key + R to open up a Run dialog box. Then, type “regedit” and press Enter to open up the Registry Editor utility.

Run dialog: regedit - Inside the Registry Editor, use the left-hand pane to navigate to the following location:
Computer\HKEY_LOCAL_MACHINE\SOFTWARE\Policies\Microsoft\Windows\System
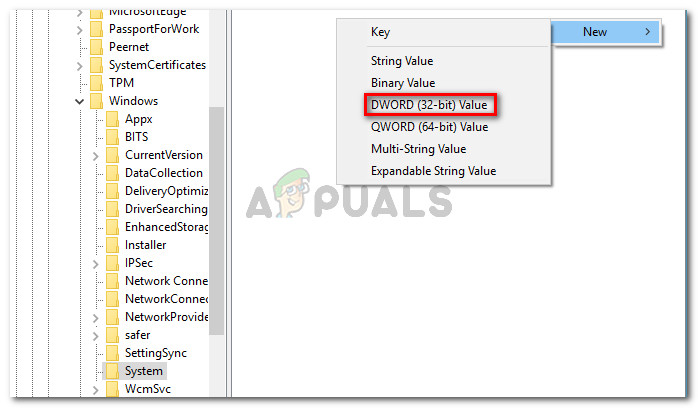
- Select the System key, then move over to the right-hand pane and create a new Dword value by right-clicking in a new space and choosing New > Dword (32-bit) value.

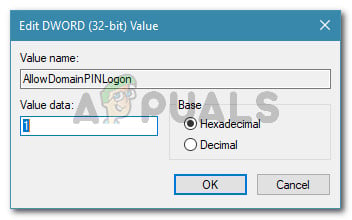
Creating a new Dword value - Name the newly created AllowDomainPINLogon. Then, double-click on and set the Base to Hexadecimal and the Value data to 1.

Name the newly created Dword to AllowDomainPINLogon and set it’s value to 1 - Close Registry Editor and restart your computer. At the next startup, see if the issue has been resolved.
If you are still seeing the “Windows Hello is preventing some options from being shown” error when trying to enable Windows Hello, move down to the next method below.
Method 2: Enabling Convenience Pin sign-in via the Local Group Policy Editor
Several users have managed to resolve the issue by using the Local Group Policy Editor to enable convenience PIN sign-in. This is theoretically the equivalent of using Method 1, but it can also be applied for enterprise use cases where you need to approach things with a domain mindset.
Here’s a quick guide on resolving the “Windows Hello is preventing some options from being shown” error by enabling the Turn on convenience PIN sign-in policy via the Local Group Policy Editor:
Note: Keep in mind that not all Windows version include the Local Group Policy editor by default. If your computer doesn’t, stick to Method 1 or follow this guide (here) to install it on your system.
- Press Windows key + R to open up a Run dialog box. Next, type “gpedit.msc” and hit Enter to open the Local Group Policy Editor.

Type gpedit.msc into the Run dialog and press Enter - Inside the Local Group Policy editor, navigate to the following location:
[Local Computer Policy] > [Computer Configuration] > [Administrative Templates] > [System] > [Logon]
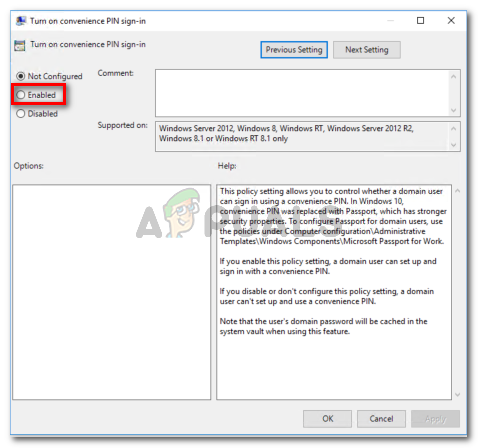
- Once you get there, double-click on Turn on convenience PIN sign-in policy and set it to Enabled.

Set the Turn on convenience PIN sign-in policy to enabled - Click Apply, then close the local group policy editor and restart your computer. The issue should be resolved at the next startup.


