Fix: Windows created a temporary paging file
The Windows created a temporary paging file error is displayed every time Windows boots up or the user tries to manually access the System Settings. This particular error happens because the pagefile.sys that is used by Windows for virtual memory has become corrupted or because Windows is fooled into believing that it needs to create a pagefile.sys file on an Audio CD.
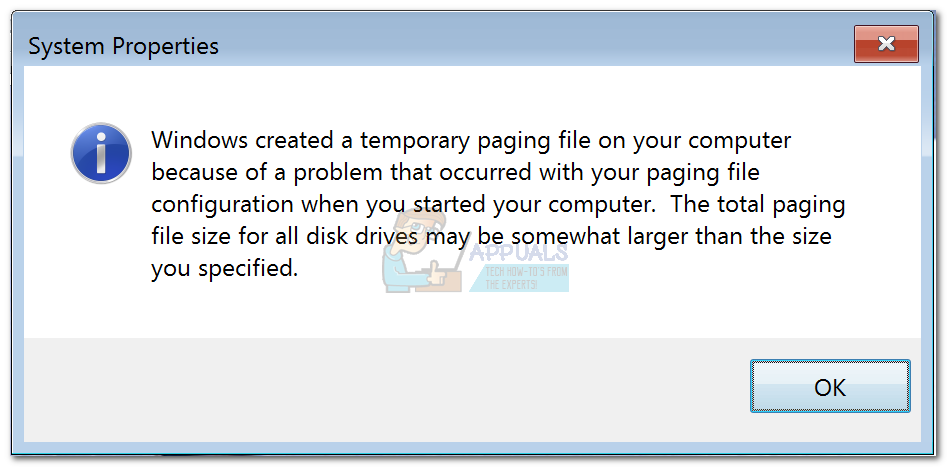
Users mainly report this issue on Windows 7, but there are some scarce occurrences on Windows 10.
What is Pagefile.sys?
Pagefile.sys (also known as the swap file), is a Windows paging file that the operating system uses as Virtual Memory. Whenever it runs out of physical memory (or RAM), Windows will resort to virtual memory.
If your computer is performing a premium activity in which all of your system resources are required, some of the information stored on RAM will be written to the paging file (pagefile.sys). In the event that the information that was just transferred to the paging file is needed again, the system will write other contents in the paging file and the previously written information is read back in.
Over time, this paging file can grow so large to the point where it ends up corrupting itself. Windows has gotten more efficient at managing the pagefile.sys file, but there are still occurrences where the paging file needs to be recreated from scratch.
Fixing the pagefile.sys issue
If you’re looking to troubleshoot this issue, there are actually three potential fixes that have helped a lot of users resolve the issue. We are going to break down each method and discuss the steps and effects in detail. Please follow each potential solution in order until you encounter a fix that resolves your issue.
Method 1: Disabling AFS via elevated Command Prompt
AFS is the Audio File System driver. Its purpose is to allow Windows to read Audio CD’s and present the tracks as individual files. Under certain conditions, Windows 7 is fooled into believing that an Audio CD is mounted as a fixed disk – because it cannot read the disk and create a pagefile.sys file on it, it causes the system to fail with the Windows created a temporary paging file error.
This method is the easiest out of the bunch, and it involves disabling the audio file system driver. This might have repercussions if you ever decide to listen to an Audio CD on your computer. But since Audio CD’s are almost completely dead, the chances of this method causing underlying issues is minimal. But keep in mind that this method might not be applicable if you don’t have the AFS driver installed.
In any case, we are also going to feature the steps of re-enabling the Audio File System driver in case the method was not effective or you want to listen to an Audio CD on your computer.
Follow the steps below to disable the AFS driver:
- Acess the Windows Start bar (bottom-left corner) and search for “cmd“. Then, right-click on Command Prompt and choose Run as Administrator.
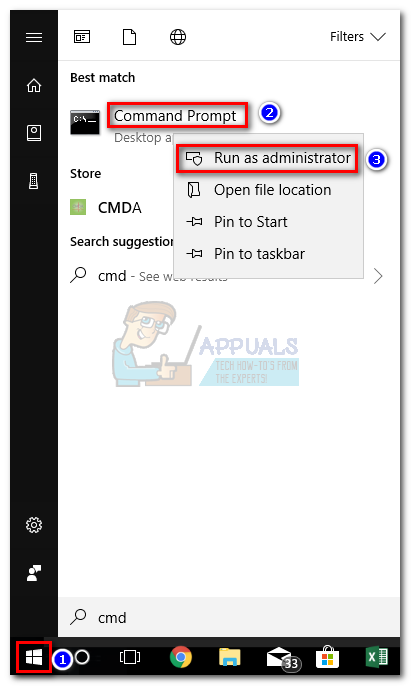 Note: You can also run Command Prompt as Administrator by selecting it and pressing Ctrl + Shift + Enter.
 - In the elevated Command Prompt, type or paste the following command and press Enter:
sc config afs start= disabled
 Note: If you’re typing the command manually, make sure you get the syntax of this command right. Keep in mind that there’s no space after start, but there is one after the = sign (start= disabled).
 - If the service is disabled successfully, you can safely close the elevated Command Prompt and reboot your system.
If the Windows created a temporary paging file error doesn’t resurface after the restart, you have successfully resolved your issue.
Note: In case you ever need to mount or listen to an Audio CD after following this method, you can re-enable the AFS driver by opening another elevated Command Prompt (step 1) and running the sc config afs start= enabled command.
In the event that the system returned “The specified service does not exist as an installed device”, move to the method below.
Method 2: Using the System File Checker tool
The Windows created a temporary paging file error can actually originate from a system file error, in which case running a couple of diagnostics might resolve the issue automatically.
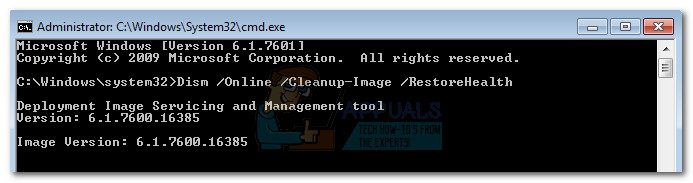
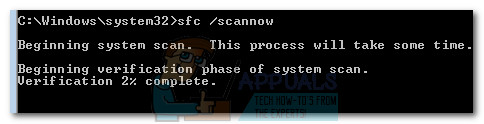
Some users have been able to eliminate the issue by running an SFC scan. The System File Checker tool will scan all protected system files and replace all corrupted files with a cached, clean copy of them. We are going to complement this scan with a DISM /Restorehealth command in order to use Windows Update to fix any remaining corrupted files. Finally, we’re going to run the sfc /scannow once again and restart the PC.
Note: The sfc /scannow command will attempt to fix any corrupted files by using the Windows Component Store – hence, it doesn’t require an internet connection. However, running the Dism /Online /Cleanup-Image /RestoreHealth command relies on WU (Windows Update) to replace corruption, so internet access is required. With this in mind, make sure you have a stable internet connection before going through the steps below.
Keep in mind that it’s a common occurrence for the System File Checker to identify and fix errors without reporting them. Regardless of the outcome of the first SFC scan, please go through all the steps provided below (SFC scan > RestoreHealth > SFC scan)
When ready, follow the steps below to run the required diagnostics:
- Acess the Windows Start bar (bottom-left corner) and search for “cmd“. Then, right-click on Command Prompt and choose Run as Administrator.
Note: You can also run Command Prompt as Administrator by selecting it and pressing Ctrl + Shift + Enter. - In the elevated Command Prompt, type sfc /scannow and hit Enter to run the System File Checker.
 Note: Keep in mind that depending on the level of corruption found on your system, this process can take anywhere from around 10 minutes to a few hours to finish.
 - Once the scan is complete, restart your system and see if the issue is resolved at the next boot. If it isn’t, continue with the steps below.
Note: If the issue is not resolved, go through all the steps below even if the first SFC scan hasn’t reported any system file errors. - Open another elevated Command Prompt (step 1), paste Dism /Online /Cleanup-Image /RestoreHealth and hit Enter to initiate the RestoreHealth scan.
 Note: Make sure you don’t lose the connection to the internet during this time and wait until the scan is finished. Then, check the results section to see whether it manages to fix any errors.
 - Regardless of the outcome of the RestoreHealth command, run another SFC scan (sfc /scannow) in the same elevated Command prompt and let the process complete.
- Once the third scan completes, close the elevated Command prompt and reboot your device.
The next time your system boots up, check if the issue has been resolved. If you’re still experiencing the same Windows created a temporary paging file error, continue with the method below.
Method 3: Forcing Windows to make a fresh copy of pagefile.sys
If the first two methods have been unsuccessful, let’s take a more direct route and delete the paging file. The following steps will instruct you how to temporarily disable virtual memory – this will allow you the (possibly corrupted) paging file. After we delete the pagefile.sys file, Windows will be forced to build a new paging file from scratch, thus solving any corruption-related problem automatically.
Note: Although pagefile.sys is located at C:\pagefile.sys, you won’t be able to see it unless you instruct your Windows Explorer to show hidden operating system files. However, you won’t be able to delete it until you force your OS to stop using your file (by disabling virtual memory).
Keep in mind that deleting the pagefile.sys file will not have any negative impact on your system whatsoever. On the contrary, it will help free up some valuable disk space and speed up certain processes once the new paging file is created.
Follow the steps down below to force your operating system to create a new pagefile.sys file:
- Log in with a local account with administrative privileges. Keep in mind that you will be required to restart several times during this method. Remember log in with the Administrator account at every startup.
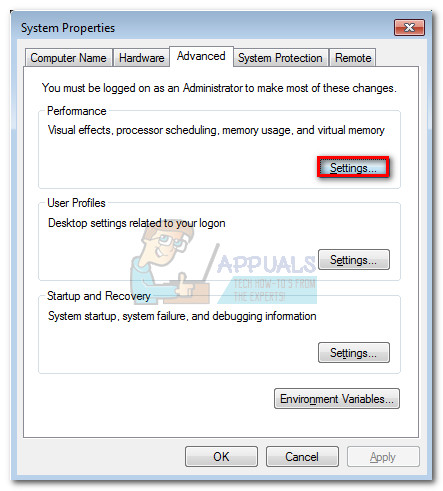
- Press Windows key + R to open a Run window and type “systempropertiesadvanced“. Hit Enter to open the Advanced tab of System Properties.

- In the Advanced tab, click the Settings button located under the Performance section.
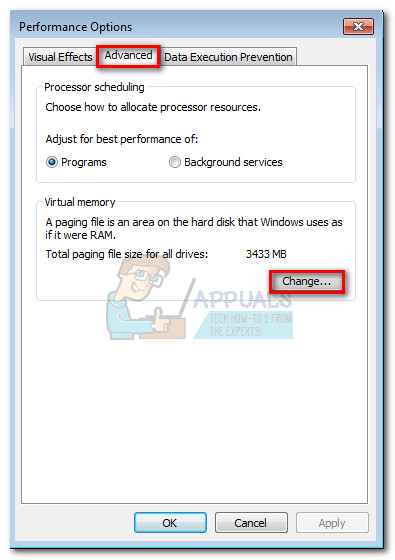
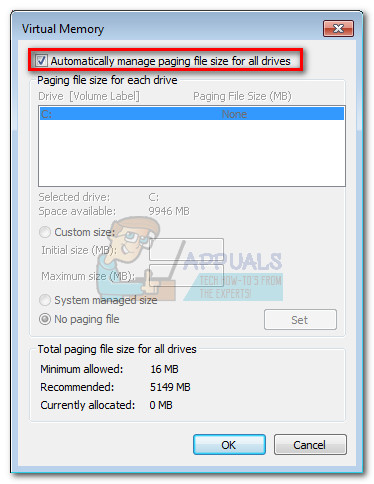
- In the Performance Options window, select the Advanced tab and click the Change button under Virtual memory.
- Uncheck the checkbox next to Automatically manage paging file size for all drives. Then, select Custom size to an Initial size of 0 MB and a Maximum size of 0 MB and click on Set.
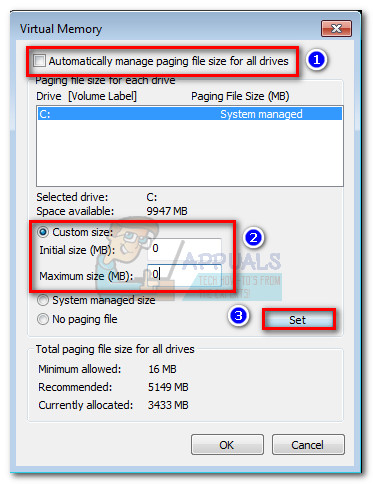 Note: We’re setting the custom sizes to 0 in order to prevent your OS from dumping information on it.
 - When prompted to confirm by System Properties, choose Yes. Then, close all dialog boxes and reboot your computer. Remember to log in with the administrator account again like we did in step 1.
- Once the startup is complete, navigate to your C: drive and locate the pagefile.sys file. If it’s not visible by default, that’s because it’s hidden by default. In this case, you’ll need to do an extra step – refer to the Note paragraph below for instructions on making the pagefile.sys file visible.
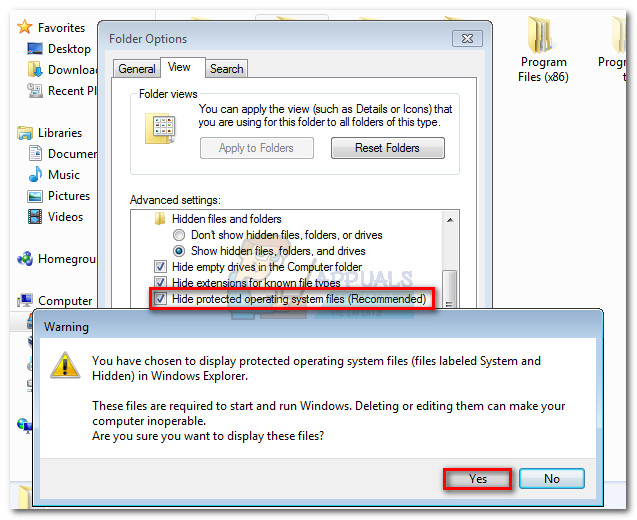
Note: If you don’t see the pagefile.sys file, open a Run window (Windows key + R), type “control.exe folders” and hit Enter to open Folder Options. In Folder Options, access the View tab and select Show hidden files, folders, or drives under Advanced settings.
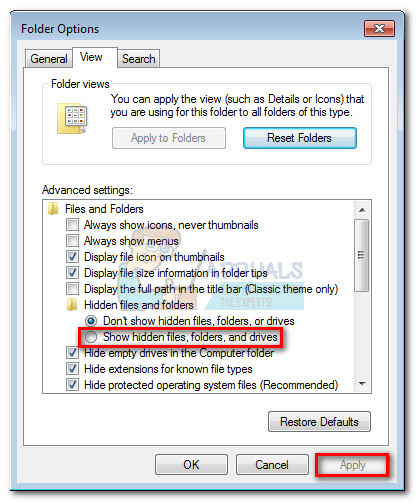
- Then, scroll down through the Advanced Settings list and disable the checkbox next to Hide Protected Operating System files. You will immediately see an additional Warning window – click Yes to continue. Finally, hit Apply to save your folder modifications. The pagefile.sys file should now be visible.
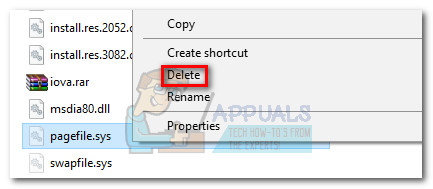
- Now that pagefile.sys is visible, you should be able to delete it without problems. Do so by right-clicking on it and choosing Delete.
- Next, re-follow steps 1 to 4 to return to the Virtual Memory window. Once you’re back there again, check the box next to Automatically manage paging file size for all drives to re-enable virtual memory.
- Click Ok, close all dialog boxes and perform a final restart. You no longer need to use an account with administrator privileges. Windows should automatically recreate a new paging file at the next startup and the issue should now be resolved.
Thanks and is it better to move pagefile to a HDD is you have SSD as boot drive?