Fix: Windows Background Slideshow Not Seeing Subfolders

Windows 10 is certainly an improvement over the older Windows versions. But in Microsoft’s classic style, there are are some things that worked perfectly on Windows 7 and Windows 8 that we’re unnecessary redesigned on Windows 10.

Such is the case with the built-in desktop background slideshow. Until the launch of Windows 10, you were able to select multiple folders to act as a desktop slideshow. Even more, if you would have selected a folder to act as a desktop slideshow, all its subfolders will also be taken into account. Well, with Windows 10, this behavior is gone.

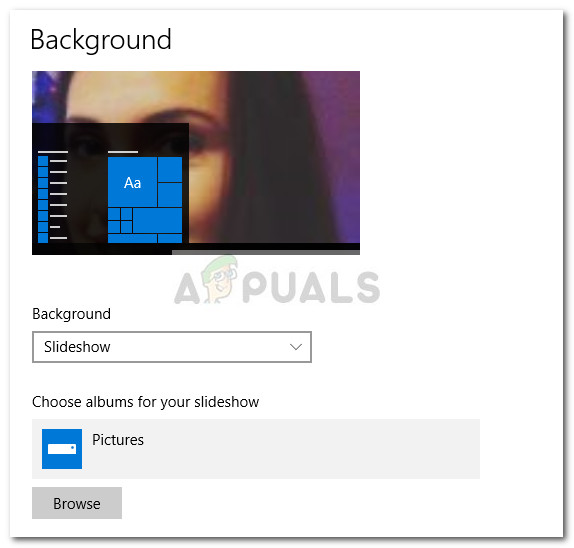
If you’re on Windows 10, you might have noticed that you can only select one folder at a time and all of its subfolders will not be used to generate the slideshow. Pretty counterintuitive, right? If you’ve taken the time to organize your selection of background images into subfolders, I can empathize with your frustration.

Fortunately, people have gotten around this issue and managed to replicate the old behavior. Down below you have a list of three different workarounds that can be used to force the Windows background slideshow feature to see the images in subfolders. Please follow whichever method seems more applicable to your situation.

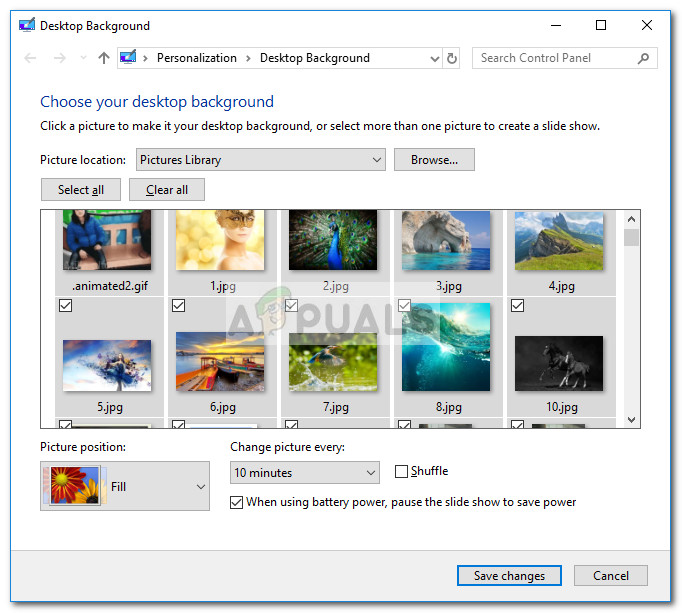
Method 1: Launching the olde Control Panel Interface (not applicable on Creators Update)

Although this is by far the most convenable solution, it won’t be applicable if you have already updated to Windows 10 Creators Update. For some reason, Microsoft has decided to remove the functionalities of the two Run commands below, so they’ll only work if you have a Windows 10 version that is not yet updated with the Creators Update.

So if you’re lucky enough to have avoided the Creators Update (and have no plan on making the switch), follow the steps below to launch the classic Control Panel interface and configure your background slideshow the old way:

  1. Press Windows key + R to open up a Run window. In the run box, type (or paste) the following command and hit Enter to open the classic Control Panel interface:
    rundll32.exe shell32.dll,Control_RunDLL desk.cpl,,@desktop
    

    Note: If that doesn’t work, use this command instead:

    control /name Microsoft.Personalization /page pageWallpaper
  2. Use the classic Control Panel personalization menu to configure your custom slideshow and hit Save changes when you’re done.

If this first method wasn’t applicable, jump straight down to Method 2.

Method 2:  Using Shell to launch the classic Control Panel interface

Although this process is fairly similar to the one used in Method 1, this one uses a Shell command instead (which Microsoft didn’t restrict after the Creators Update). With this in mind, the steps below should work on any Windows 10 version, even if you have already applied the latest updates. Here’s a quick guide to launching the old background control panel UI using a Shell command:

  1. Before you open the classic Control Panel UI, I recommend setting up the image folder that you’re going to use. An easy approach is to add image folders as subfolders of the Pictures library folder.
  2. Once your image folder is set up, press Windows key + R to open up a Run prompt. Then, type or paste the following command to bring up the old Control Panel interface:
    shell:::{ED834ED6-4B5A-4bfe-8F11-A626DCB6A921} -Microsoft.Personalization\pageWallpaper

  3. Proceed to make the background slideshow selection as you see fit, then hit the Save changes button.
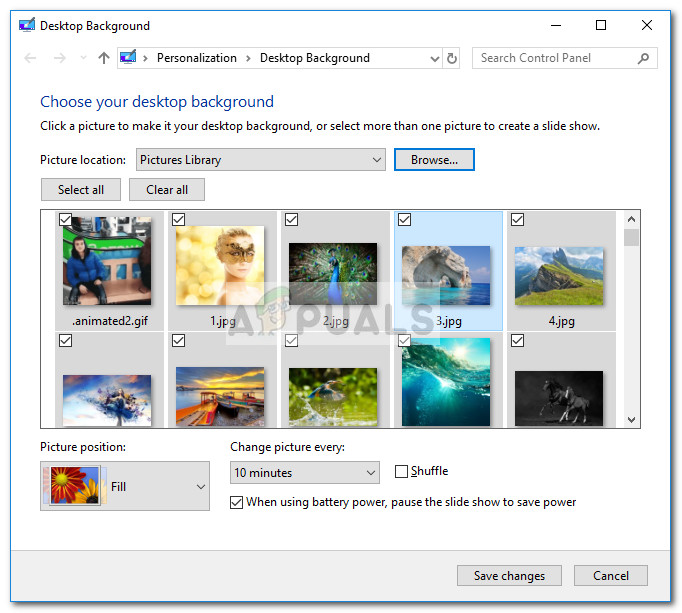
    Note: You can use the Select all button if you not all entries are selected by default.

Method 3: Using File Explorer to create a desktop background slideshow

If you’re not comfortable with using CMD or Shell commands, you can also use File Explorer for a more intuitive way of replicating the old Windows behavior.

Here’s a quick guide to using File Explorer to create a desktop background slideshow that will include subfolders:

  1. Open File Explorer and navigate to the main image folder (the one that holds all the subfolders that you wish to include in the background slideshow).
  2. Click on the search function in the top-right corner and type “kind:=picture“.
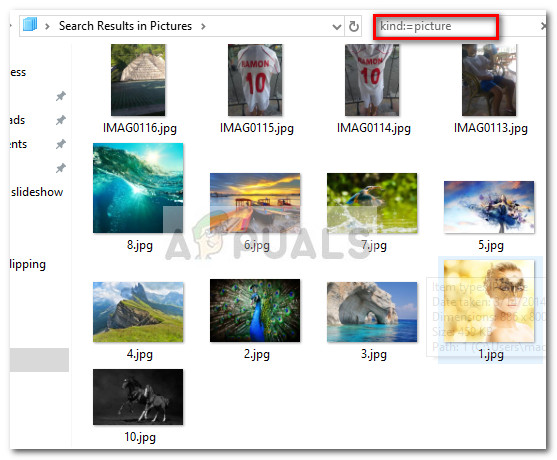
    Note: You can also use “type:image” in the search box for the same result.
  3. Once the selection is made, press Ctrl + A to select all images, then right-click on any of them and choose Set As Desktop background.
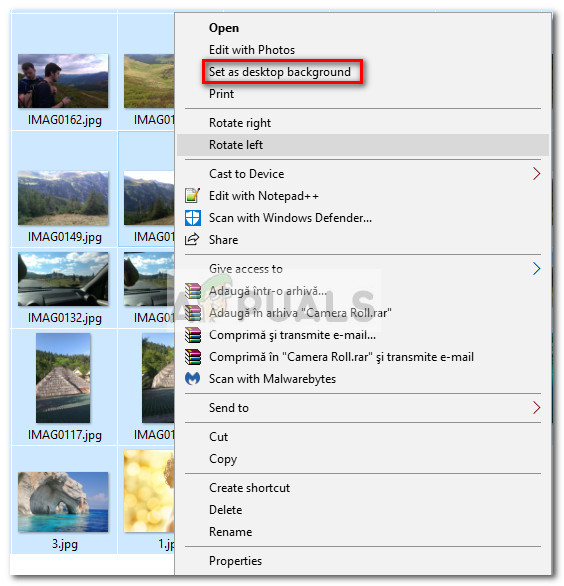
  4. That’s it. If you open the Background page of the Personalize menu, you should be able to see the search query that you previously constructed.

ABOUT THE AUTHOR

Kevin Arrows


Kevin Arrows is a highly experienced and knowledgeable technology specialist with over a decade of industry experience. He holds a Microsoft Certified Technology Specialist (MCTS) certification and has a deep passion for staying up-to-date on the latest tech developments. Kevin has written extensively on a wide range of tech-related topics, showcasing his expertise and knowledge in areas such as software development, cybersecurity, and cloud computing. His contributions to the tech field have been widely recognized and respected by his peers, and he is highly regarded for his ability to explain complex technical concepts in a clear and concise manner.

Comments

13
    UJ
    uk_john Jun 24, 2020

    The “Shell” command fixed my problem. Seems if you add wallpapers manually, the Setting/Desktop remembers that last folder, not the folder you used originally. I had fogotten what folder I put the wallpapers infor myslideshow, but your shell command found it for me! Thank you!

      RS
      Rene_Sensman Sep 24, 2020

      That’s incredibly helpful! Now, my other query: is there a way of finding details of the current slideshow image? I have several thousand photos accumulated over 20 years of digital images and my memory is not able to go that far back!

        MZ
        Muhammad Zubyan Author Sep 25, 2020

        Ok so first of all open Run, type this command
        “shell:::{ED834ED6-4B5A-4bfe-8F11-A626DCB6A921} -Microsoft.PersonalizationpageWallpaper” and press enter once the Settings window pops up it will show you exactly where the files are stored just go to that location find that image that’s it. Keep me updated!

          RS
          Rene_Sensman Sep 25, 2020

          Thanks Zubyan. Unfortunately, I have several thousand images from which the slideshow is selected! This seems only to show all the subfolders and not the location of the specific image.

          MZ
          Muhammad Zubyan Author Sep 25, 2020

          That’s unfortunate to hear but there is still something that you can do to find the location of the current image you have as your wallpaper. Before starting Just a reminder modifying the registry can cause some serious issues so please don’t change anything in “Regedit” in case you know what you are doing we won’t be responsible for your actions.1. Open the Start menu.
          2. Search for and open Regedit.
          3. Navigate to HKEY_CURRENT_USERControl PanelDesktop.
          4. Find Wallpaper entry. Its data will be the file path of the current desktop background image.You can copy that path and put that path in your Explorer or search to find that wallpaper just head over to that path and find the wallpaper. Keep me updated!

          RS
          Rene_Sensman Oct 1, 2020

          Thanks Zubyan. The file path I get is: file:///C:/Users/johne/AppData/Roaming/Microsoft/Windows/Themes/TranscodedWallpaper which again does not help me identify the image. Not sure what I am doing wrong?!?What would be useful would be to right click on the image and have an option such as “File details” or “See properties”!

          MZ
          Muhammad Zubyan Author Oct 1, 2020

          Don’t worry we just made progress now follow these instructions:-1. Open Run by searching for it or pressing the Win+ R key together
          2. type “%AppData%MicrosoftWindowsThemesTranscodedWallpaper” and press enter.
          3. It will ask you which program do you want to use to open this file, Select your Image viewer.
          4. Once your Wallpaper is opened. Right-click on the Photo and go to Properties.Hope this helps if it doesn’t let me know so I can help you further. Thanks!

          RS
          Rene_Sensman Oct 4, 2020

          OK, tried this :)1. Couldn’t find an image viewer program to open the file. Only option was Imaging Devices Control Panel. Photos which is the default app was not listed. Tried to find another app but none listed.2. Searched the web for solutions and was advised that Windows Photos is in WindowsApps in CProgram Files. Couldn’t gain access to folder to copy location as only administrator access available.3. Tried using Firefox to open the file. Image location listed as file:///C:/Users/johne/AppData/Roaming/Microsoft/Windows/Themes/TranscodedWallpaperData%.Absolute madness that on my own PC I do not have automatic admin rights! So really not sure how to proceed from here but thanks for all your suggestions!

          MZ
          Muhammad Zubyan Author Oct 4, 2020

          I am referring your point number “1” here so we are going to enable the old Windows photo viewer and try opening the file from it first please refer to our article on how to restore old windows photo viewer:-https://appuals.com/how-to-…Once your Old Windows photo viewer is back just select it and open this photo again. Hope this helps!

    JG
    Joe Gills Mar 9, 2022

    I can confirm that the Shell command, Method 2, also works fine in Windows 11

    Reply
    AA
    Amico Anonimo Jan 23, 2023

    In method #2, your watermark covers the command to be entered, making it useless.

      MZ
      Muhammad Zubyan Author Jan 25, 2023

      shell:::{ED834ED6-4B5A-4bfe-8F11-A626DCB6A921} -Microsoft.PersonalizationpageWallpaper

      We have provided the command in the box but here it is:

    FO
    forestppl Aug 9, 2023

    The kind:=picture etc isn’t finding any images anymore. My windows either reset the system language or the commands are only now in local languages instead of english. File type descriptors are still in english.