How to Fix ‘We couldn’t create a new partition’ Installation Error
Windows 10 was definitely well worth the update since it one of the best Windows operating systems in a while when you take everything into account, including the era it was released in, its simplicity, and the variety of features it offers to its users.
However, installing it or updating your previous version of Windows OS was difficult for plenty of users and some of them were even forced to five up simply because of the fact that they were unable to get rid of a single error message which appeared on screen. We have created an article for one of the issues you may encounter so please read on!
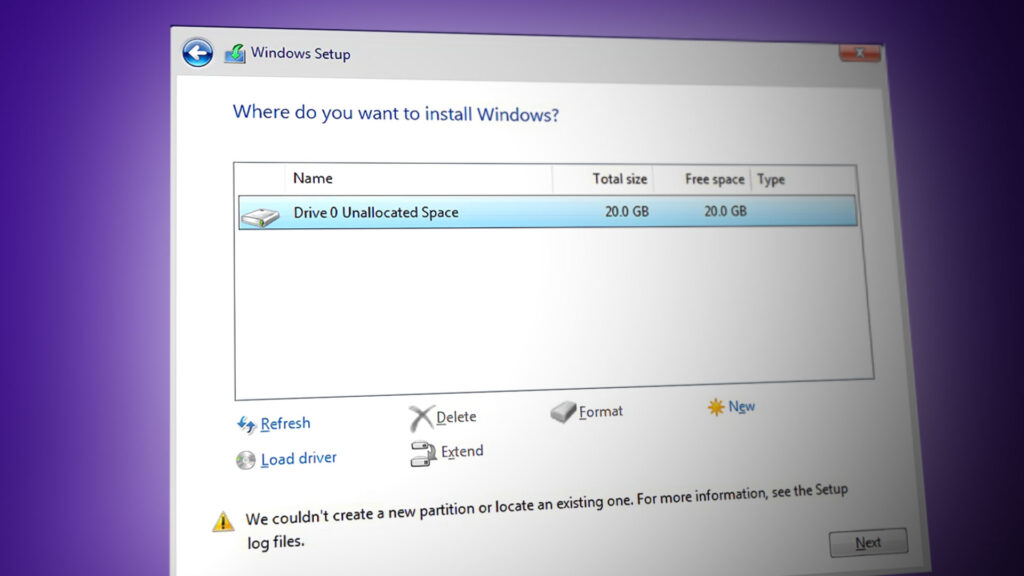
Windows 10 Installation Error “We couldn’t create a new partition”?
This particular error message usually appears when users try to install Windows 10 from a bootable DVD or USB drive and it freezes the process before it even started. It can also occur if you want to update your previous version of Windows to Windows 10 and it has been bugging plenty of users for quite a long time.
Luckily, the fix for this problem is not impossible to find but you may have to try out a lot of different methods before you are able to get rid of the problem. Check out the instructions below in order to get started.
Solution 1: Using “diskpart” In Order to Create a New Partition
If the Windows 10 updating wizard was unable to create a new partition on your hard drive where Windows 10 may be installed as an additional operating system, you might have to make it yourself using Command Prompt. The process is simple to comprehend and it should fix your problem easily.
Note: Before we start this process make sure that you don’t have any SD Cards connected to your PC. We have to warn you that this process will delete all files from your hard drive, so if you’re planning to use it, make sure you create a backup beforehand. To run diskpart, follow these steps:
- Start Windows 10 setup using bootable USB or DVD.
- If you get “We couldn’t create a new partition” error message close the setup and click the Repair button.
- Choose Advanced tools and then select Command Prompt.

- When Command Prompt opens, enter “start diskpart”. Make sure you click Enter after the command in order to run it.
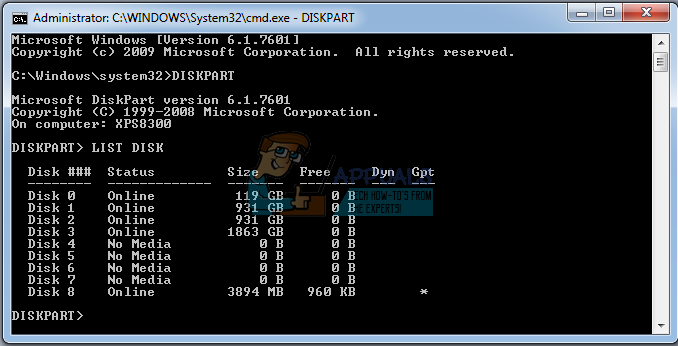
- Now enter list disk. You should see the list of all hard drives connected to your computer.
- Find the number that represents your hard drive and enter select disk 0 (we used 0 as an example, so be sure to replace 0 with a number that matches your hard drive).
- Enter the following lines and press Enter after each line:
disk 0 clean
disk 0 create partition primary
disk 0 active
disk 0 format fs=ntfs quick
disk 0 assign
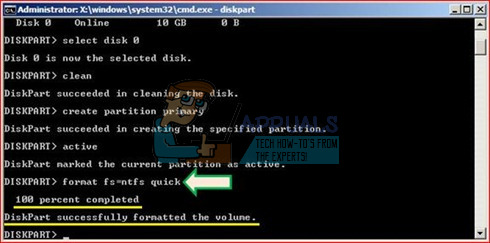
8. Enter exit in order to close Command Prompt.
9. Start the installation process again.
Note: If you computer is unable to boot from your USB or DVD bootable drive, you might need to tweak your boot settings in order to disable certain security features which prevent your PC from booting from anything else other than the drive with Windows installed on it. If this problem occurs for you, follow the instructions below to fix it.
- Turn on the computer and immediately press the F10 key repeatedly, about once every second, until the Computer Setup Utility opens.
- Use the right arrow key to choose the Security menu, use the down arrow key to select Secure Boot Configuration, and press Enter.
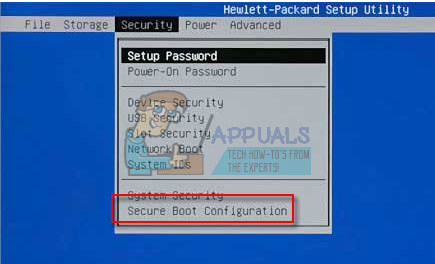
- Before you can use this menu, a warning appears. Press F10 to continue to the Secure Boot Configuration menu.
- The Secure Boot Configuration menu opens.
- Use the down arrow key to select Secure Boot and use the right arrow key to modify the setting to Disable.
- Use the down arrow key to select Legacy Support, and then use the right arrow key to modify the setting to Enable.
- Press F10 to accept the changes.

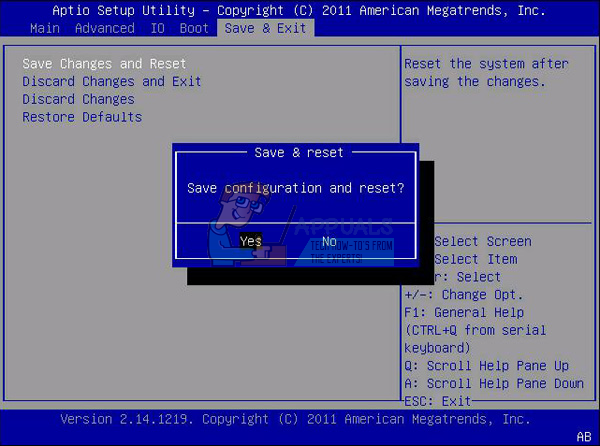
- Use the left arrow key to select the File menu, use the down arrow key to select Save Changes and Exit, then press Enter to select Yes.
- The Computer Setup Utility closes and the computer restarts. When the computer has restarted, use the power button to turn the computer off.
If you are not sure how to boot from your DVD or USB, you need to know just which option to select when the boot menu opens. It will ask you from which device you want to boot your computer. Follow the instructions below to boot from your DVD or USB easily.
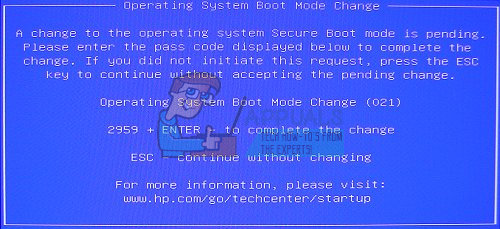
- Press the power button to turn the computer on. As soon as the computer starts, a message appears indicating that the boot mode has changed.
- Type the four-digit code shown in the message, then press Enter to confirm the change.
Note: No text field displays for the code. This is expected behavior. When you type the numbers, the code is logged without a text field.
- Press the power button to turn off the computer, wait a few seconds, then turn on the computer and immediately press the Escape key repeatedly, about once every second, until the Startup menu opens.
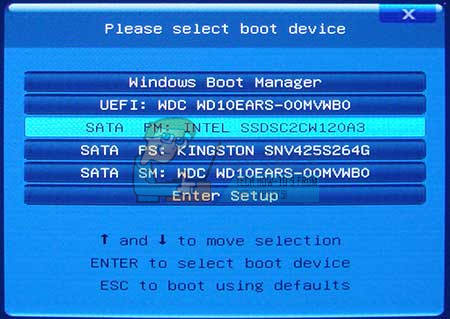
- Press F9 to open the Boot Menu.
- Use the down arrow key to select the SATA device under the +CD/DVD drive heading, then press Enter to select the CD/DVD drive as the boot device. If you want to boot from USB, make sure you select the name of your USB as the device.
- The computer starts Windows 8.
- Insert the bootable CD or DVD into the CD/DVD drive. Insert the USB bootable drive if you selected it in the previous steps.
- Press the power button to turn the computer off and wait about 5 seconds.
- Press the power button again to turn the computer on.
- The computer starts from the CD, DVD, or USB.
Solution 2: Set the Partition You Want to Install Windows to as the Primary One
If you receive this particular error message while trying to install Windows 10 on your computer, you may need to set the partition of your choice as the primary one on your computer. This is also achieved using the diskpart tool in Command Prompt.
- Start Windows 10 setup using bootable USB or DVD.
- If you get “We couldn’t create a new partition” error message close the setup and click the Repair button.
- Choose Advanced tools and then select Command Prompt.
- When Command Prompt opens, enter “start diskpart”. Make sure you click Enter after the command in order to run it.
- Enter “list disk”.
- You should see the list of available hard drives. Locate your hard drive and enter select disk 0. We used disk 0 in our example, so be sure to replace 0 with a number that represents your hard drive.
- Enter “list partition”.

- List of available partitions will appear. Locate the partition on which you want to install Windows 10 and enter select partition 1. Remember to replace 1 with a number that matches your partition.
- Enter “active”.
- Type “exit” and press Enter to exit the Command Prompt.
Solution 3: Disconnect Every Storage and Peripheral Device From Your Computer
When you encountered this error message, it’s probably because there are some peripherals connected, such as an external HDD, SSD, USB thumb drive/flash drive or an SD card. Just remove and disconnect all external storage drive from the USB port. If you’re using USB drive containing setup files to install OS, reconnect only the bootable USB drive and start again.
To make this clear, only leave the device which is necessary for your installing process since other devices may cause incompatibility issues with your computer.
Note: Many users reported “We couldn’t create a new partition” error message while trying to install Windows 10 on a SSD. According to users, in order to fix this issue you’ll have to disconnect all other hard drives and leave only your SSD drive connected.
Alternatively, you can try disabling all other hard drives except for your SSD from BIOS. After you’ve disabled or disconnected all other drives, the SSD should be recognized by installer. Now all that you have to do is to delete all partitions on your SSD and Windows 10 should install without any problems.
Solution 4: Use a USB 2.0 Storage Device
Users have reported that they were struggling to install Windows from USB 3.0 devices even though their computers support it by default. However, using a USB 2.0 flash drive seemed to fix the issue for them which might mean you need to purchase a different USB drive.
It’s usually your BIOS which doesn’t support USB 2.0 and not your computer. Motherboards which support USB 3.0 without any drivers installed are rare no matter how new they might be.
Just type ‘clean’ and ‘active’. No need to type ‘disk 0 clean’