Fix: USB Mouse and Keyboard not Working Windows 10
A USB mouse/keyboard connected to Windows 10 might fail to work primarily because of either hardware problems or other software conflicts within the system itself. In most cases, only one of the HCI devices (mouse or keyboard) might fail to work. The solutions in this article are for both of them.
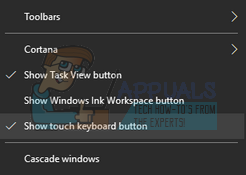
You can also toggle on-screen keyboard if your keyboard isn’t working. Make sure that you have a wireless/PS2 mouse connected to your computer. Right-click on the taskbar and select “Show touch keyboard button”. This will launch the on-screen keyboard and you can use to type till we fix the problem.
Solution 1: Checking PS/2 Mouse/Keyboard
Before we resort to more complex solutions, we will try to fix the problem using simple fixes which worked for people. The PS/2 port is a six-pin connector used for connecting keyboards and mice to your computer. It was introduced in the late 1990’s and were popular until USB mice and keyboard took over.
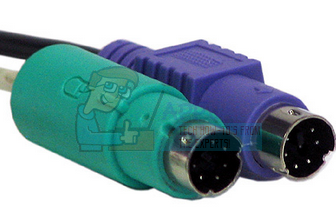
If your computer has PS/2 ports, try plugging in a PS/2 mouse/keyboard and see if it works. In most cases, the computer detects the device instantly and it works without any trouble. Turn off your machine, plug in the PS/2 device and turn on your PC the normal way. After logging into Windows, switch your USB Keyboard/Mouse and check if the computer detects it. If it doesn’t, restart your computer while keeping the USB Keyboard/Mouse plugged in.
Note: You should also plug in any USB storage device to make sure that your USB ports are working properly. If they aren’t, it means that the problem lies with the USB ports. We can try reinstalling the drivers as shown in the later solutions.
Another thing you can try is loading your operating system without any peripherals connected. Once the operating system is fully booted up, plug in the devices and check if they are working properly.
Solution 2: Turning off Fast Startup
Windows 10’s Fast Startup (also called fast boot) works similarly to the hybrid sleep modes of previous versions of windows. It combines the elements of a cold shutdown and the hibernate feature. When you shut down your computer, Windows logs off all users and closes all applications similar to the cold boot. At this point, Window’s state is similar to when it is freshly booted up (as all users are logged off and applications are closed). However, the system session is running and the kernel is already loaded up.
Then Windows sends a notification to devise drivers to prepare for hibernation and saves the current system state to hibernation and turns off the computer. When you restart the computer, Windows doesn’t have to reload the kernel, system state or the drivers. It just refreshes your RAM with the loaded image in the hibernation file and navigates you to the startup screen.
This feature makes Windows boot faster so you don’t have to wait the traditional time. However, this feature is also known to cause problems by not loading the required drivers properly each time. As it doesn’t reload the drivers, some drivers might not be already be loaded. Due to this, your mouse and keyboard might not be working properly.
- Press Windows + R to launch the Run application. In the dialogue box type “control panel” and hit Enter. This will launch your computer’s control panel. You can also use the Windows search bar to open the control panel.
- Once in the control panel, click on Power Options.

- Once in the Power Options, click on “Choose what the power buttons do” present at the left side of the screen.
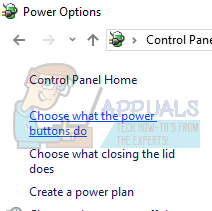
- Now you will see an option which requires administrative privileges named as “Change Settings that are currently unavailable”. Click it.

- Now head to the bottom of the screen and uncheck the box which says “Turn on fast startup”. Save changes and exit.

- You might need to restart your computer. Check if the problem at hand got fixed.
Solution 3: Uninstalling Drivers for the Mouse/Keyboard
We can now try reinstalling the default drivers for your device by uninstalling them from the device manager and restarting your computer. When you restart your computer, the computer automatically detects the hardware connected and since there are no drivers installed for the device, it installs the default drivers.
- Click on the Windows search bar present at the left side of your screen and type “device manager”. Open the application which returns the result.

- Expand the category of Mice and other pointing devices/Keyboards. Now right-click on the device and select “Uninstall device”.
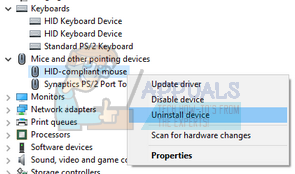
- Now Windows will ask you to confirm your actions before it proceeds with the uninstallation. Select “Uninstall” to proceed.
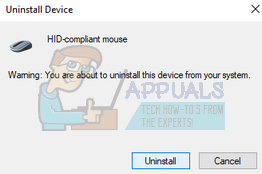
- Now restart your computer and plug in your device (mouse/keyboard). Now Windows will automatically detect the hardware connected and attempt at installing the required drivers.
- If it still doesn’t work, head back to the device manager and most probably you will see the device present with a tiny exclamation mark in front of it. It means that the driver for this device isn’t installed properly.
- Right-click it and select “Update driver”. Now select “Search for drivers automatically”. Make sure that you have an active internet connection. Hopefully, the drivers will be installed and the device starts functioning again properly.

- If it still doesn’t install the required drivers, head over to your manufactures website and download the drivers for your specific device. Repeat the update process like we did earlier and this time, select “Search for drivers manually” and navigate to the file path of the driver you downloaded.
Solution 4: Changing Power Management Settings
Each device has a feature where it turns off when not in use to save power or windows can wake up from sleep if any activity is detected on the device. These options are known to cause problems in many cases. The power saving is also very minute as a keyboard or a mouse doesn’t consume a lot of energy. We can try disabling these options and check if they do the trick.
- Click on the Windows search bar present at the left side of your screen and type “device manager”. Open the application which returns the result.
- Expand the category of Mice and other pointing devices/Keyboards. Now right-click on the device and select “Properties”.
- Uncheck the setting which state:
“Allow this device to wake the computer”
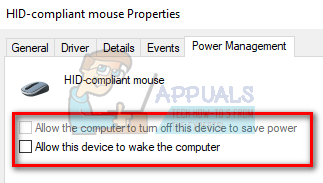
Do the same for all the mice and keyboards.
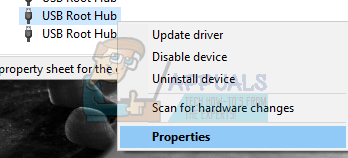
- Now while still in the device manager, scroll down and expand the category of “Universal Serial Bus controllers”. Right-click on “USB Root Hub” and select Properties.
- Navigate to the Power Management tab and uncheck the setting which states “Allow the computer to turn off this device to save power”. Press Apply to save changes and exit the properties.
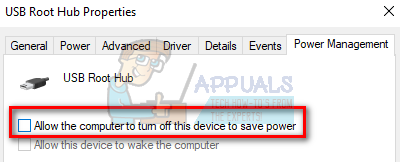
Note: If you have more than one USB Root Hubs on your computer, apply this change to all of them.
- Now reboot your computer and check if the problem at hand got solved.
Note: If you see any USB ports disabled or having an exclamation mark in in front of their name, either enable them or update their drivers properly. This is a sign that the port/device isn’t working because of a driver issue.
Solution 5: Changing Ease of Access Settings
Ease of Access settings is available on almost all versions of Windows to help the user in using the computer. Sometimes these settings might not be configured/not be working properly causing problems in using the mouse and keyboard. We can disable these settings and check if the issue gets resolved.
- Click on the Windows search bar present at the left side of your screen and type “Ease of Access”. Open the application which returns the result.
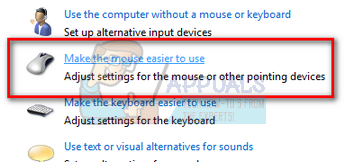
- Once in the Ease of Access Center, select the category of “Make the mouse easier to use”.
- Uncheck the option which says “Turn on Mouse Keys”. Press Apply to save changes and exit.
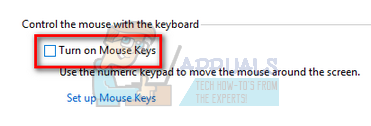
If you were having trouble with your mouse, you can go ahead and restart your computer. If you are having problems with your keyboard, we can change its ease of access settings as well.
- Head to the Ease of Access Center like we did earlier and select “Make the keyboard easier to use”.

- Uncheck the following options present on the screen:
“Turn on Mouse keys”
“Turn on Sticky Keys”
“Turn on Toggle Keys”
“Turn on Filter Keys”
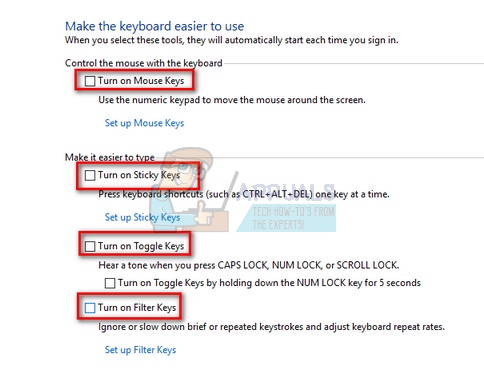
Press Apply to save changes and exit. You can also disable filter keys by pressing the right “Shift” key for 10 seconds. A small window will pop up asking you to either enable the filter keys or disable them.
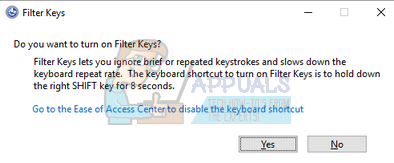
- Restart your computer and check if all the devices started working properly.
Solution 6: Running ChkDsk
We can try checking if your computer has any discrepancies or corrupt sectors. It is possible that the location where your device drivers are located is corrupted or in conflict with another entity.
- Click on the Windows search bar present at the left side of your screen and type “Command Prompt”. Right-click on the application which returns in the result and select “Run as administrator”.
- Once in the command prompt, execute the following command:
CHKDSK E: /f
Here “E” is the name of the disk driver which is following by the “/f” command.

- This process might take some time as your entire disk is being checked for errors. When the scan is complete, execute the following command:
sfc /scannow

- If Windows detects any discrepancies, it will inform you accordingly. If it does, execute the following command:
DISM /Online /Cleanup-Image /RestoreHealth
- After all the processes are complete, restart your computer and check if the problem got solved.
Solution 7: Changing BIOS Settings
If all the solutions above don’t work, we can try changing your BIOS Settings. The BIOS is the main module your computer accesses when it powers on. It is the BIOS which kick-starts your operating system and helps in loading all the essential drivers.
First, open your BIOS and try disabling the USB2 Legacy Support. We cannot list the exact method as all manufacturers have their own BIOS settings format. After you disabled the option, restart your computer and check if this makes any difference. If it doesn’t, you can reset BIOS to Optimized Default. The computer might prompt for a password and upon entering, the BIOS settings will be fresh.
Solution 8: Restoring your Windows
If all the above methods don’t work, we can try restoring your system to the last system restore point. Save all your work correctly and backup any important data. Do note that all the changes to your system configurations after the last restore point will be removed.
- Click on the Windows search bar present at the left side of your screen and type “restore” in the dialogue box and select the first program which comes in the result.

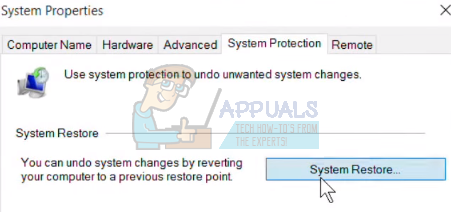
- One in the restore settings, press System Restore present at the beginning of the window under the tab of System Protection.
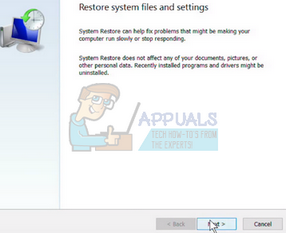
- Now a wizard will open navigating you through all the steps to restore your system. Press Next and proceed with all the further instructions.
- Now select the restore point from the list of options available. If you have more than one system restore points, they will be listed here.

- Now windows will confirm your actions for the last time before it starts the system restore process. Save all your work and backup important files just in case and proceed with the process.
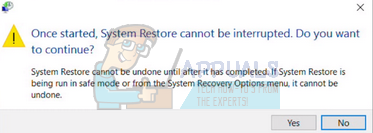
You can learn more about system restore to gain more knowledge about what it does and what are the processes involved.
Note: You can also enter restore mode if you abruptly take off the power cord connected to your computer. For laptops, take out the battery while the laptop is still running. You may have to repeat this process a two or three times before you boot in recovery mode. Do this at your own risk. There is also a danger of damaging your computer by pulling out the power abruptly.