Fix: This Disk is Write Protected
The error “this disk is write protected” usually occurs when either the system has locked a removable storage out of the system, or there is a write-protected switch enabled on the removable hardware.
This error might occur on USB drives, CD drives, and Micro SD cards. The workarounds for this problem fall in two categories: either it is a hardware problem where the lock is enabled, or it is a software problem related with the operating system. We have listed all the workarounds for this issue. If after following all the solution the error still persists, you should make sure that the device is not bricked. A bricked USB device cannot be accessed from any computer and making the drive work again is very tedious and impossible in some cases.
Note: The methods listed below will probably erase all the data present on your removable device.
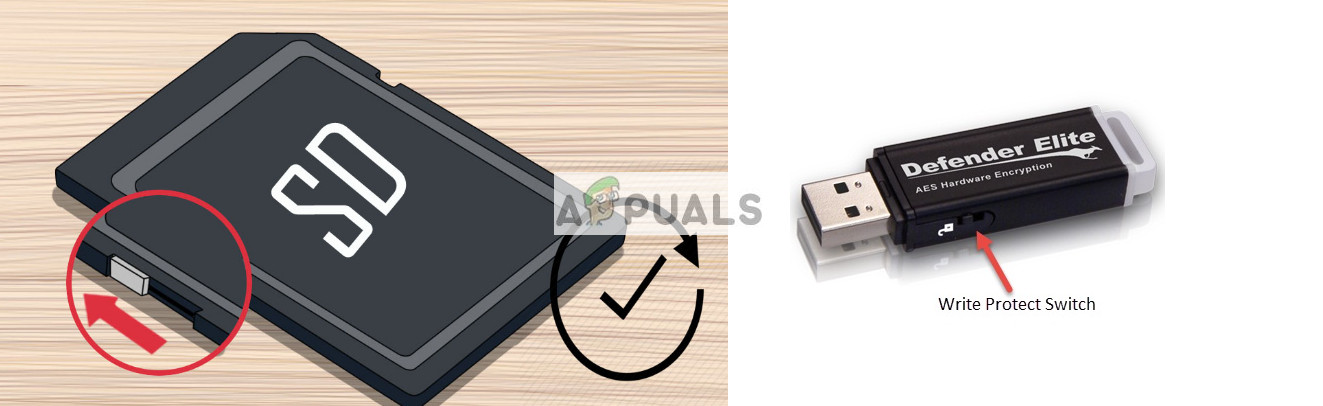
Solution 1: Toggling Physical Write Protect Switch off
Before we move on to the software related workarounds of the problem, we can check if the problem only lies with the physical write protect switch being toggled. You can easily check this by removing the USB or SD card from your system and see if there are any switches on the device.
On SD card devices, there will be a visible “white” switch while in USB devices the switch might vary. Change it to the unlocked position, plug it back into the computer and check if the problem got solved.
Solution 2: Using DiskPart Command Utility
DiskPart is a command-line disk partitioning utility which has been there in Windows for a while. It is used for creating a multipartition layout for removable devices such as flash drives. We can use this utility from the command prompt and see if this solves our problem.
- Press Windows + R, type “command prompt” in the dialogue box, right-click on the application and select “Run as administrator”.
- Once in elevated command prompt, type “diskpart” and press Enter. Now type “list disk”. All the removable devices plugged into your computer will be listed in front of you in the terminal interface.
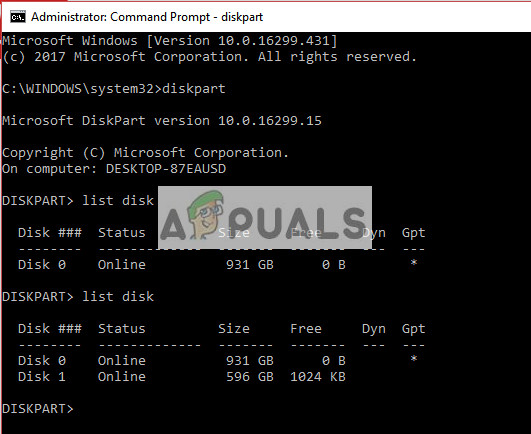
- Now identify the disk using the disk numbers assigned as shown in the picture above. Once you have identified the disk, type the command “select disk 1”. Here we have assumed that the disk which is our USB drive causing the problem is disk 1.
- Once you have selected the disk, type “attributes disk clear readonly” and press Enter. This command will clear all the ‘readonly’ attributes if they are attached to your disk.
- Unplug your USB device and plug it again. Now check if the problem at hand got solved.
Solution 3: Using Registry Editor
If both the above solutions don’t work, you can try editing some values in the registry. We will change the value of “WriteProtect” in the registry and see if this fixes the problem. Afterward, you will format your USB drive using ‘exfat’ instead of ‘fat32’ and check if this fixes the problem. Unplug your USB before starting the solution.
Note: Registry editor is a powerful tool. Deleting registries which you have no knowledge of may render your computer’s performance. Make a backup of the registry before following the rest of the solution.
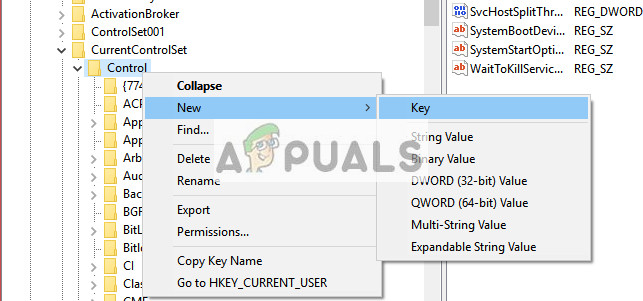
- Press Windows + R, type “regedit” in the dialogue box and press Enter.
- Once in the registry editor, navigate to the following directory:
HKEY_LOCAL_MACHINE\SYSTEM\Currentcontrolset\control\
- Now check if you can find the entry of “StorageDevicePolicies”. If you don’t, you will create a new one. If you do, you can skip all the creating steps and jump to editing the value. Right-click on any control and select New > Key.
- Name the new key as “StorageDevicePolicies”. Once you have created the key, navigate to the right navigation pane and select New > DWORD (32-bit) Value. Select 32bit option if you have a computer of 32bits and 64bit if you have a 64bits system.
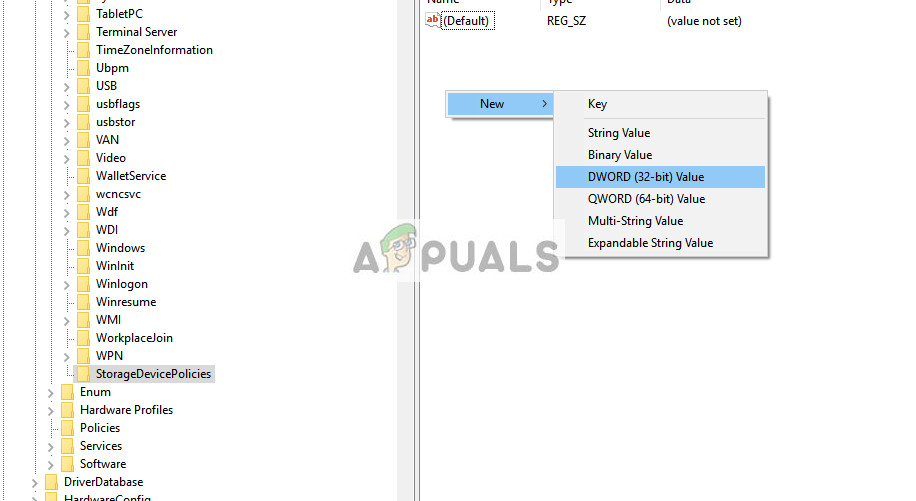
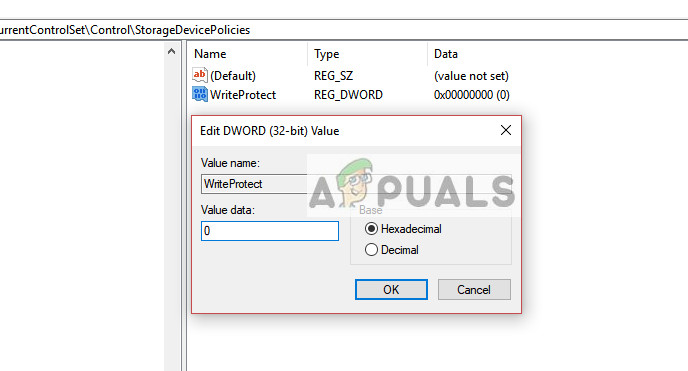
- Set the name of the DWORD to “WriteProtect” and set the value as “0” in Hexadecimal. Press OK to save changes and exit.
- Now open “This PC” using File Explorer and refresh the window 5 or 6 times. Now plug your USB back into the computer and format it by right-clicking it and selecting ‘Format’. Set the format type as “exfat”.
- After formatting, check if you can access your removable device correctly.
Solution 4: Using Disk Management
In this solution, we will be using the Disk Management utility present in Windows OS. Disk management is used for managing all removable and connected storage devices to your computer. It can also be used to create and delete partitions. We will delete the existing partition and create a new one.
- Press Windows + R, type “diskmgmt.msc” in the dialogue box and press Enter.
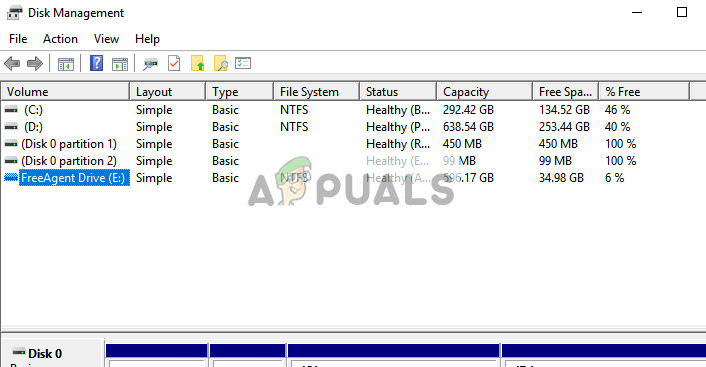
- Once in disk management, select the disk you are trying to troubleshoot. Navigate to the window below and delete the existing partition.
- Once the partition is deleted, you will be seeing an empty space in place of the partition. Right-click and select “Create Partition”. Navigate through the wizard and select the default values and drive letters.
- After creating the partition, refresh your computer and check if you can access the drive without any problems.
Solution 5: Trying on another computer
Sometimes the problem can be computer specific. It is possible that there are some registry values causing the computer to not format the USB device as instructed or there can be some other element which might be malfunctioning. As each computer configuration is different, it is advised that you try on a new computer.
Tips:
- If you are trying to delete some file, you should check if the problem lies only with a specific file. Sometimes files get corrupted and refuse to be deleted in any way.
- Some users also responded that the format was successful in a UNIX system as compared to a Windows one.
- Connect your USB to android using USB OTG.
- Make sure the USB device is clean.
- Make sure that the USB device is not bricked or there is not some hardware fault.


