Fix: This Computer Can’t Connect to the Remote Computer
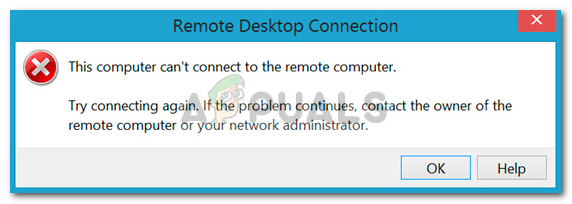
As the long list of Remote Desktop Connection issues continues, users have reported that they are facing an issue upon trying to connect to the remote computer. The ‘This computer can’t connect to the remote computer’ error often occurs after a Windows update which changes your credentials for the connection. According to the reports, whenever users try to establish a remote connection between the host and the target system, they are presented with the following error message.
Like most of the RDP issues, this one is quite easy to resolve as well. You can circumvent the issue by implementing the solutions provided down below.
What causes the ‘This computer can’t connect to the Remote Computer’ Error on Windows 10?
After going through several user reports, from what we have salvaged, the error is often due to the following factors —
- Windows update: Many users have reported that the issue occurred after they upgraded to Windows 10 or installed a Windows 10 update. This occurs when the Windows update messes up your configuration.
- Saved credentials: In some cases, the issue can also occur if your RDP app has saved your credentials which later on are lost or misconfigured.
Before getting into the solutions that will help you isolate the issue, please make sure that you have performed a single system restart. The issue might just go away with a simple reboot, therefore, it is worth the try. If it persists, try the solutions given down below.
Solution 1: Delete saved Credentials
For most of the users, the issue was resolved once they deleted the saved credentials. The error often occurs when your saved credentials are misconfigured or lost due to a Windows update or any other means. Therefore, to fix the issue, you will have to delete the credentials. Here’s how to do it:
- Open up the Remote Desktop Connection application.
- Click on ‘Show options’ and then navigate to the Advanced tab.
- Under ‘Connect from anywhere’, click Settings.
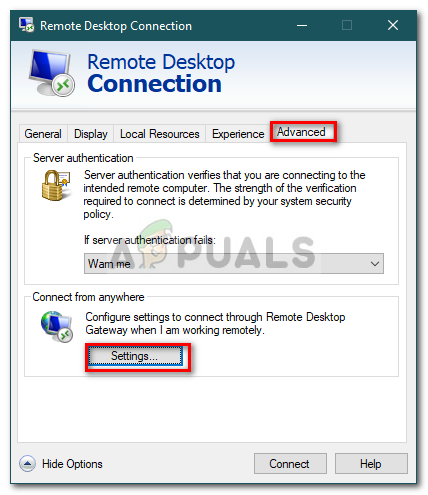
Remote Desktop Connection Settings - Afterward, click on Delete credentials to remove them.
Solution 2: Delete Credentials using Control Panel
If deleting the credentials using the guidelines provided in solution 1 doesn’t fix your issue, you can try deleting the credentials using the Control Panel. Here’s how to do it:
- Go to the Start Menu and open up the Control Panel.
- Now, navigate to Credential Manager and then click on Windows Credentials.
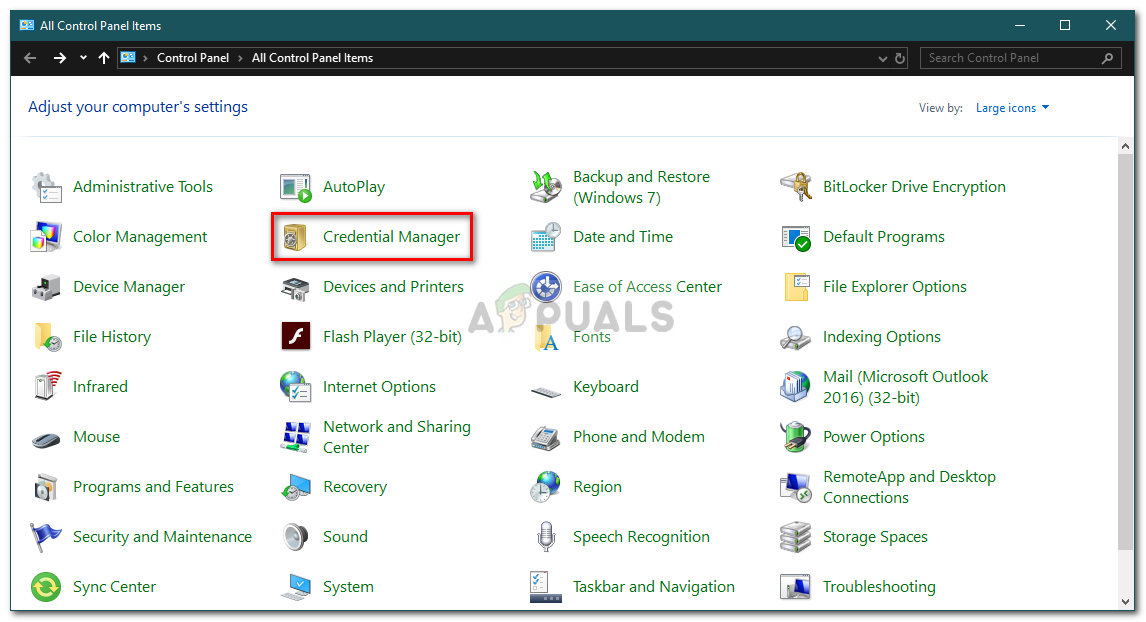
Control Panel - From the list, remove the credentials for RDP.
- Launch Remote Desktop Connection again and see if it works.
Solution 3: Using the Group Policies
In some cases, if you are trying to connect to a latest RDP client via an old one, you will most likely get the error. This is because the security on the latest RDP client has been changed. Therefore, to fix the issue, you will have to do the following:
- Press Windows Key + R to open Run.
- Type in ‘gpedit.msc’ and press Enter.
- Navigate to the following location:
Computer Configuration > Administrative Templates > Windows Components > Remote Desktop Services > Remote Desktop Session Host > Security
- From the list of policies, double-click ‘Require use of specific security layer for remote (RDP) connections’.
- Click the Enabled box and then from the drop-down list in front of the Security layer, choose Negotiate.
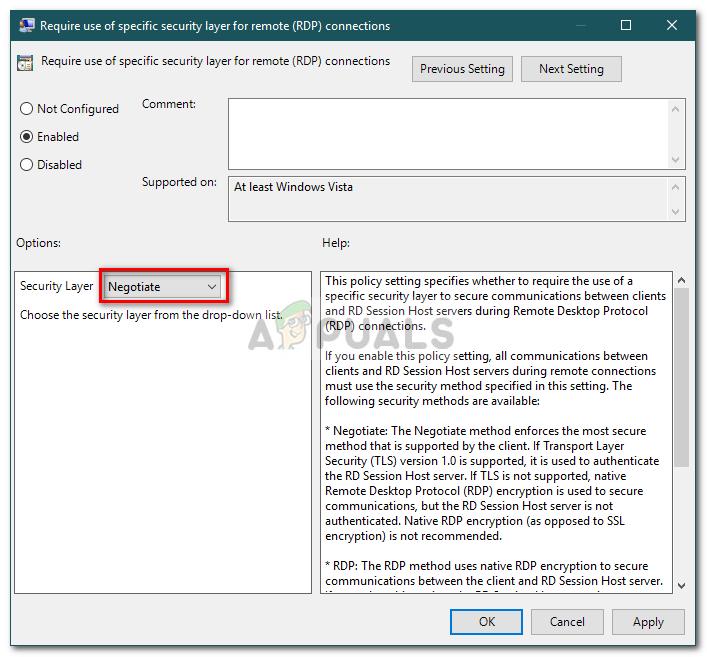
Configuring RDP Security Policy - Hit Apply and then click OK.
- Restart your system for it to take effect.
Solution 4: Modifying Windows Firewall Settings
If the above solutions do not work out for you, this might be because of your Windows Firewall. The firewall might be blocking the outgoing or incoming requests for RDP due to which you are not able to connect to the target system. Thus, you will have to add an exception for RDP. Here’s how:
- Go to the Start Menu, search ‘Allow an app through Windows Firewall’ and open it up.
- Click on Change Settings to be able to add an exception.
- Locate Remote Desktop and make sure the box is ticked.
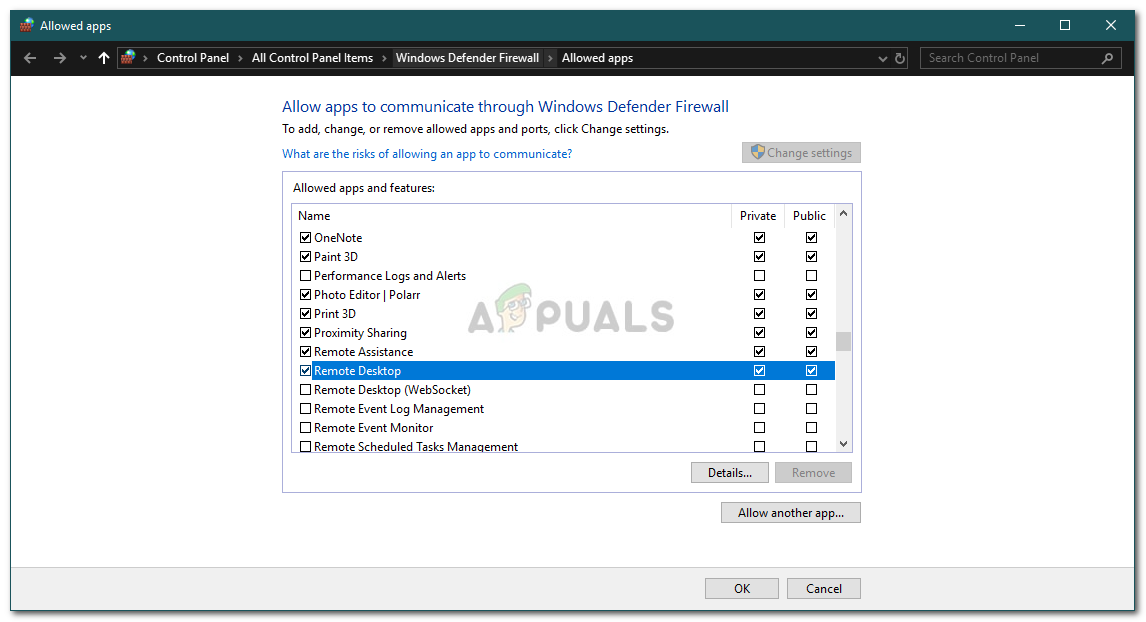
Allowing Remote Desktop App Through Firewall - Click OK.
Solution 5: Checking Remote Connections
In certain scenarios, the issue occurs when your system is configured not to allow a remote connection. If this is the case, it will stop any remote connections from establishing. Therefore, make sure that the remote connections are allowed. Here’s how to do it:
- Go to the Start Menu, type in ‘Remote settings’ and select ‘Allow remote access to your computer’.
- Make sure that the ‘Allow Remote Assistance connections to this computer’ box is checked.
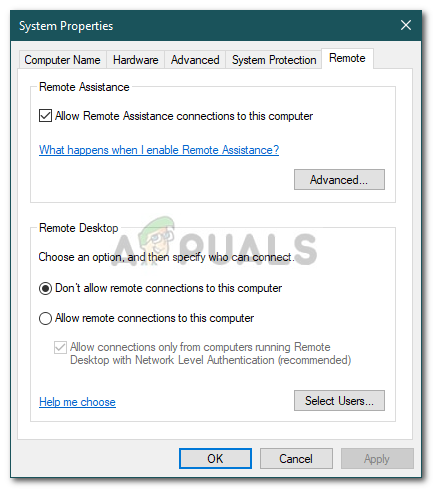
Allowing Remote Assistance to the System - Click Apply and then hit OK.
- Try using RDP now.


At solution one you never show what to do on the next screen after clicking ‘settings’. There is nothing that comes up that says ‘Delete Credentials’.