Fix: The Windows Security Center Service Can’t be Started
Staying safe while using your computer is generally the best advice anyone can give you because there are many ways your computer may end up compromised. Installing a good antivirus program and turning on your firewall may not be enough because even the best programs in the world might not be able to prevent your computer from malfunctioning if you are not paying enough attention.
Don’t open unknown links sent to you by anyone and don’t download files from unverified sources. Sketchy websites can download things to your computer without you even knowing and the problem gets bigger, even Windows Security Center may begin to act suspicious…
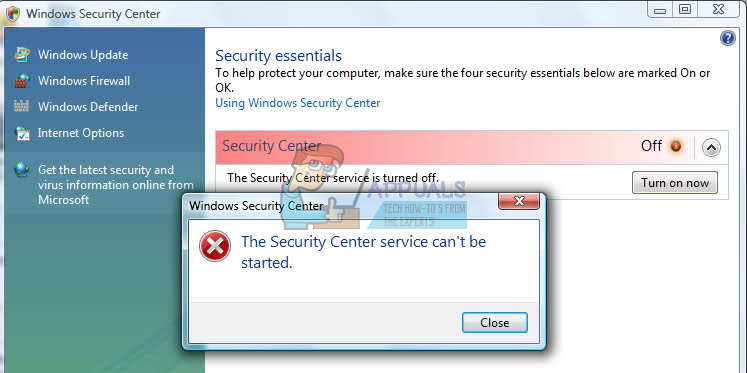
“The Security Center service can’t be started” Error Message
Several users have reported that their Windows Security Center was turned off without their consent and they were struggling to turn it back on. When they open the Security Center and try to turn it on they receive this particular message on their screen.
This is not necessarily an act of a malicious application because a lot of things may affect Windows services to misbehave. However, this can also be a red alarm so make sure you fix this solution as soon as possible by following the instructions below.
Solution 1: Fix the Problems Related to the Service
If the real issue is related to the service in charge of Windows Security Center, it’s the best if you try to troubleshoot this service before you try to do anything else. It’s quite easy and it may fix your problem instantly.
- If you are using a version of Windows older than Windows 10, the easiest way for you to access the services running on your PC is clicking on the Start button and navigating to the Run dialog box.
- Type “services.msc” in the dialog box and wait for the list of services to open.
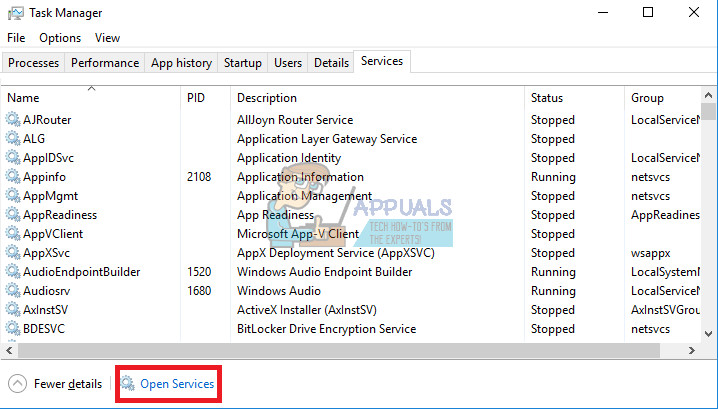
- If you are using Windows 10, you can also access Services by using the Ctrl + Shift + Esc key combination in order to bring up Task Manager.
- Navigate to the Services tab in Task Manager and click on Open Services at the bottom of its windows, next to the gears icon.
After you have successfully open Services, follow the instructions below.
- Locate the Security Center service by clicking on the Name column in order to sort the services in an alphabetical order.
- Note that this process goes by the name of SecurityHealthService in Task Manager but it’s called “Security Center” in the Services window.
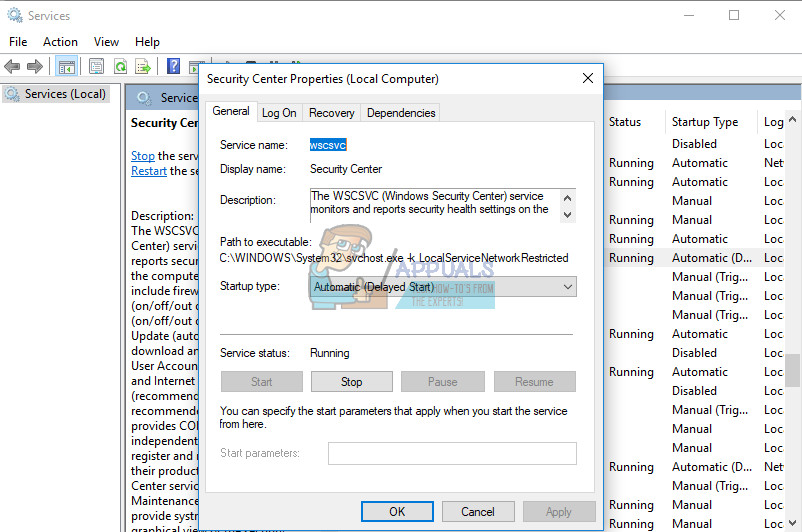
- Right-click on the Security Center service and click on Properties.
- Navigate to the Startup type and set it to Automatic (Delayed Start).
- If the service is not running, you will be able to click on Start just under the Service status.
The service should start now and you won’t have any problems dealing with it in the future. However, you may receive the following error message when you click on Start:
“Windows could not start the Security Center service on Local Computer. Error 1079: The account specified for this service differs from the account specified for other services running in the same process.”
If this occurs, follow the instructions below to fix it.
- Follow the steps 1-4 from the instructions below in order to open Security Center properties.
- Navigate to the Log On tab and click on the Browser… button.
- Under the “Enter the object name to select” box, type in your computer’s name and click on Check Names and wait for the name to become authenticated.
- Click OK when you are done and type in the administrator password in the Password box when you are prompted with it.
- Click OK and close this window.
- Navigate back to Security Center’s properties and click Start.
- Close everything and check to see if the service is still running.
Note: If you still notice certain issues, open Services again by following the instructions above and repeat the same process for services named Remote Procedure Call (RPC) and Windows Management Instrumentation. Make sure there are started and that their startup type is set on Automatic.
Solution 2: Fixing Your Registry
One of the possible causes for this issue you are having is simply the fact that your registry has become corrupted and you might need to fix it manually. Editing your registry may lead to irreversible changes to your computer unless you back it up so first let’s make sure you back it up.
- Click on the Start button and type in Registry Editor if you are using Windows 10.
- If you are using an older version of Windows, open the Run dialog box and type “regedit.exe”.
- Make sure you are logged in with an administrator account or make sure you provide the admin password if you need to.
- As soon as Registry Editor opens, click on File >> Export and choose a location to export the current state of your registry.
Since we have successfully backed up our registry, let’s proceed to deal with the Security Center issue.
- Navigate to the following location in your registry:
HKEY_LOCAL_MACHINE >> SYSTEM >> CurrentControlSet >> services >> wscsvc
- Right-click on this subkey and choose the Delete option. Click Yes when prompted.
- Next, you will have to open Notepad. Simply search for it in the search bar and open a new file.
- Copy the text below to your Notepad window:
Windows Registry Editor Version 5.00 [HKEY_LOCAL_MACHINE\SYSTEM\CurrentControlSet\services\wscsvc]
“DisplayName”=”@%SystemRoot%\\System32\\wscsvc.dll,-200”
“ErrorControl”=dword:00000001
“ImagePath”=hex(2):25,00,53,00,79,00,73,00,74,00,65,00,6d,00,52,00,6f,00,6f,00,\
74,00,25,00,5c,00,53,00,79,00,73,00,74,00,65,00,6d,00,33,00,32,00,5c,00,73,\
00,76,00,63,00,68,00,6f,00,73,00,74,00,2e,00,65,00,78,00,65,00,20,00,2d,00,\
6b,00,20,00,4c,00,6f,00,63,00,61,00,6c,00,53,00,65,00,72,00,76,00,69,00,63,\
00,65,00,4e,00,65,00,74,00,77,00,6f,00,72,00,6b,00,52,00,65,00,73,00,74,00,\
72,00,69,00,63,00,74,00,65,00,64,00,00,00
“Start”=dword:00000002
“Type”=dword:00000020
“Description”=”@%SystemRoot%\\System32\\wscsvc.dll,-201”
“DependOnService”=hex(7):52,00,70,00,63,00,53,00,73,00,00,00,57,00,69,00,6e,00,\
4d,00,67,00,6d,00,74,00,00,00,00,00
“ObjectName”=”NT AUTHORITY\\LocalService”
“ServiceSidType”=dword:00000001
“RequiredPrivileges”=hex(7):53,00,65,00,43,00,68,00,61,00,6e,00,67,00,65,00,4e,\
00,6f,00,74,00,69,00,66,00,79,00,50,00,72,00,69,00,76,00,69,00,6c,00,65,00,\
67,00,65,00,00,00,53,00,65,00,49,00,6d,00,70,00,65,00,72,00,73,00,6f,00,6e,\
00,61,00,74,00,65,00,50,00,72,00,69,00,76,00,69,00,6c,00,65,00,67,00,65,00,\ 00,00,00,00
“DelayedAutoStart”=dword:00000001
“FailureActions”=hex:80,51,01,00,00,00,00,00,00,00,00,00,03,00,00,00,14,00,00,\
00,01,00,00,00,c0,d4,01,00,01,00,00,00,e0,93,04,00,00,00,00,00,00,00,00,00
[HKEY_LOCAL_MACHINE\SYSTEM\CurrentControlSet\services\wscsvc\Parameters]
“ServiceDllUnloadOnStop”=dword:00000001
“ServiceDll”=hex(2):25,00,53,00,79,00,73,00,74,00,65,00,6d,00,52,00,6f,00,6f,\ 00,74,00,25,00,5c,00,53,00,79,00,73,00,74,00,65,00,6d,00,33,00,32,00,5c,00,\
77,00,73,00,63,00,73,00,76,00,63,00,2e,00,64,00,6c,00,6c,00,00,00
[HKEY_LOCAL_MACHINE\SYSTEM\CurrentControlSet\services\wscsvc\Security]
“Security”=hex:01,00,14,80,c8,00,00,00,d4,00,00,00,14,00,00,00,30,00,00,00,02,\
00,1c,00,01,00,00,00,02,80,14,00,ff,01,0f,00,01,01,00,00,00,00,00,01,00,00,\
00,00,02,00,98,00,06,00,00,00,00,00,14,00,fd,01,02,00,01,01,00,00,00,00,00,\
05,12,00,00,00,00,00,18,00,ff,01,0f,00,01,02,00,00,00,00,00,05,20,00,00,00,\
20,02,00,00,00,00,14,00,9d,01,02,00,01,01,00,00,00,00,00,05,04,00,00,00,00,\
00,14,00,8d,01,02,00,01,01,00,00,00,00,00,05,06,00,00,00,00,00,14,00,00,01,\
00,00,01,01,00,00,00,00,00,05,0b,00,00,00,00,00,28,00,15,00,00,00,01,06,00,\
00,00,00,00,05,50,00,00,00,49,59,9d,77,91,56,e5,55,dc,f4,e2,0e,a7,8b,eb,ca,\
7b,42,13,56,01,01,00,00,00,00,00,05,12,00,00,00,01,01,00,00,00,00,00,05,12,\
00,00,00
- In your Notepad windows, click on File >> Save As.
- In the Save as Type box, choose the All Files option and name the file Hkey.reg in the File Name box. Click Save.
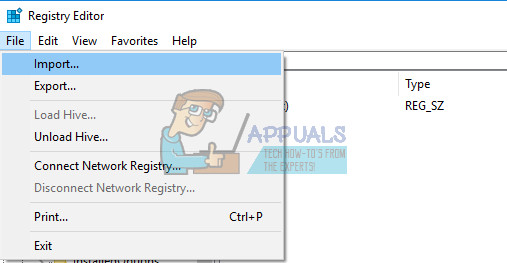
- Navigate back to Registry Editor and click on File >> Import…
- Locate the Hkey.reg file you just created using Notepad and double-click on it.
- Click OK and exit the Editor.
- Restart your computer and check to see if the Security Center is running.
Solution 3: Repairing WMI Repository
This is a possible fix to this issue and it’s generally easy to check is everything okay with your WMI Repository.
- Open Command Prompt by clicking on the Start menu and typing Command Prompt. Right-click on the first result and select Run as administrator.
- Copy and paste the following command in order to check your WMI Repository:
winmgmt /verifyrepository
- If you receive a “WMI repository is consistent” message, there should be nothing to worry about regarding it so please skip forward to the next solution.
- On the other hand, if you receive a “WMI repository is inconsistent” message, there is indeed something wrong with it and fixing it may solve your issue.
- In order to fix it, copy and paste the following command in Command Prompt and click Enter:
winmgmt /salvagerepository
- Exit Command Prompt, restart your computer, and check to see if the problem with Security Center still persists.
Solution 4: Running Several Error Scanning Tools
There are a couple of really helpful tools which can assist you with solving issues like this one. System File Checker (SFC) is a tool which can scan your hard drive for missing or broken system files and it can replace and fix them automatically.
- In order to run System File Checker, search for Command Prompt and run it with administrator privileges.
- When Command Prompt opens, copy and paste the following command in order to start the scanner:
sfc /scannow
- Wait for the scanner to finish and check the log in order to see if it located any errors regarding your system files.
Deployment Image Servicing and Management (DISM) will scan your Windows Image and repair any issues it may find. Running it is also done via Command Prompt.
- Open Command Prompt in the same manner as you did in the previous section.
- Copy and paste the following command in order to have DISM scan and repair any errors regarding your Windows image. Make sure you click Enter in order to run the command.
DISM /Online /Cleanup-Image /RestoreHealth
- Please allow the tool some time and wait for it to finish before closing Command Prompt and restarting your computer.
Solution 5: A Simple Windows 7 Registry Fix
If you are using a PC running Windows 7 and if you skipped the Solution 2 regarding the manual registry fix, you might be able to perform this automatically and skip the hassle. This fix was able to help a lot of people and save them plenty of effort so make sure you try this as well.
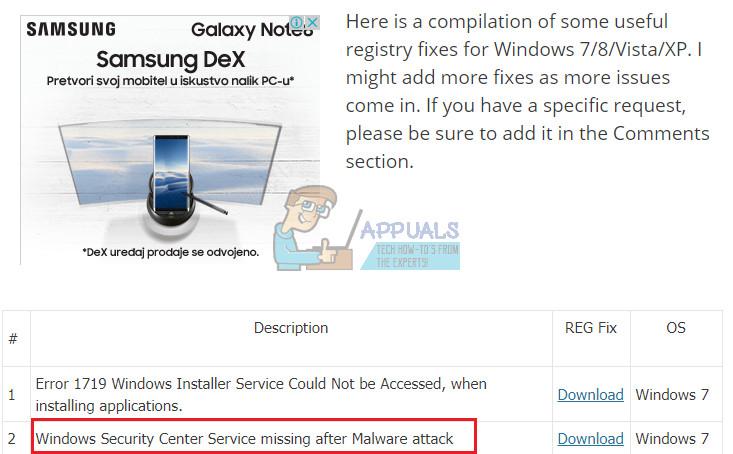
- Navigate to the following link which contains plenty of registry fixes regarding all kinds of Windows errors.
- The file you need is located at the second spot on the list under the description “Windows Security Center Service missing after Malware attack”.
- Click on the Download button next to the description, in the REG Fix column.
- Open your Downloads folder or the folder you downloaded the file to and extract the zip file by right-clicking on it and selecting Extract here…
- Simply click on the file and accept any dialogues that might open.
- The file will add the registry keys needed in order to activate Windows Security Center service again.
Solution 6: Service Not Running as a Local Service
Issues with several services including Security Center service way occur if the service was not configured to run as a Local Service and it runs independently. Fixing this is fairly easy and it requires some knowledge from Solution 1.
- Type “services.msc” in the search box which you can access after clicking on the Start menu.
- Locate Security Center, right-click on it, and select Properties.
- Navigate to the Log On tab and click Browse under This account.
- Type Local Service and confirm. Type the password of your account and click OK.
- Repeat the same for another service called Windows Management Instrumentation service.
Solution 7: Scanning Your System for Malware
The solutions from above were all related to fixing things which were wrong with your system such as missing registry files or misconfigured startup type of the Security Center service. However, it’s highly likely that this issue was caused by a malicious application which usually targets services crucial to your computer’s security such as Security Center, Windows Firewall, etc. It’s advisable to scan your system immediately using various tools you can find online for free.
- Download Malwarebytes: Anti-Malware from their official site.
- Run the file you just downloaded and follow the instructions on screen in order to install it.
- Open MBAM once it’s downloaded and click on the Scan button located at the bottom of the Home screen.
- MBAM will firstly look for updates to its database before proceeding with the full scan. Please be patient until the scan finishes as it might take a while.
- After the scan finishes, remove the infections the scanner find and restart your computer.
- If your Security Center is still not running, try configuring its startup type and renew its registry keys by following through the Solutions 1 and 2.
Note: After scanning with Malwarebytes: Anti-Malware, it’s advisable to use other free scanning tools such as Microsoft Security Essentials, Hitman PRO, etc.