Fix: System Idle Process High CPU Usage
In Windows, the System Idle Process task contains one or more kernel threads which execute when there are no runnable tasks in the system. When you see the idle process running, it means that there were no other tasks available for the computer to schedule; hence it calls and executes this task.
Because of the Idle Process function, it may seem to users that the process is monopolizing resources (CPU time, Memory etc). However, System Idle Process doesn’t use up system resources even when it is running at high percentages (99 or 100%). The “CPU Usage” is usually a measure of how much CPU time is not being used by other processes. In some versions of windows, this was used to implement power saving and in later versions, it was used to call routines in Hardware Abstraction Layer to reduce CPU clock speed.
Still despite all the functions, if you are experiencing problems due to the process, we can still go on with the troubleshooting. For some users, their computer was comparatively slow although this shouldn’t be a case.
Solution 1: Disabling Startup Processes
- Press Windows + R to launch the Run application. Type “msconfig” in the dialogue box and press Enter.

- Navigate to the Services tab present at the top of the screen. Check the line which says “Hide all Microsoft services”. Once you click this, all Microsoft related services will be disabled leaving behind all the third-party services.
- Now click the “Disable all” button present at the near bottom at the left side of the window. All the third-party services will now be disabled.
- Click Apply to save changes and exit.
Now you should enable these processes in a chunk and check if your PC is still slow. If it isn’t, you can enable another chunk and check again. This way you will be able to diagnose which process is giving the problem and then troubleshoot it accordingly.
Solution 2: Checking Drivers for problem
It is possible that a specific driver is causing the problem. You can use the RATT utility to create event logs and check which driver is causing the problem. Once you have identified the driver which is causing the problem, you update the driver or disable it accordingly. Here is how to update the driver.
- Press Windows + R to launch the Run Type “devmgmt.msc” in the dialogue box and hit Enter. This will launch your computer’s device manager.
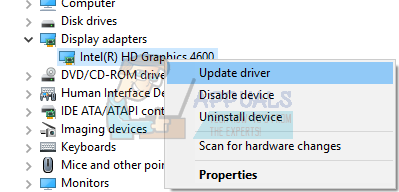
- Here all the installed devices on your computer will be listed. Navigate through all of them until you find the driver which is causing the problem.
- Right click on it and select “Update driver”.
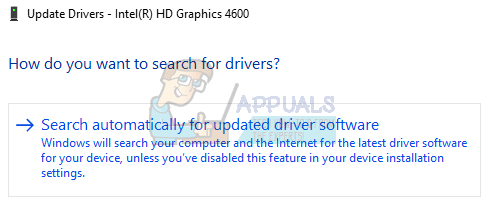
- Now Windows will pop a dialogue box asking you which way do you want to update your driver. Select the first option (Search automatically for updated driver software) and proceed. If you are unable to update the drivers, you can head over to your manufacturer’s site, download the drivers manually and select the second option.
- Update all your drivers before restarting your computer. After restarting, check if the problem is solved.