Fix: Spell Check not working in Word
Microsoft Word is a word processor developed by Microsoft. It has been around for decades and is the most used office application around the globe. It receives periodic updates from Microsoft itself targeting various issues and improving various features.
Users using Microsoft Word might come across an issue where their words are not being monitored by the editor. This issue is not usually a big one and can be easily fixed by changing some of the settings. We will go through various settings for you to check. Start with the first one and work your way down.
Solution 1: Unchecking ‘Detecting language automatically’
Microsoft Word has a function where it automatically detects the language your inputting and it tries to correct it accordingly. This may be a good feature for many writers but this has proven to be inconsistent in numerous cases. We can try unchecking this setting after select all the text and see if this does the trick. If you are using a normal language such as English, it is most likely that you won’t even need this feature to be active.
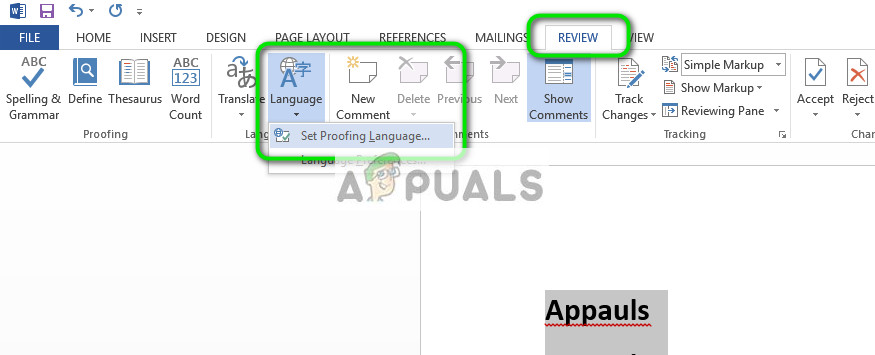
- Open the word file. Press Ctrl + A to select all the text and click on the Review tab present at the top of the screen.
- Now select Language and select “Set Proofing Language”.

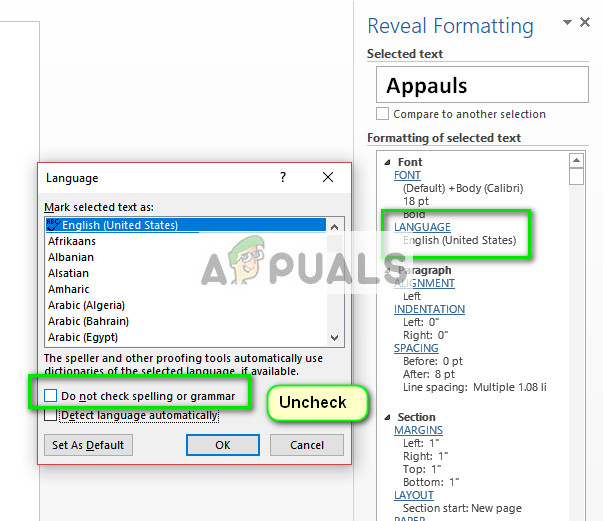
- Now uncheck the options “Do not check spelling or grammar” and “Detect language automatically”. Press OK to save changes.

- Now check if you can successfully use the utility spell check. If you can’t restart Word and try again.
Tip: You can also use the Default button when the list of options come up.
Solution 2: Changing Exceptions
There is also a feature in this word editor to include exceptions from all proofing and spelling checks. This is very useful for writers who don’t want their work to be checked as they want to use ‘custom’ language in their work. You should if your document is listed as an exception. If it is, simply removing it will solve the problem.
- After selecting all the text, click on the Review tab at the top of the screen. Now select Language and click “Language Preferences”.

- Now click on “Proofing” and navigate to the end of the options. Now uncheck both the checks i.e. “Hide spelling errors in this document only” and “Hide grammar errors in this document only”.

- Press OK to save changes and exit. You might be prompted to restart the application for the changes to take place. After restarting, check if the problem at hand got solved.
Solution 3: Disabling “Do not check spelling or grammar”
Another functionality present in Microsoft Word is to stop checking the spelling or grammar for several words. Through this, you can ensure that a specific miss-spelling is not detected by the word editor. This is useful for numerous users as there is always such a word they choose to ignore. However, if configured incorrectly, this means that word ignores all the spell checks. We can try reverting this options and see if this does the trick.
- Open the document. Now select the specific word which is not being shown in the spell check and press Shift + F1.
- Now click on Language. A dialog similar in Solution 1 will come up. Make sure that the option “Do not check spelling or grammar” is unchecked.

- Press OK to save changes and exit. Now check if the problem got solved. If it didn’t, consider restarting the application and check again.
Tips:
- Copy the entire text, open a new word file and paste it there. Now save the word file with a different and open it again to check the functionality.
- Make sure that the word is not in the custom dictionary. The words in the custom dictionary are automatically excluded from being checked (File > Options > Proofing > Custom Dictionaries).
- Also, make sure that the word is not saved in a foreign language dictionary which is automatically applied to all or some part of the text (Review tab > Language > Language Preferences).


