Fix: Sharing Tab is Missing on Windows 10
Windows has offered users with the ability to share files and folders for a very long time. By default, the sharing tab is located in the Properties window where users can create a share path and also set advanced sharing permissions and more.
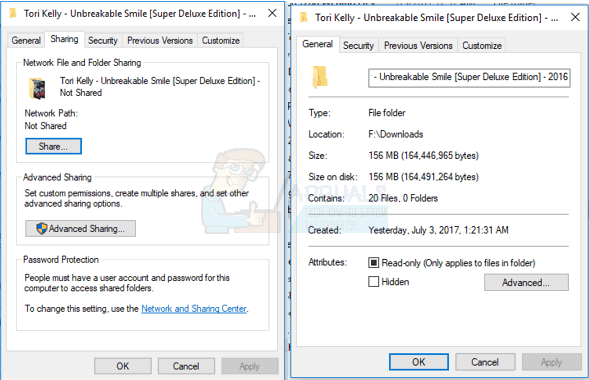
There are times where the Sharing tab may not show up in the Properties tabs and you’re unable to create any shares for other users to access. The screenshot below shows a scenario where the Sharing tab is both available and missing.
The Sharing tab and context menu entry is mostly likely to get missing when services like the server service isn’t running on your PC. This can also be an internal issue, where a specific registry value is missing, and can easily be fixed using the Windows Registry. In this article, we’ll provide fixes to this issue using the causes identified.
Method 1: Starting Required Services
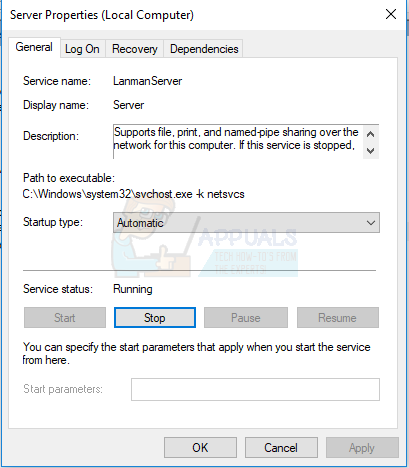
Most times, this problem occurs when the Server and Security Accounts Manager services are not running. Here’s how to get them running.
- Press the Windows key + R to launch the Run prompt, type msc and hit Enter.

- In the Services console, look for the Server and Security Accounts Manager Double-click on each entry and make sure the Startup type is set to Automatic and click the Start button to immediately start the service.
- Check the folder properties and context menu entry and the Sharing option should be available at this time.
Method 2: Applying a Registry Fix
- Press the Windows key + R to open the Run prompt. Now type regedit and hit Enter to open the Registry Editor. If you’re asked to grant access via a UAC prompt, accept it.

- Navigate to HKEY_CLASSES_ROOT\Directory\shellex\PropertySheetHandlers\SharingIf the folder doesn’t exist, right-click on the parent folder and use the New > Key menu to create an entry.
- Confirm if there is a default value with type REG_SZ and Data {f81e9010-6ea4-11ce-a7ff-00aa003ca9f6}. If this particular entry is absent, right-click in this directory and select New > Key and create a new entry with the following information.
Key: HKEY_CLASSES_ROOT\Directory\shellex\PropertySheetHandlers\Sharing
Value: (Default)
Data: {f81e9010-6ea4-11ce-a7ff-00aa003ca9f6}
Type: REG_SZ

- Close regedit, and check the folder properties and context menu entry and the Sharing option should be available at this time, else reboot your PC and check again.
Alternatively, you can download this registry file and double-click to run it.
Method 3: Add Missing Group Memberships
When a user account isn’t not a member of the local groups, Users, Administrators, or Power Users, for a particular folder or file, the Sharing tab won’t appear. It’s very rare for this to happen, but here’s how you can add your user account to the users group.
- Open the Properties of the content you want to share and click on the Security tab.
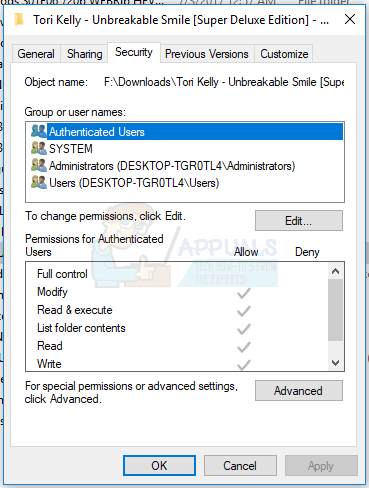
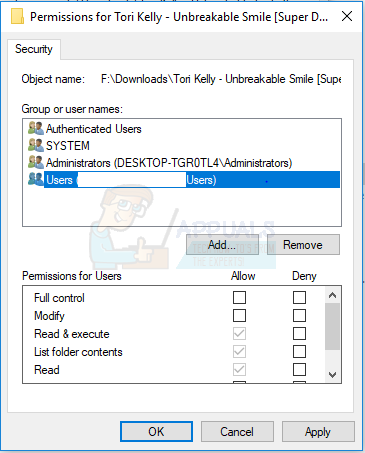
- Click on Edit > Add, enter the username of your account and click Check Names. When the full path to your account appears, click on OK. If you don’t know your username, just type Users, which actually will work for all users of the PC.

- You can additionally set permissions for your user account by clicking on the group or user name and checking the Permissions box below.
- Check the folder properties and context menu entry and the Sharing option should be available at this time.
Open the registry and navigate to the following address:
HKEY_LOCAL_MACHINESYSTEMCurrentControlSetControlLsa
Click on the “Forceguest” key and set its value data to “0”.