Fix: Scripted Diagnostics Native Host has Stopped Working
Many people come across an error message stating “Scripted diagnostics native host has stopped working”. This issue usually comes up when you are updating your drivers or accessing some system files. This error has been there for a long time and is associated with a lot of different modules.
These modules may range from Windows Update, your Disk, several system files etc. We have compiled a list of workarounds to fix this issue. Start from the top and work your way down. There is no ‘definite’ fix for this error as all computer configurations are different. If anything doesn’t work, we can try restoring your system to a previous restore point or doing a clean installation of Windows.
Solution 1: Checking your Disk
It is possible that your disk has bad sectors which are causing this problem. We can try checking your disk fully and see if anything comes up. Backup up your data and configurations before carrying out all these solutions just in case.
- Press Windows + S, type “command prompt” in the dialogue box, right-click on the application and select “Run as administrator”.
- Once in elevated command prompt, execute the following command:
CHKDSK /R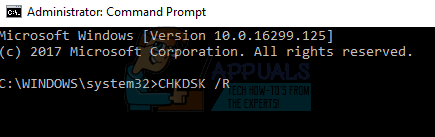
- The computer might prompt for a restart. If it does, follow the instructions and check if the error still persists.
Solution 2: Checking Recently Installed Update/Installing Updates Manually
If the above solution didn’t work, we can check if any recent update was installed on your computer. Many users reported that updating Windows was the culprit. After uninstalling the update (after which they started experiencing the problem), the problem went away. If this doesn’t work, then we can try the opposite; we can check if Automatic updates are turned off. If they are, we can try updating manually and check if it makes any difference.
- Press Windows + S, type “windows update” and open the application which comes forth in the results.
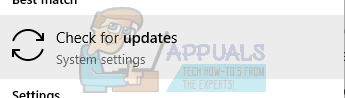
- Once in Update settings, click on “View installed update history”.

- Click on “Uninstall updates” which comes forth in the next window.
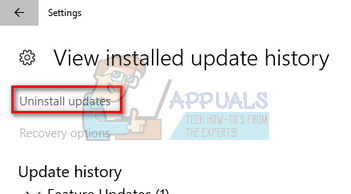
- In front of you will a list of all the recently installed updates along with the date and time. Diagnose and determine after which update you started to experience the problem. Select it and click “uninstall”. Restart your computer afterward and check if the error is solved.
If you have disabled the Windows Update mechanism on your PC, you should turn it back on and check if there are any updates available to be installed. Some users reported that installing the latest updates available seems to solve their problem. You can more guidance on how to manually run Windows Update.
Solution 3: Diagnosing Problem using Reliability Monitor
If the above methods don’t help in solving the problem, we can resort to more advanced ways to check where the problem is originating from. We will use an inbuilt Microsoft application called “Reliability Monitor”. It documents all system events along with system updates and all the application/system crashes (if any). If you happen to diagnose the problem, you can streamline your troubleshooting process and proceed with the fix.
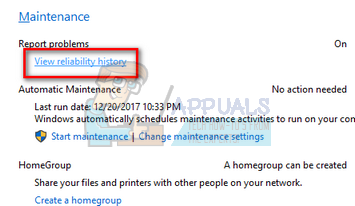
- Press Windows + S, type “Security and Maintenance” and open the application which returns in the search.

- Expand the category of “Maintenance” and click on “View reliability history” under the heading of “Report problems”.
- Windows will take a while to compute all the events which occurred in the recent days. After a few seconds, it will display a graph like this. Blue exclamation marks mean that there was an update installed on your computer (including security updates and virus definitions etc.). Red crosses mean that there was a crash event. You can click on it to view all the related information.
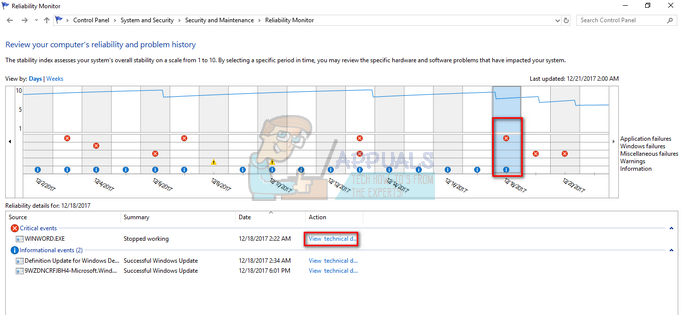
Using these details, you can check and relate to any errors/updates happening after or before you started experiencing the problem. From here you would get a better idea which way to proceed.
Solution 4: Deleting CrashHandler.vbs
Another workaround which worked for many people was deleting the file “CrashHandler.vbs”. This is a file present at each user configuration and is unique for each different user on the system. You can copy the file to another location so you can always restore the file if anything goes wrong. Rename the file and copy it to another location. Then delete the files and restart your computer and check if the problem is solved. The file can be located in this file path. Do note that some of these folders are hidden so make sure that “Show hidden folders” is enabled in file explorer.
C:\Users\<YourUserName>\AppData\Roaming\Microsoft\Windows\Start Menu\Programs\Startup\CrashHandler.vbs.
Solution 5: Running SFC and DISM
System File Checker (SFC) is a utility present in Microsoft Windows which allows the users to scan their computers for corrupt files in their operating system. It is a very useful tool for diagnosing the problem and checking if any problem is due to corrupt files in windows.
We can try running SFC and see if our problem gets solved. You will get one of the three responses when running SFC.
- Windows didn’t find any integrity violations
- Windows Resource Protection found corrupt files and repaired them
- Windows Resource Protection found corrupt files but was unable to fix some (or all) of them
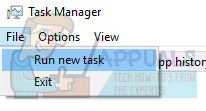
- Press Windows + R to launch the Run application. Type “taskmgr” in the dialogue box and hit Enter to launch your computer’s task manager.
- Now click on File option present at the top left side of the window and select “Run new task” from the list of options available.
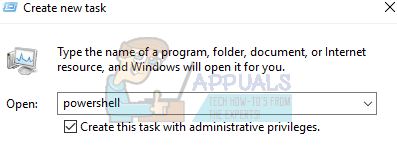
- Now type “powershell” in the dialogue box and check the option underneath which states “Create this task with administrative privileges”.
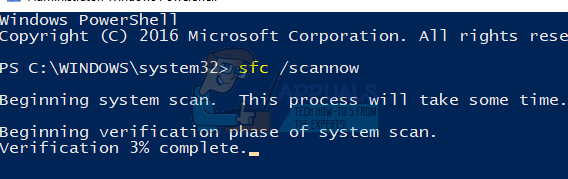
- Once in the Windows Powershell, type “sfc /scannow” and hit Enter. This process may take some time as your entire Windows files are being scanned by the computer and being checked for corrupt phases.
- If you encounter an error where Windows states that it found some error but was unable to fix them, you should type “DISM /Online /Cleanup-Image /RestoreHealth” in the powershell. This will download the corrupt files from the Windows update servers and replace the corrupt ones. Do note that this process can also consume some time according to your internet connection. Don’t cancel at any stage and let it run.
If an error was detected and was fixed using the above methods, restart your computer and check if the taskbar started working normally.
Solution 6: Starting Computer in Clean-Boot state
If all the above solutions don’t work, we can try Clean Booting. This boot allows your PC to turn on with a minimal set of drivers and programs. Only the essential ones are enabled while all the other services are disabled. If the error doesn’t occur in this mode, you should enable the processes back on only with small chunks and check if the error returns. If it doesn’t, you can turn on another chunk and check. This way you will be able to diagnose which process is causing the problem.
- Press Windows + R to launch the Run application. Type “msconfig” in the dialogue box and press Enter.
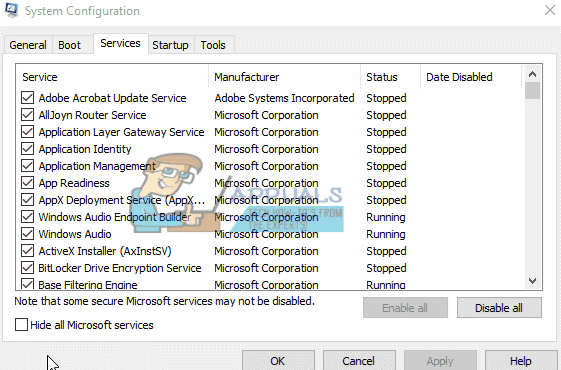
- Navigate to the Services tab present at the top of the screen. Check the line which says “Hide all Microsoft services”. Once you click this, all Microsoft related services will be disabled leaving behind all the third-party services (you can also disable all Microsoft related processes too and check more extensively if there are no third-party services causing the problem).
- Now click the “Disable all” button present at the near bottom at the left side of the window. All the third-party services will now be disabled.
- Click Apply to save changes and exit.
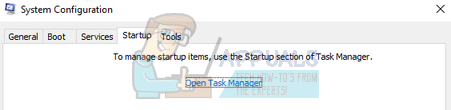
- Now navigate to the Startup tab and click the option of “Open Task Manager”. You will be redirected to the task manager where all the applications/services which run when your computer starts will be listed.
- Select each service one by one and click “Disable” at the bottom right side of the window.
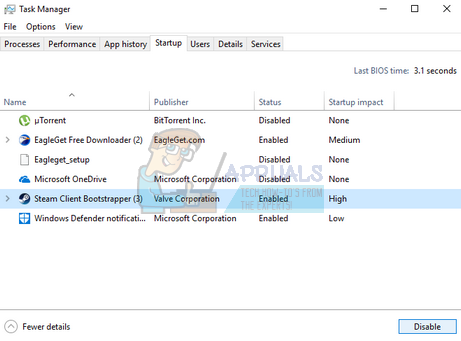
- Now restart your computer and check if the problem appears again. If it doesn’t, enable a small chunk (explained at the start) and then check again. If you diagnose a specific service, you can try restarting or disabling it using services window.
Solution 7: Restoring from last Restore Point/ Doing a Clean Install
If all the above methods don’t work, we are left with no choice but to restore Windows to the last restore point. If you don’t have a last restore point, you can install a clean version of Windows. You can use the utility “Belarc” to get all your licenses saved, backup your data using external storage and then perform a clean install.
Here is the method on how to restore Windows from the last restore point.
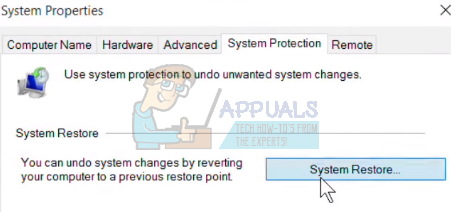
- Press Windows + S to launch the start menu’s search bar. Type “restore” in the dialogue box and select the first program which comes in the result.

- Once in the restore settings, press System Restore present at the beginning of the window under the tab of System Protection.
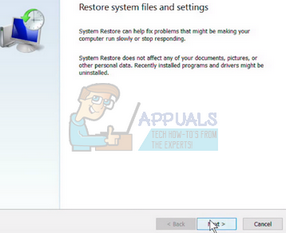
- Now a wizard will open navigating you through all the steps to restore your system. Press Next and proceed with all the further instructions.
- Now select the restore point from the list of options available. If you have more than one system restore points, they will be listed here.

- Now windows will confirm your actions for the last time before it starts the system restore process. Save all your work and backup important files just in case and proceed with the process.

You can learn more about system restore to gain more knowledge about what it does and what are the processes involved.
- Once you have restored successfully, log into the system and check if the error at hand got fixed.
If you don’t have any restore points, you can do a clean install of Windows using bootable media. You check our article on how to create a bootable media. There are two ways: by using media creation tool by Microsoft and by using Rufus.