Fix: Rocket League Error Code 68
The launch of any online multiplayer games is almost exclusively followed by faulty server and excess error codes. Rocket League is no exception and it appears that folks have been receiving all sorts of error codes from the game, including the error code 68.
This error can be quite difficult to solve properly as it often appears for no apparent reasons and there are quite a few very different causes for the problem, all of which can occur to you on any console. That is why it’s important that you follow through all of the solutions before giving up.
Solution 1: You Have Been Banned
The most obvious cause for the error code 68 is that you may have been temporarily banned from playing the game by leaving too many matches. For example, if you were in the middle of the match and you exited by turning off your computer or by force-closing the game, the game sometimes gets confused and doesn’t know what to report.
Actually, what happens is that you may have received a warning 15-minute ban which prevents you from joining new games but the game fails to present that information and it throws the error code 68 anyway. However, most people reported that the error code disappears exactly after 15 minutes so it’s the best for you to wait. However, if you have broken some more game rules in the meantime, you can expect the ban time to be longer than that.
Solution 2: Check to See if the Servers Are Down
Sometimes the servers are to blame, especially if they become too crowded, resulting in various weird error codes. Every game developer has suggested to users that they should try reconnecting for a couple of minutes before trying to fix the error code in other ways.
Additionally, there are plenty of users who confirmed that being patient paid off and they were soon able to continue playing the game normally.
Sometimes it’s simply the servers which are going under maintenance and sometimes there is a problem with the account users are using to play the game. You can always check the status of various servers for any of the platforms available by clicking on the links below:
- PlayStation Network Status: https://status.playstation.com
- Xbox Live Status: https://support.xbox.com/xbox-live-status
- Rocket League Twitter: https://twitter.com/rocketleague
- DownDetector for Rocket League: http://downdetector.com/status/rocket-league
Solution 3: Restart Several Components
Enjoying the game properly without any crashes can also be fixed by resetting certain components until the game actually starts working. However, you should be aware of the fact that there are quite a few things that should be reset if you really want to make sure that everything is running smoothly since the cause of the problem may be your Internet connection, your console, the Steam client, etc. Follow the instructions below to restart all of these components successfully.
Restart Steam:
- Open the Steam client UI by double-clicking on the icon located in the system tray which should display the last open Steam window you were in.
- Locate the menu at the bottom left part of the windows and click on Steam >> Exit.
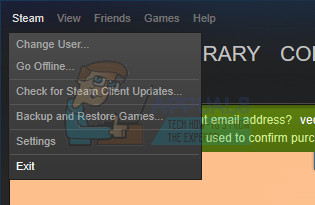
- Wait for the client to shut down completely before opening Steam again by locating its icon on the Desktop or in the folder you installed it in.
Restart Your Device and Your Internet Connection:
Since the game can be played on various devices such as Xbox One, PlayStation 4 or a PC, below are the correct steps on properly resetting all consoles which will also delete the cache for PS4 and Xbox One. It’s important to also reset your Internet connection before turning the consoles on again since it’s recommended to plug out your Internet connection every once in a while simply to reset it.
Xbox Users:
- Press and hold the power button at the front of the Xbox console until it shuts down completely.
- Unplug the power brick from the back of the Xbox. Press and hold the power button on the Xbox several times to make sure there is no remaining power and this will actually clean the cache.
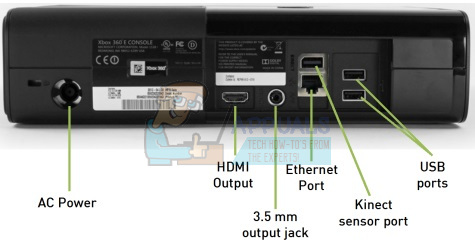
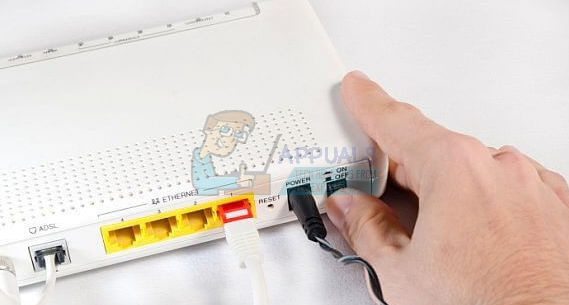
- Unplug the Ethernet cable from the Xbox One if you are using it to connect to the Internet and let the cable stay unplugged for at least a couple of minutes before plugging it back in. Meanwhile, restart your router and your modem by clicking the Power buttons located on them before you plug the cable back into your device.
- Plug in the power brick and wait for the light located on the power brick to change its color from white to orange.
- Turn the Xbox back on as you would do normally.
PlayStation Users:
- Completely turn off the PlayStation 4.
- Once the console is completely shut down, unplug the power cord from the back of the console.
- Let the console stay unplugged for at least a couple of minutes. Unplug the Ethernet cable from the Xbox One if you are using it to connect to the Internet and let the cable stay unplugged for at least a couple of minutes before plugging it back in. Meanwhile, restart your router and your modem by clicking the Power buttons located on them before you plug the cable back into your device.
- Plug the power cord back into the PS4 and turn it on the way you normally do.
PC Users:
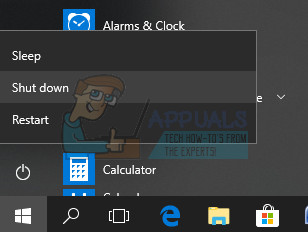
- On your running PC, click on Start >> Power button at the bottom of the menu and choose the Shut down option.
- Once your PC has shut down completely, unplug the Ethernet cable from your PC if you are using it to connect to the Internet and let the cable stay unplugged for at least a couple of minutes before plugging it back in. Meanwhile, restart your router and your modem by clicking the Power buttons located on them before you plug the cable back into the computer.
- Turn the PC on normally by pressing the power button.
Solution 4: Change the MAC Address of Your PC (Just for PC Users)
Changing the MAC address is a somewhat advanced process which should be performed with care but it shouldn’t take a long time and users have reported that it has worked for them in certain occasions.
Users who are most likely to benefit from this solution are users who are using limited Internet connection they don’t administer themselves such as students living in dorms and students using university servers. Changing the MAC address may help their Internet traffic and improve their connection to the Rocket League servers.
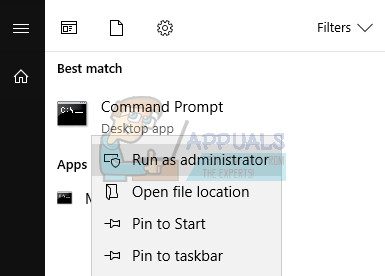
- Find your network adapter’s information by clicking the Start menu or the search button next to it and typing “cmd”. Right-click on the first result and choose the Run as administrator option. You can also search for “run” in order to open the run dialog box and type “cmd”.
- Type the command below and make sure you press Enter afterwards. Write down the Description and Physical Address for the network device you are currently using whose name will match the type of connection (wireless, LAN, etc).
- ipconfig/all
- Type in the following command displayed below and click Enter. Write down the GUID, which is displayed between the “{}” brackets next to the Physical Address you located earlier.
- net config rdr
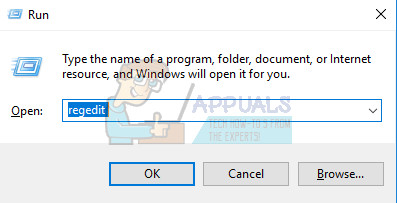
- Open the Registry Editor. You can open it by opening the Run dialog box (Windows key + R) and typing “regedit”.
- Navigate to the registry key presented below and expand it by clicking the arrow next to it.
- .
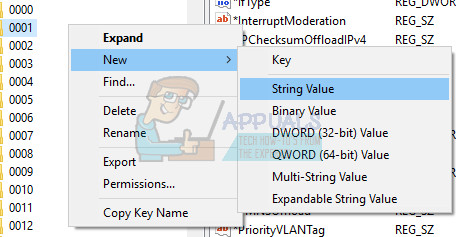
- Find your adapter by opening the folders named “0000”, “0001”, etc, and compare the DriverDesc key to the Description your wrote down above.
- Right-click on the folder that matches your network device and select New >> String Value. You should name it “NetworkAddress”.
- Double-click the new NetworkAddress entry and enter your new MAC address in the “Value data” field, MAC addresses consist of 12 digits and there should be nothing separating the letters and digits.
- Restart your computer to enable the changes and you can check if the changes were applied properly. Once again open the Command Prompt window and run the “ipconfig/ all” command and check the Physical Address next to your active network device. The new set of numbers should be in place.