Fix: Remote Desktop can’t Connect to the Remote Computer for one of these Reasons
The “Remote Desktop can’t connect to the remote computer for one of these reasons” error typically appears when a Remote Desktop connection is unexpectedly interrupted, preventing users from accessing a remote system. This error indicates a configuration or network issue blocking the connection.
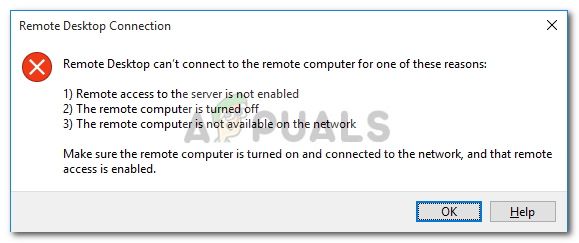
The most common causes are Remote Desktop being disabled on the target machine or incorrect firewall settings. Other factors, like network misconfigurations, DNS problems, or insufficient permissions, can also lead to this error.
In this article, we will discuss different ways to solve this error.
1. Change/Tweak your Firewall Settings
To address Remote Desktop connection issues, adjust firewall settings to allow RDP through security layers. If the firewall blocks port 3389 (RDP’s default port), connections won’t work. Make sure to allow traffic on this port or list Remote Desktop as an allowed app to prevent the firewall from blocking access. This step tackles a common cause of connection failures.
- Type ‘Allow Remote Desktop Connections‘ in the Start Menu.
- Select the first result.
- In the window that appears, scroll to the Remote Desktop section and click ‘Show settings‘ next to ‘Change settings to allow remote connections to this computer‘.
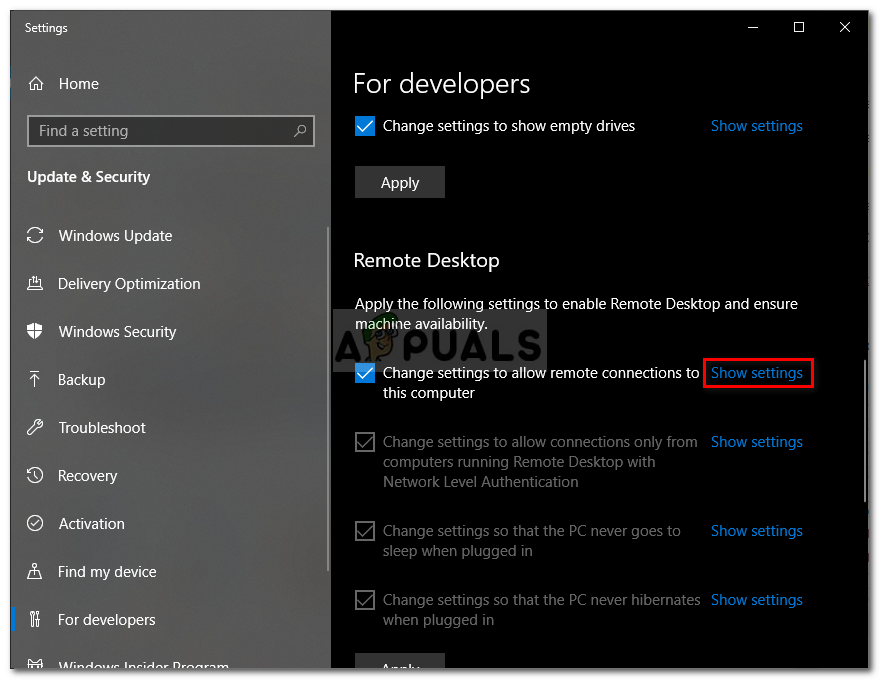
Allowing RDP Connections - Ensure ‘Allow Remote Assistance Connections to this Computer‘ is checked. Click Apply, then OK to close the window.
2. Allow Remote Desktop Connections if not allowed
This issue usually happens when Remote Desktop connections aren’t allowed on the remote system. Enabling this setting lets the machine accept RDP requests, which is crucial for a connection. Without it, connection attempts are blocked, causing errors. Allowing Remote Desktop ensures the system can accept remote access, solving a common connectivity issue.
- Type ‘Allow Remote Desktop Connections‘ in the Start Menu.
- Select the first result.
- In the window that appears, scroll to the Remote Desktop section and click ‘Show settings‘ next to ‘Change settings to allow remote connections to this computer‘.
Allowing RDP Connections - Ensure ‘Allow Remote Assistance Connections to this Computer‘ is checked. Click Apply, then OK to close the window.
3. Reset your Remote Desktop Credentials
When you save credentials for a specific remote computer and then try to connect to a different one, an error can occur because the saved credentials don’t match. This is because the new computer requires different login details than the ones you saved.
- Search for Remote Desktop Connection in the Start Menu.
- Click on Remote Desktop from the results.
- Enter the computer’s IP address. If credentials are saved, you’ll see an option to edit or delete them.
- Click delete to remove the saved credentials.
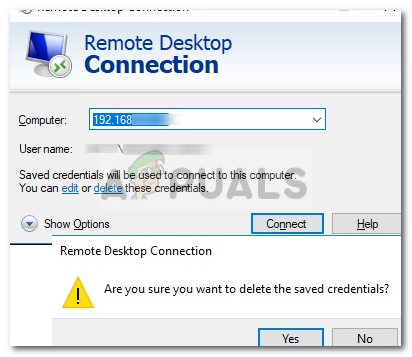
Deleting Saved Credentials
4. Add the Remote Computer’s IP address to your hosts file
Updating the hosts file with the remote computer’s IP address can fix connection issues by making sure your computer links the remote’s name to its IP. When DNS doesn’t work, adding the IP gives a direct path. This ensures Remote Desktop connects to the right machine, especially when network settings fail.
- Press Windows Key + X and select Command Prompt (Admin) from the list to open an elevated command prompt.
- Once in cmd, type this command:
cd C:/Windows/System32/Drivers/etc
- After that, type this command:
notepad hosts
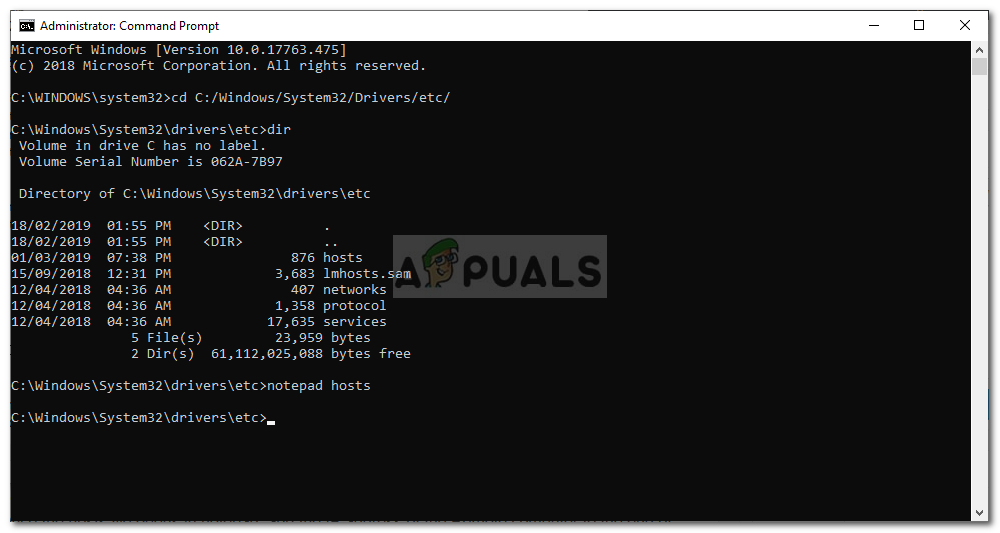
Editing the hosts File - Once the hosts file opens in notepad, add the IP address of the remote computer to the end of the file. Finally, click the close button and when asked to save changes, click Save.
5. Add the RDGClientTransport Key
Changing how Remote Desktop manages connections can often fix persistent issues. Adding the RDGClientTransport key tells the system to use RPC over HTTP, which can bypass network problems or security blocks affecting the default method. This is especially helpful when corporate firewalls, proxy settings, or other security measures block the connection.
- Press Windows + R to open Run.
- Type regedit and press Enter.
- Paste the following path in the registry editor’s address bar:
HKEY_CURRENT_USER/Software/Microsoft/Terminal Server Client
- Right-click in the right pane, select New → DWORD (32-bit) Value, and name it RDGClientTransport.
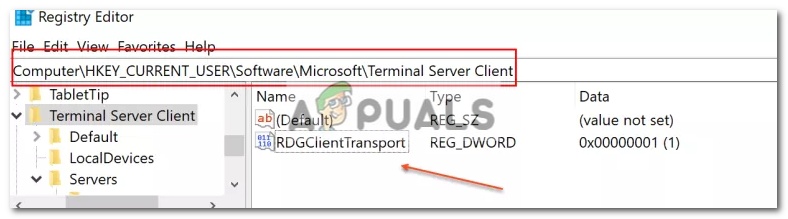
Adding RDGClientTransport Key - Double-click the key to open its properties, set the value data to 1, and click OK. Then, close the Windows Registry.
6. Change Network Properties
Sometimes the problem is how your network is set up. Change your network from “Public” to “Private” so Windows trusts other devices. Public networks block services like Remote Desktop, but setting it to private allows connections. This update adjusts firewall settings to permit Remote Desktop.
- Click the network icon in the system tray.
- Select your connected network to open its settings.

Accessing Network Settings - Under the network name, click Properties.

Selecting Network Properties - Select Private as your network profile.
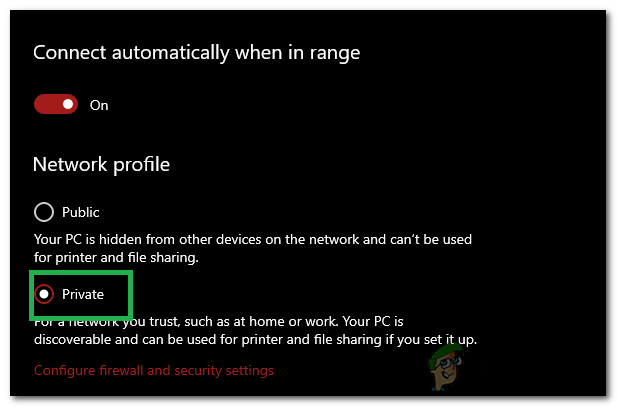
Choosing “Private” - Check if the issue is resolved.


Here is my one penny solution…
During Windows update my network connection on each PC was converted from Private to Public. There RDP protocol simply wouldn’t connect. But when I changed the network back to Private all file sharing and printer sharing and remote desktop started working again. Took me days to figure that one out :-).