Fix: The Recycle Bin C:\ is Corrupted
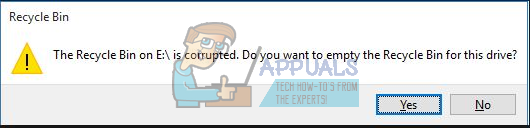
Many users come across the problem where their Recycle Bin gets corrupted. When it does, users will not get the full functionality of the Recycle Bin such as they won’t be able to see the files they deleted, they won’t be able to delete files permanently in the Recycle Bin, or even completely empty it. They will get an error “The Recycle Bin on <drive name> is corrupted. Do you want to empty the Recycle Bin for this drive?”.
Each drive partition present on your computer has its own Recycle Bin. It is hidden and is considered a protected system folder. You can only view it if you enable the option to graphically see the system files on your computer. Now there are two ways through which you can reset the Recycle Bin; either through an elevated command prompt or graphically deleting it using file explorer.
Solution 1: Using Elevated Command Prompt
We will use a command using an elevated command prompt to reset the Recycle Bin folder present on each of your hard drives. Do note that you require administrator access to follow this solution and you would have to carry out the task for each drive partitions. Also, be careful when executing the command as you can accidentally delete important system files on your computer.
After you execute the command, the Recycle Bin folder and all the files present will be deleted. When you restart your computer, Windows will automatically create new Recycle Bins for you to use.
- Press Windows + R, type “command prompt” in the dialogue box, right-click on the application and select “Run as administrator”.
- Once at the command prompt, execute the following command. Make sure to replace “C:” with all other drives on your computer. For example, if you have a D drive, it would be “D:”
rd /s /q C:\$Recycle.bin
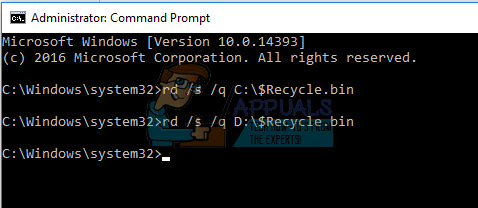
- Restart your computer and check if the problem at hand got fixed.
Solution 2: Using Graphical Interface
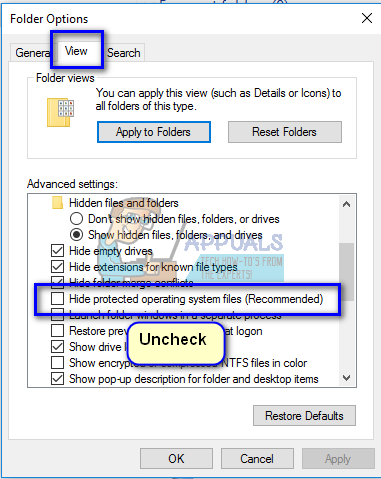
Another method to reset the Recycle Bin is using the Windows Explorer to manually delete all the items present in each partition. Do note that you will still require administrative privileges to perform this solution. First, we will change the properties of the File Explorer so we can see different system files on your computer (Recycle Bins on each drive are considered system files).
- Press Windows + E to launch Windows Explorer. Click on “View” present at the near top of the Windows. Check the box “Hidden items”. Now click on “Options” and select “Change folder and search options”.

- Select the “View” tab and uncheck the option “Hide protected operating system files”.
- Now navigate to Local Disk C. You will be able to see a folder named “$RECYCLE.BIN”. This is Recycle Bin which is mostly associated with the one you see on your Desktop. Right-click it and select “Delete”. A UAC will pop up. Authorize the delete by pressing Yes.
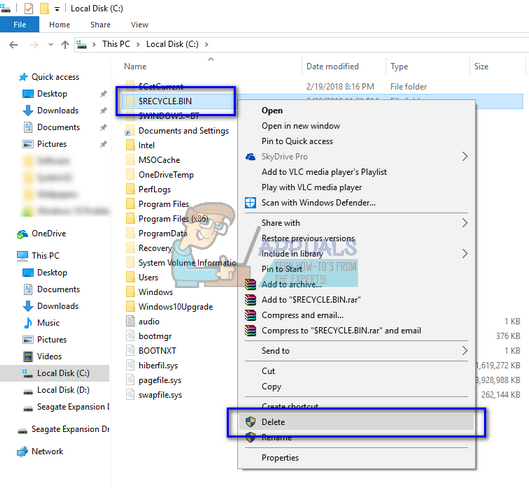
- A new Recycle Bin will automatically pop up in its place. Repeat this for all drives/partitions you have on your computer. The Recycle Bin will be located at the same place. If it doesn’t, restart your computer and check again.
Note: If you unable to perform the above tasks in normal mode or if the method is unsuccessful, try booting your computer into Safe Mode. You read our article which guides you step by step on how to boot your computer into Safe Mode.