Fix: Realtek HD Audio Manager Headphones and Speakers Show Up as Same Device
If you are using headphones and speakers then you might experience this problem. A lot of us want to connect both our headphones as well as speakers to the system so that we can hear the music from whichever device we want i.e. speakers or headphones. The problem here is, if you are using the Realtek Audio Manager then it won’t let you use both of these devices at once. If you plug in both devices, you will only be able to hear from your headphones. You will have to physically disconnect the headphones if you want to use your speakers for the sound. Of course, you will have to reconnect the headphones once you want to use the headphones for sound. So, in short, you won’t be able to switch the devices without unplugging them from the computer.
The reason behind this behavior of the Realtek Audio Manager is the settings. The settings of Realtek Audio Manager are usually set to treating both audio inputs/outputs as the same device. These are usually the default settings of Realtek Audio Manager. This is why, as you might have noticed, the devices will show up as a single device i.e. speakers or headphones and not 2 separate devices in the Sound window of your system. The settings can easily be changed so you don’t have to worry.
Method 1: Change Realtek Audio Manager Settings
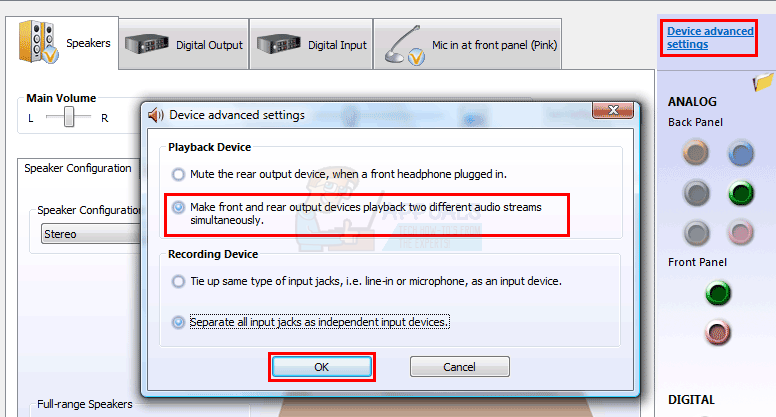
There are some settings in the Realtek Audio Manager that can be changed to solve this issue. There is an option named Make front and rear output devices playback two different audio streams simultaneously that is unchecked by default. So, checking this option and making both audio streams as separate ones might work for you.
Here are the steps for changing this option
- Double click the Realtek Audio Manager from the icon tray (bottom right corner)
- Click Device advanced settings from the top right corner
- Check the option Make front and rear output devices playback two different audio streams simultaneously from the Playback Device section
- Click Ok
Once done, you should be good to go.
Method 2: Disable Front Panel Jack Detection
Disabling the Front Panel Jack Detection option from the Realtek Audio Manager has worked for a lot of users as well. Try to change this option if the method 1 didn’t work for you. Here are the steps that can help you find this option
- Double click the Realtek Audio Manager from the icon tray (bottom right corner)
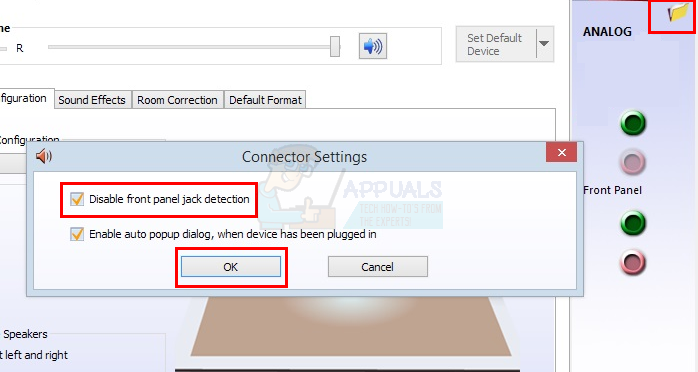
- Click the yellow folder icon on the top right corner (just below Device advanced settings)
- Check the option Disable Front Panel Jack Detection
- Click Ok

This should solve the issue for you.
Note: If changing this setting doesn’t solve the issue then perform the following steps
- Double click the Realtek Audio Manager from the icon tray (bottom right corner)
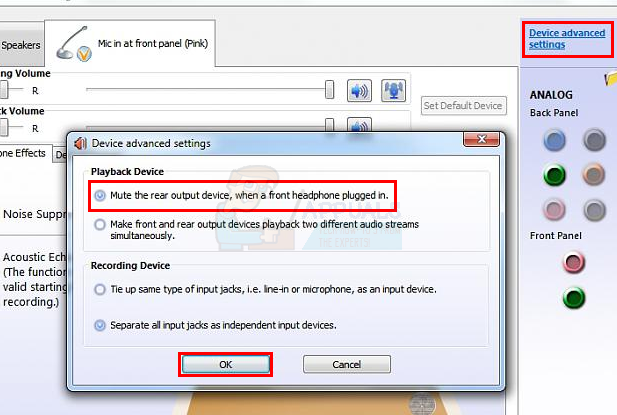
- Click Device advanced settings from the top right corner
- Uncheck the option Mute the rear output device, when a front headphone plugged in from the Playback Device section
- Click Ok
Now check if the problem is resolved or not.
Method 3: Uninstall Realtek Drivers
If nothing else works then try uninstalling the Realtek Drivers from the Device Manager and let Windows install the audio drivers. Windows comes with its own set of generic drivers that are compatible with almost all the devices. Simply uninstalling the Realtek drivers and rebooting will push the Windows to install the drivers for you. This has resolved the issue for a lot of users. Although the problem should be solved by the 2 methods given above but if nothing has helped then this should be your last resort.
Here are the steps for uninstalling the Realtek Drivers
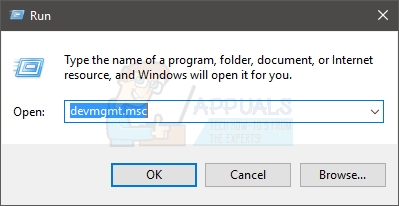
- Hold Windows key and press R
- Type devmgmt.msc and press Enter
- Locate and double click Sound, video and game controllers
- Right click your realtek high definition audio device
- Select Uninstall and confirm any additional prompts

Restart the computer when the drivers are successfully uninstalled. You should have the proper drivers installed on the next startup.
Method 4: Change BIOS Settings
There is a front panel setting in the BIOS settings that can be changed to solve this issue. This setting might not be available for every user but it will let the users (who have this option) have a second audio output.
Follow the steps given below to access and change the BIOS settings
- Turn on your computer
- Press F1 or Del or F10 when the manufacturer’s logo appears. You will also see the button mentioned on the screen as well. The button you press to open BIOS depends on your manufacturer so it varies from manufacturer to manufacturer. You can Google your brand e.g. HP or Dell and the button used to get into the BIOS menu.
- For some devices, pressing the button won’t get you into the BIOS menu. For example, if you have an HP laptop, you might get into a new menu and you will see the BIOS menu as an option in the presented menu. If that is the case, use your arrow keys to move and press Enter to select the option. Simply navigate to BIOS menu option and press Enter.
- Locate an option named Onboard Devices Configuration in the BIOS menu. Again, the BIOS menus vary from manufacturer to manufacturer. So, you might have this option named a little differently and you might have this option in a completely different place than that of another brand. So, you will have to navigate and find this option yourself. Again, if you are having difficulties then you can read the manual that came with your device or go to your manufacture’s website and read the instructions from the website
- Use the arrow keys to navigate between the options and press the Enter key to select an option
- Once you find the option, change Front Panel Type from HD Audio to AC97
- Save the settings and then press Esc to exit the BIOS
Follow the steps given below once you enter the Windows after changing the front panel settings
- Double click the Realtek Audio Manager from the icon tray (bottom right corner)
- You will notice that you now have a tab called HD Audio 2nd output in the Realtek Audio Manager.
- Click the yellow folder icon on the top right corner (just below Device advanced settings)
- Check the option Disable Front Panel Jack Detection
- Click Ok
- Select the Speakers tab and click the Set Default Device button. Make your speakers as default
- Click Device advanced settings from the top right corner
- Check the option Mute the rear output device, when a front headphone plugged in from the Playback Device section
- Click Ok
Once done, both your headphones and speakers have the same audio stream. You should also be able to switch the devices for audio purposes.
This fixed my problem, thank you so much mate.