Fix: Realtek Digital Output has No Sound
There are many instances where users using Realtek Digital Output has no sound output. It doesn’t mean that your sound hardware isn’t working. It means that there are some configuring issues or the drivers are not updated.
This problem is very widespread and the solution which worked in almost all cases was setting the speakers as the default one. In most cases, you don’t even need Realtek Digital Output as the output device. If this fails, we can check if your drivers are updated to the latest build.
Solution 1: Setting as Default Device
In many cases, it is not even necessary for you to use Realtek Digital Output. Digital Output refers to high definition digital audio devices which don’t use analog cables to connect to the computer. Home theater systems or TV’s with high definition sound output use Digital Output to produce sound.
If you have a computer or normal speakers, it may not be necessary to use Digital Output. Instead, we can use the normal speakers as the default device and check if sound starts to work again.
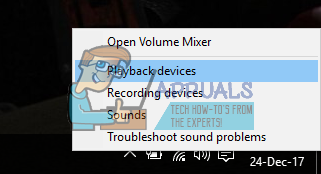
- Right-click on the speaker icon on your taskbar and select “Playback devices”.
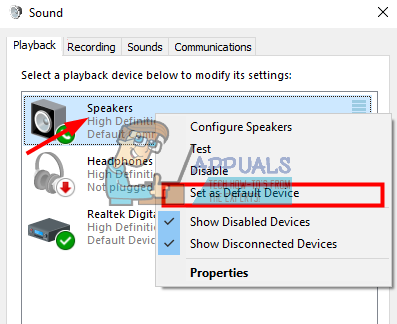
- Right-click on “Speakers” and select “Set as Default Device”. Press OK to implement changes and exit.
- Now try running any sound and check if this solved the problem. Restart your computer.
Solution 2: Updating Sound Drivers
There can also be an issue of your sound drivers not properly installed or being outdated. They relay information to your speakers and are practically running your speakers and producing the sound. We can try updating them through reinstallation and checking if the problem gets solved. If after restarting the computer the problem gets fixed, you can stop there. If it doesn’t, we can try updating the drivers further.
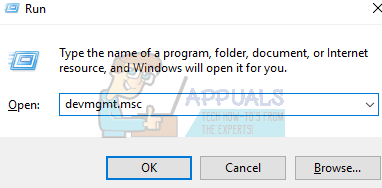
- Press Windows + R button to bring up the Run application on your computer. In the dialogue box type “devmgmt.msc”. This will launch your computer’s device manager.
- All connected devices to your computer will be listed here according to the category. Click on the category of “Audio inputs and outputs”
- Right-click on Speakers and select Properties.
- Click on Driver tab present at the top of the screen. Here you will see an option to uninstall your sound driver. Click it.
- Now Windows will confirm your action. After confirming the driver will be uninstalled from your system.
- Restart your PC Upon the restart, Windows will install the default drivers for your speakers. Now check if there is correct sound output. If there is, you can stop here. If there isn’t any sound, you can continue to update the drivers.
- Head over to the sound options just like we did. Right click on Speakers and open its properties.
- Now click on the option of “Update Driver”. Windows will prompt you to either install the drivers manually or automatically. Select automatically and let Windows search and install the drivers.
If these two solutions don’t target your problem, you can check out our other articles where we have listed extensive methods on troubleshooting no sound scenario.
Related Articles:
No Sound after Fall Creators Update 1709
No Sound After Installing Windows 10