Fix: RDP not Working after Update 1709
RDP is a proprietary protocol developed by Microsoft which provides the user with a graphical interface to connect to another computer over a network connection. The user has to use the RDP client software for this purpose while the other computer must run RDP server software.
These clients already exist for Windows OS and are readily available and used by the users. After the Windows Fall Creators Update 1709, there were many instances where users complained that their RDP clients didn’t seem to work right. It either crashed in session or would even refuse to log in properly. This issue is primarily tracked down to printers issue while there are other workarounds present as well.
Solution 1: Using the Mouse to log in instead of the Enter key
First things first, if you having problems while logging into your client with a username and password, it is likely to be a bug due to the latest update. This bug mostly affects only UWP (Universal Windows Platform) application, not the classic mstsc.exe.
Whenever you are trying to login using your credentials, after entering them, don’t press Enter. Instead, use your mouse and click on the “Connect” button instead. Make sure that you are typing the correct credentials, are connected to the network and are pressing the button using the mouse instead of the Enter key.
Solution 2: Disabling Printer Redirection in RDP Settings
One of the main reasons RDP fails to work correctly is the printer redirection bug present in the new 1709 update. Whenever you have printer redirection enabled on your computer, you can access the printer resource remotely without any problems. This is a very useful feature and is implemented in many businesses and institutions. However, turning off this resource fixes the problem instantly.
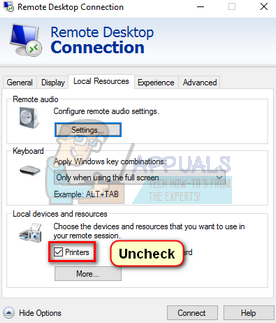
- Open your RDP client and navigate to the “Local Resources” tab present at the top of the screen.
- Once in local resources, uncheck the option of “Printers” under the heading of “Local devices and resources”.
- Make sure that the changes are saved. Try reconnecting the RDP client once again and check if the problem is solved.
Solution 3: Disabling Easy Print driver in RDP Sessions
Another workaround which worked for a lot of users was editing the registry or the group policy to ensure that your computer doesn’t use the Easy Print drivers by default. In some cases, the issue seems to be tied to the Easy Print drivers. In the previous solution, we completely disabled the sharing of printer resources. However, if you use these resources in your work, you need to edit the registry/group policy so you can continue working.
Using Group Policy Editor:
- Press Windows + R to launch the Run application. Type “gpedit.msc” to launch the group policy editor.
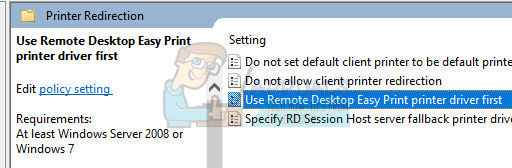
- Once in the editor, navigate to the following path:
Computer Configuration > Administrative Templates > Windows Components > Remote Desktop Services > Remote Desktop Session Host > Printer Redirection
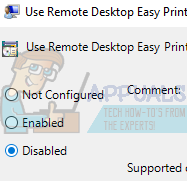
- At the right side of the window, search for the policy named as “Use remote desktop easy print printer driver first”. Double-click it to open its properties.
- Set its value as “Disabled” instead of “Not Configured”. Save changes and exit. Restart your computer to ensure that all the changes have been implemented.
Using Registry Editor:
- Press Windows + R to launch the Run application. Type “regedit” in the dialogue box and press Enter.
- Once in the registry editor, navigate to the following path:
Computer\HKEY_LOCAL_MACHINE\SOFTWARE\Policies\Microsoft\Windows NT\Terminal Services
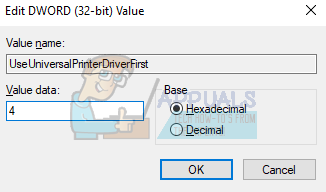
- Once you are at the target location, right-click on the blank space at the right side of the screen and select New > DWORD
- Name the new key as “UseUniversalPrinterDriverFirst” and set its value as “4”. Press Ok to save changes and exit. Reboot your computer to ensure that all the changes have been implemented.
In both of these methods, we instruct the RDP client to use the locally installed driver instead of Easy Print. Easy Print will only be used as a fallback if the default drivers don’t work. Next, you need to add the PDF printer to the host. For most QuickBooks, you can find that by extracting the installer and browsing to the 3rd party (or ABS) folder. Run the exe present there to install the ABS PDF Driver.
If you still experience the crash, search for other 3rd party PDF printers installed on the client. If you find any, make sure the same is installed on the host. As long as the host has a driver to run them, you won’t experience any problems.
Solution 4: Adding New Rules to Windows Defender Firewall
Another workaround for the crashing of the RDP client is editing the firewall rules in Windows Defender Firewall. Firewall is an inbuilt feature of Windows and to some extent, ensure that your computer is safe even in remote desktop connections. We can try enabling some more rules to ensure that the problem doesn’t arise again.
- Press Windows + S to launch the search bar. Type “Windows Defender Security Center” and open the first relevant result which comes forth.

- Click on the connections icon present at the left side of the screen and click on “Advanced settings” at the right side of the window. A UAC prompt may pop up to confirm your actions. If prompted, press yes.

- Once in the Advanced Settings, click on “Inbound Rules” using the left navigation pane and search for “Remote Desktop” entry on the right side. You can easily locate them by pressing the letter “R” after clicking any entry.
- You need to enable three rules:
Remote Desktop – Shadow (TCP-ln)
Remote Desktop – User Mode (TCP-ln)
Remote Desktop – User Mode (UDP-ln)
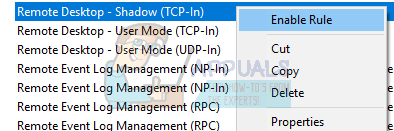
- Right-click on them one by one and select “Enable Rule”.
- With all of these rules enabled on top of “Remote Desktop (TCP-ln)” which is always enabled, the RDP client will hopefully work as expected. Make sure to restart your computer to ensure that all the changes take place.
Solution 5: Deleting ABS PDF Driver
Another issue which many users faced was the ABS PDF Driver. Even though we recommended this driver in the earlier solutions, it seems that this driver conflicts with RDP sometimes and upon the removal, RDP works as expected. Follow the instructions to remove the driver from your system.
You should attempt to remove the ABS PDF Driver manually yourself. If you encounter an error in between stating that it is already in use no matter how many times you try, follow the method listed below.
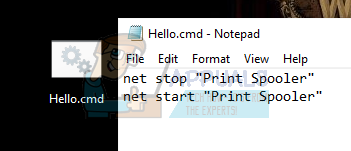
- Go to your Desktop. Right-click on any empty space and select “New > Text Document”. Name the document anything.
- Open it and paste the two command listed below:
net stop “Print Spooler”
net start “Print Spooler”
- Save the changes and exit. Now rename the text document to “anyname.cmd”.
- Press Windows + S to launch the search bar. Type “print management” in the dialogue box and open the first relevant result which comes forth.
- Once in the Print Management application, navigate to the following file path:
Print Servers > “Server Name” > Drivers
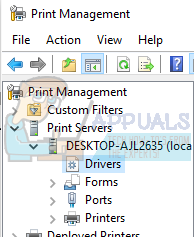
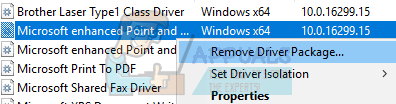
- At the right side of the screen, you will see all the drivers present. Minimize your Window and drag it near to the command prompt file we just created.
- Now we will try to execute the command prompt while instantly selecting the “Remove Driver Package” button after the last line executes.
When you execute the command prompt, you will see the following lines:
D:\temp>net stop “Print Spooler”
The Print Spooler service is stopping.
The Print Spooler service was stopped successfully.
D:\temp>net start “Print Spooler”
The Print Spooler service is starting.
The Print Spooler service was started successfully.
Exactly when the last line comes forward on your screen, press the button “Remove Driver Package..”. You will have exactly one second to accomplish this. If done correctly, the driver for the printer will be uninstalled successfully. Make sure to right-click the command prompt file and select “Run as administrator”.
Note: This issue with ABS PDF Driver usually occurs in a computer where QuickBooks are used.
Solution 6: Repairing Microsoft Office (post solution 5)
If you disabled ABS Print Driver, you might experience a problem where QuickBooks was no longer able to set the invoices correctly to Outlook. Outlook might stop responding and close with an error. Before you try other methods, it is advised that you repair install your Microsoft Office correctly. In many cases, repairing office solved the problem correctly without interfering with the bad driver which was giving the problem. If you can repair install your Microsoft Office, you can go ahead and reinstall the entire package altogether.
Solution 7: Adding Registry Key to Disable Printer Redirection altogether
Another workaround we can try is disabling the printer redirection from the RDP client altogether. We will add a registry key which will un-tick and gray out the option where you can select printer resources to share during the session. It is advised that if solution 2 works for you, and you want to make sure that no one accidentally enables this again, only then you follow this solution. You can always revert the changes by navigating back to the registry and deleting the entire key,
- Press Windows + R to launch the Run application. Type “regedit” in the dialogue box and press Enter.
- Once in the registry editor, navigate to the following file path:
Computer\HKEY_LOCAL_MACHINE\SOFTWARE\Microsoft\Terminal Server Client
- Once the desired path, right-click on the empty space present at the right side of the screen and select New > DWORD.
- Name the new word as “DisablePrinterRedirection”. Once the key is added, double-click it and set its value as “1”.
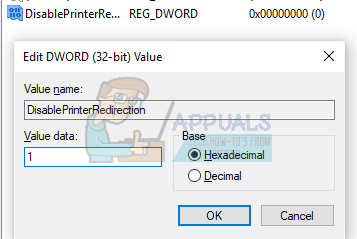
- Press Ok to save changes and exit. Restart your computer to make sure that the changes are implemented. Open the RDP client and check if the problem got solved.
Note: Solution 2 more or less achieves the exact same this as this solution. Make sure that you try it before carrying out this registry edit. If solution 2 didn’t work, it is very unlikely that this registry edit will make any further difference.