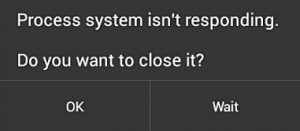
Fix: Process System Isn’t Responding
The “process system isn’t responding” is a common error that can be found on virtually any kind of Android device. Samsung and Alcatel models seem to be even more susceptible to this error message.
It’s not a given fact, but most users have reported that this error occurs right after they are done installing a new app. The issue is also linked to installing apps from outside Google Play Store.
Since the issue doesn’t really have an error code that will help us pinpoint the cause, we are left to guess if the error is a result of an app crashing or something that happens deep within the kernel.
The error is meant to signal that some hardware piece or the Android OS itself isn’t providing your apps with the data they need.
Since there’s a lot of variation that will cause this error, the solutions are multiple. Before we get to the fixing part, let me walk you through the most common causes that will trigger the “process system isn’t responding” error:
- Software conflict
- Insufficient storage space or memory
- Bad sectors on SD card
- Malicious apps installed from unknown sources
- Unreliable custom ROM (rooted devices only)
- Vital system processes were moved or deleted with Link2SD or another similar app (rooted devices only)
Below you have a series of troubleshooting guides and fixes that will help you pinpoint the cause and hopefully make the “process system isn’t responding” error go away. Please follow each method in order, as they are ordered by frequency and severity. Make your way down until you find a fix that works for your device.
Method 1: Make sure you have enough resources
If we’re approaching this issue from a logical point of view, it’s entirely possible that your Android OS is unable to provide your apps with the necessary data simply because it doesn’t have the right resources to do it.
I advise you to start your troubleshooting quest by checking if you have the necessary internal storage space and free RAM for you device to function properly. Here are the steps you need to take:
- Go to Settings > Memory & Storage and make sure you have at least 300 MB of free space on your internal storage.
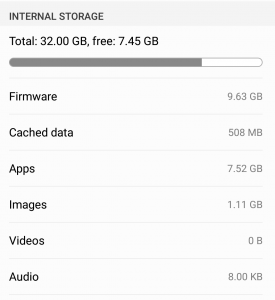
- If you’re under that limit, delete the cached data. If that isn’t enough, uninstall some of the apps you use rarely.
Note: On some Android versions you can delete all the cached data by going to Settings > Storage > Cache Data or Saved Data and tapping on Clear Cache.

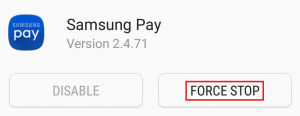
- Go to Settings > Memory & Storage and tap on Memory.
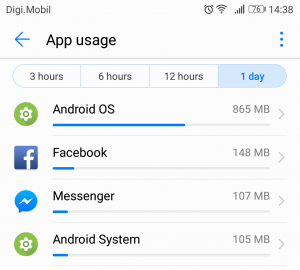 Note: On some Android versions the Memory entry is located under Settings > Android Settings.
 - You should see a list of apps and a number of resources they consume. Tap on a RAM heavy app and tap on Force Stop to free up some RAM.
- Browse your phone for a while and see if the error re-appears.
Method 2: Performing various restarts
Sometimes, the fix to the “process system isn’t responding” error is to simply restart your device. If you can, it is advisable to also drain the capacitors in order to achieve a clean boot-up.
If you got this message after an app force-closed in the middle of installing, please go through the following steps:
- Press and hold the Power button until the boot window pops up.
- From there, tap on Restart (Reboot on some devices) and wait until your phone boots up again.
- If the issue persists, turn off your phone completely and remove back case of your phone.
- Physically remove the battery and hold the power button for about half a minute. This will drain the remaining electricity from your internal hardware and capacitors.
Note: If you have a device with a non-removable battery, try to perform a simulated battery disconnect. The steps to forcing a reboot of this type are different from manufacturer to manufacturer. If pressing and holding Volume down + power button for 20 seconds doesn’t do the trick, perform an online search on “simulated battery disconnect + YourPhoneModel“.
Method 3: Make sure your Android is fully updated
It’s good practice to regularly ensure that your Android device is up to date. In the event that it isn’t, chances are outdated software is causing the “process system isn’t responding” error. Here’s how to ensure your device is fully updated:
- Open Google Play Store, swipe from left to right and tap on My apps & games.
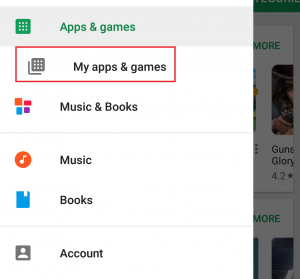
- You should see a list with all the apps that need to be updated. Update every app to the latest version or tap on the Update All to schedule them all for updating.
- Go to Settings and tap on System update.
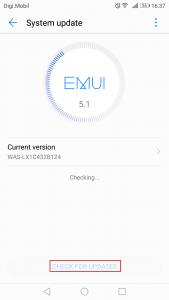
- Tap on Check for Updates and wait for the query to be completed. If there are any OS updates, install them and wait for your device to reboot.
- Browse your device normally and see if the error re-appears.
Method 4: Removing the SD card
Your SD card might just be the reason why the “process system isn’t responding” error appears. If your SD card has malfunctioned or it simply has some bad sectors that prevent the system from accessing the required information, it can trigger this error. From what I was able to gather, the issue is much more common on SD cards that are larger than 32 GB.
A quick way to check if your SD card is causing this issue is to physically remove it. Once you have it removed, restart your device. Browse on your phone and see if the issue is still present. If it is, move down to the next method.
If the issue doesn’t appear, it’s clear that you have a malfunctioning SD card. Before you throw it out, wipe it completely and re-insert it in your device. In the event that the issue doesn’t repeat after the SD wipe, you simply had a series of bad sectors.
Method 5: Boot Up in Safe Mode
Regardless of the Android version,you’re working with, a third party app is still capable of bringing your device to a crawl. Since there have been reports of this error appearing as a result of a software conflict, it might be worth a shot to test this theory.
Booting up your Android in Safe Mode will ensure that no 3rd party application will be permitted to run. In the event that booting up Safe Mode made the error go away, it’s clear that you’ve got your hands on a software conflict. Follow the steps below to see if an app is causing the error and fix it:
- With your device powered on, press and hold the power button until the boot menu pops up.
- Press and touch on the Power Off icon. Tap on OK to reboot your phone in Safe Mode
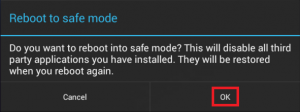 Note: If the procedure above doesn’t reboot your phone into Safe Mode, do an online search with “reboot *YourPhoneModel* in Safe Mode” and follow a guide.
 - Your device should reboot in Safe Mode. You can confirm this by checking if the Safe Mode icon is present in the lower left corner of the screen.

- Play with your device for a while and see if the issue re-appears.
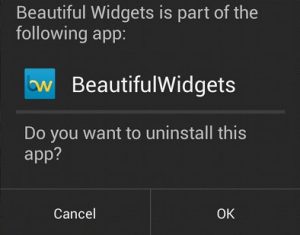
- If the error is not appearing in Safe Mode, go ahead and uninstall every app that you might have downloaded around the time this issue first started appearing. I would suggest you start by removing any apps that you might have installed from outside Google Play Store.
- Once you’re done, exit Safe Mode by rebooting your device.
Method 6: Wiping the cache partition
Before we go through more drastic measures, let’s try wiping the cache partition and see if the issue is resolved. Keep in mind that wiping the cache partition won’t delete any personal data from your device. The data that will be deleted is just temporary system & apps files. All your app data will be deleted, but Google Play Store will automatically restore it as you use them again. Here’s how to wipe the cache partition:
- Power off your Android device completely.
- Press and hold Volume Up + Home button + Power button. Release the power button when the device vibrates, but keep holding the other two buttons.
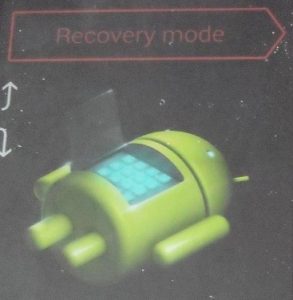
Note: If this doesn’t take you into Recovery Mode, do an online search on ” how to enter recovery mode + YourPhoneModel” - Release the other buttons when you see the Android System Recovery Screen.
- Use the Volume down key to navigate down and highlight wipe cache partition.
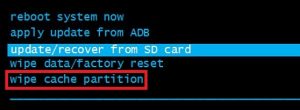
- Press the Power button to select it.
- Wait for the process to complete. Your device will restart at the end of it.
Method 7: Factory reset your Android
If you’ve come this far without a result, the last manageable thing you can do is to factory reset your device. If you haven’t touched any of the system files, this will most likely than not make the error go away.
But keep in mind that performing a factory reset will remove any personal data from internal storage. If you have your personal media on the SD card don’t worry, the data from there will not be affected by the following procedure. If you don’t have an SD card, it’s highly advisable that you create a backup before doing a factory reset. With this in mind, here’s how to factory reset your phone:
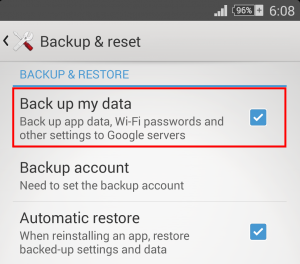
- Go to Settings and scroll down to Backup & reset.
- Tap on Backup & Reset and make sure the box next to Back up my data is check. If it’s not, tap on it and wait for a backup to be created.
- Tap on Factory data reset and confirm by tapping on Reset Phone.
- Make the final confirmation by tapping on Erase everything.
- Wait for the process to complete. Your device will reboot at the end of it.
Method 8: Reflash to a stock ROM
If a factory reset didn’t help, I can almost bet you’ve done it and messed up with some vital system files. I’ve seen a lot of users complaining about this error after they’ve tried to move system stuff from internal storage to the SD card.
Of course, you wouldn’t have been able to move any vital files without root access, that goes without saying. But if you’re rooted and you have messed with an app like Link2SD, it’s entirely possible that you’ve done some damage to the Android OS.
If that’s the case, the only way forward is to unroot your device and revert to a stock ROM. If you haven’t flashed your device before, do not attempt it yourself unless you don’t really need the phone. My recommendation at this point would be to take it to a certified technician and ask for a stock re-flash.
Help! Phone locks at “Process system…”; Wait/OK don’t operate. What now?