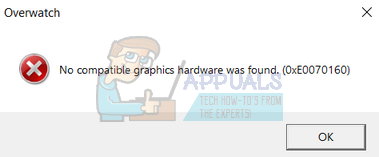
Fix: Overwatch No Compatible Graphics Hardware Was Found
The error “No compatible graphics hardware was found” usually occurs when Overwatch fails to detect and use the resources of the graphics hardware present on your computer. This issue became more frequent after the Creators Update of Windows 10.
The reasons behind this error are very generic. In some cases, a new driver from Nvidia is the cause while it can also be the issue of compatible resolution. No matter what, this error can be fixed within a few minutes by applying the fixes down below. Start from the first one and work your way down.
Solution 1: Enabling GPU Scaling for AMD graphics hardware
GPU scaling is a feature of modern graphics processing units which is designed to ensure that the image output of any game/application fits the screen. GPU scaling is a very useful feature in situations where the GPU is outputting a different resolution as compared to the monitor’s native resolution.
After extensive troubleshooting, it seems that computers running AMD graphics hardware had the problem scaling the GPU output automatically. After enabling the feature, the error message went away and the game was able to launch as expected. Regardless of your manufacturer, try enabling GPU scaling and see if it does the trick.
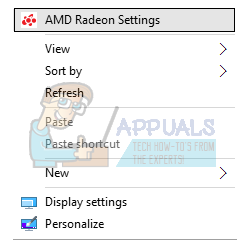
- Right-click on any empty space on your desktop and click “AMD Radeon Settings”.
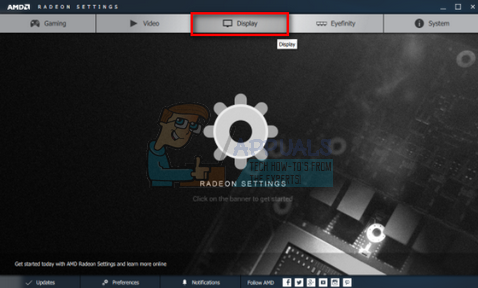
- In AMD Radeon settings, click on the ‘Display’ present at the near top of the screen.
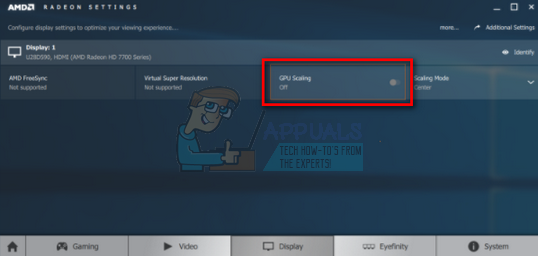
- Turn the GPU Scaling option to “On” instead of “Off”.
- After applying the necessary changes, restart your computer and try launching the game again. Make sure that you are running the game in administrator mode.
Solution 2: Installing the Latest Windows Updates
Windows roll out important updates targeting the bug fixes in the operating system. If you are holding back and not installing the Windows update, we strongly recommend that you do. Windows 10 is the latest Windows operating system and new operating systems take a lot of time to get perfect in every regard.
There are a lot of issues still pending with the OS and Microsoft rolls out frequent updates to target these issues.
- Press Windows + S button to launch your start menu’s search bar. In the dialogue box type “Windows update”. Click the first search result which comes forward.

- Once in the update settings, click on the button which says “Check for updates”. Now Windows will automatically check for updates available and install them. It may even prompt you for a restart.
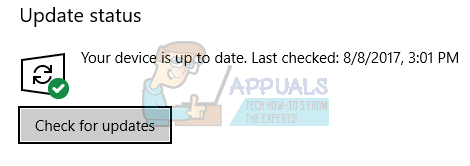
- After updating, restart your computer and check if your issue got fixed.
Solution 3: Uninstalling Problematic Third-Party Applications
We also observed that the issue got fixed instantly after all problematic third-party applications were uninstalled. There are some applications which use the GPU extensively, not allowing Overwatch to use the resources like it needs hence the error message. Applications such as screen recorders etc. should be targeted first. Press Windows + R, type “appwiz.cpl” and press Enter to bring forth all the applications installed on your computer.
There are no specific applications reported but you should think and diagnose them yourself as each computer configuration is different. Take into consideration any software which tends to utilize your GPU. Try stopping/ closing them before you consider the possibility of uninstalling them for good. If this solution doesn’t prove to a success, move on to the next ones.
Solution 4: Changing Display Resolution
Like we explained above, there seems to be a resolution problem after the creators update. The game isn’t able to use the high custom resolution of your computer hence it pops the error message. We can try changing your computer’s resolution and launch the game. If the game launches as expected, you can change your resolution back after closing the game.
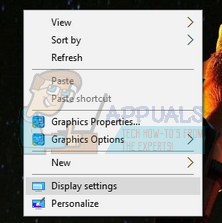
- Right-click on any empty space on your desktop and select “Display settings”.
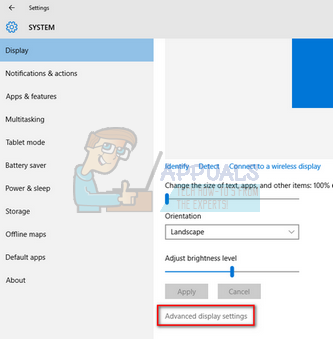
- Browse to the end of the settings page and select “Advanced display settings”.
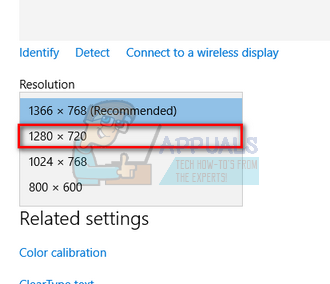
- Change the resolution to some other value rather than the one set. For example, the native resolution of the monitor was ‘1366 x 768’ but after changing it to the standard ‘1280 x 720’, the game launched properly. Press Apply to save your changes and exit. If the game launches without any problem, you can change the resolution back to your standard one.
Solution 5: Rolling back NVIDIA drivers
If you have Nvidia graphics hardware installed on your computer, you can try rolling back the drivers to a previous version. It seems that the new drivers automatically installed using the windows update are not compatible with Overwatch. We can try manually rolling back the drivers and see if they fix the problem. If this doesn’t work, we can try installing the default drivers by uninstalling the current one.
- Press Windows + R, type “devmgmt.msc” in the dialogue box and press Enter.
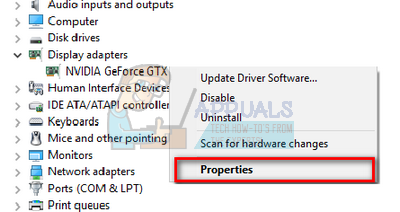
- Once in the device manager, expand “Display adapters”, right-click on your Nvidia hardware and click “Properties”.
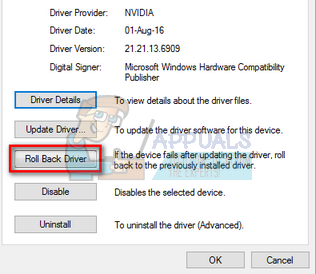
- Navigate to the “Driver” tab and click on “Roll back Driver”. After rolling back the driver, restart your computer and try launching Overwatch again.
Solution 6: Updating Graphics Driver
If all the above solutions don’t work, we can try updating the graphics driver. It may be possible that your graphics driver is not properly configured or is outdated. We need to completely delete all driver files before we install the new driver, therefore, we need to use the utility Display Driver Uninstaller. You can download the utility over the internet easily.
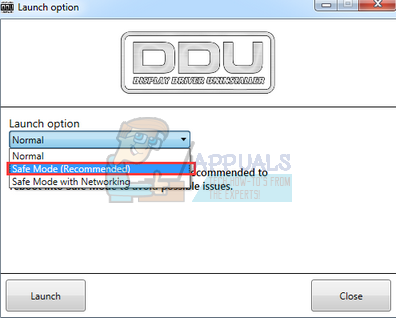
- After installing Display Driver Uninstaller (DDU), launch your computer in safe mode. You can learn how to boot your computer into safe mode by reading our article on it.
- After booting your computer into safe mode, launch the application which was just installed. Choose the option Safe Mode.
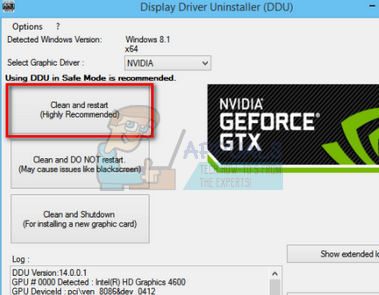
- After launching the application, select the first option “Clean and restart”. The application will then automatically uninstall the installed drivers and restart your computer accordingly.
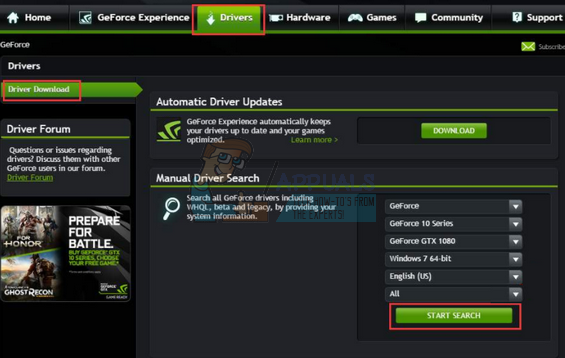
- Boot your computer into normal mode and launch the application. Launch the GeForce Application, open the “Drivers” tab and click the button “Driver Download”. Enter your specification on the right side of the screen and click “Start search” for the application to search for the optimal drivers for your computer.
- After the driver is updated, restart your computer and check if the problem got solved.
Note: Here we have seen how to install the Nvidia drivers using GeForce Experience application to download them. Alternatively, you can download the drivers from the official website and install them using the device manager.
Thanks it worked!