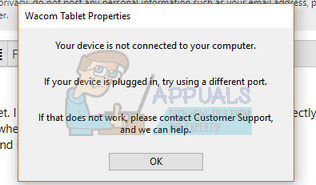
Fix: No Device Connected (Wacom)
The error “No Device Connected” occurs when your computer fails to recognize and detect your Wacom tablet. This issue is very common among Wacom users when they try to connect their tablet to their computer.
The issue is readily solved by reinstalling drivers, rolling back drivers, or restarting the Wacom services. There are also some hardware concerns you need to address. Make sure that you are plugging your device into a proper port. Try changing ports and make sure that the cable is attached properly and is in working condition.
Solution 1: Restart Wacom Service
We will try restarting the Wacom service as our first step in solving the problem. This will restart the entire procedure, refresh currently stored configurations, and try detecting your tablet again.
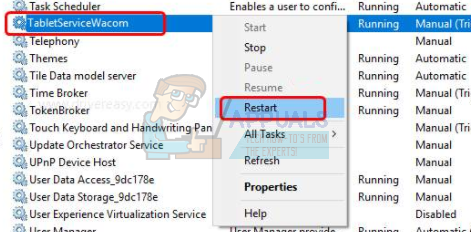
- Press Windows + R to launch the Run application. Type “services.msc” in the dialogue box and press Enter.
- Navigate through all the services until you find the one named “TabletServiceWacom”. Right-click it and select “Restart”.
- Now check if the problem is solved.
Solution 2: Update Driver and Reinstall Programs
If restarting the service doesn’t work, we can try updating the driver. First, we will remove the driver and then uninstall all related applications. Reinstalling the applications and drivers will ensure that all misconfigurations are dealt with and the computer will recognize the tablet as if it was plugged in for the first time.
Note: If the tablet still fails to be detected after installing the latest drivers, try rolling back drivers. Rolling back means installing a previous version of drivers. You can easily download them from the official website.
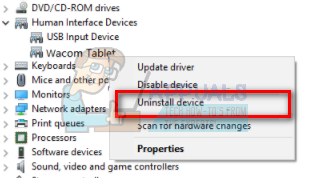
- Press Windows + R to launch the Run application. Type “devmgmt.msc” in the dialogue box and press Enter. This will launch the device manager.
- Navigate through all the devices until you find the category “Human Interface Devices”. Expand it and select “Wacom Tablet”. Right-click it and select “Uninstall Device”.
- Press Windows + R to launch the Run application. Type “appwiz.cpl” in the dialogue box and press Enter. A new window will appear, listing all the programs installed on your computer.
- Navigate through all of them until you find any application related to Wacom. Right-click it and select “Uninstall”. Do this for all the applications related to the tablet.
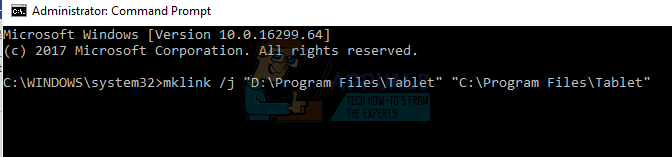
- Press Windows + S to launch the search bar. Type “cmd” in the dialogue box, right-click on the application and select “Run as administrator”.
- Once at the command prompt, execute the following instruction:
mklink /j “D:\Program Files\Tablet” “C:\Program Files\Tablet”
In this case, the custom location for Program Files is the D drive. You can replace “D” with whatever your drive happens to be.
- Head over to the Wacom official website and download the latest drivers available. Save them to an accessible location as we will be accessing them later on.
- Press Windows + R to launch the Run application. Type “devmgmt.msc” in the dialogue box and press Enter. This will launch the device manager.
- Locate Wacom Tablet from the list of devices, right-click it and select “Update driver”.
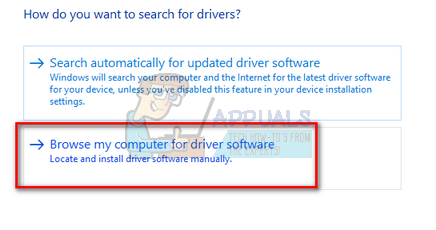
A new window will pop up asking whether you want to update the drivers automatically or manually. Select the second option (manually). Browse to the location where you downloaded the drivers and install them.
- Restart your Wacom device and plug it back in.
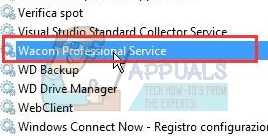
- Press Windows + R, type “services.msc” in the dialogue box, and press Enter.
- Navigate through all the services until you find “Wacom Professional Service”. Right-click it and select “Restart”. Now check if the problem is solved.
Solution 3: Reinstall the Visual C++ Redistributable Packages
Another workaround for this problem is to ensure that you have the latest Visual C++ Redistributable packages installed on your computer. Close all Wacom services as explained above, update your redistributables and then try connecting the tablet again.
- Head over to the official Microsoft downloading page.
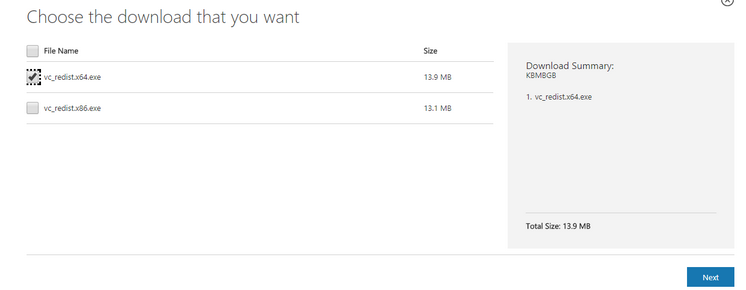
- Click the Download button after selecting the language.

- Select “vredist_x64.exe” and press Next. The download will commence shortly. Save the file in an accessible location and run the exe file.
- After the installation is complete, restart your computer and check if the problem is solved.
Note: If you are using 64-bit Windows, you can install both (vredist_x64.exe and vredist_x86.exe). However, if you have 32-bit, you should only install “vredist_x86.exe”. You can check which version of Windows you have by pressing Windows + S, typing “system information,” and opening the application that appears.
fixed! thank you