Fix: Nexus 7 Won’t Turn On
Google Nexus 7 was, in its prime years, the ultimate compact tablet. Made possible by a collaboration between Google and Asus, it was the pure Android experience that many users craved.
But the early days of Android weren’t as reliable as we might like to remember. Nexus 7 tablets and virtually any other Android-powered device had issues that we deem totally unacceptable today.
Setting the spec-related shortcomings aside, the biggest flaw with Nexus 7 is that sometimes it refuses to turn up – especially if you allowed the battery to drain completely or you didn’t use it for an extended period of time. Another frequent problem is the dreadful boot-loop error in which the device will be stuck in a continuous attempt to boot up.
Google admitted there’s a slight manufacturing flaw with the batteries on Nexus 7 as they are incredibly hard to jump-start again after they have been totally drained. This is a common occurrence on both the original Nexus 7 and the 2013 reiteration.
Before we start
Unfortunately, the battery is not the only potential culprit that can make your device to stop powering on. Before we get to more advanced topics, let’s eliminate some suspects first:
- Make sure that your power adapter is working properly. It’s recommended that you use the original cable and power adapter that came with your Nexus tablet. Verify them by trying them with another device.
- Make sure there’s nothing foreign in the micro-USB port (like dust or lint). If you see signs of dirtiness, use a pair of tweezers, a toothpick or a needle to remove any foreign material. When you’re done, use a cotton swab dipped in rubbing alcohol to remove any remaining dirt.
- If your tablet’s screen is flickering before it turns off completely, you definitely have a bad battery and you should send it for a repair or buy a new one.
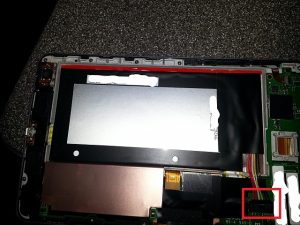
Method 1: Making sure the battery connector isn’t dislodged
Asus has a serious design fault with this particular model. Since the battery compartment is slightly bigger than the battery itself, any sudden movement has the potential of pulling the connector out and cut power to your device. If the icon and flash symbol are implying the device is charging but the charge stays at 0% no matter how long you leave it charging, this will most likely fix your issue.
Here’s what you need to do:
- Open the back cover of your Nexus device.
- Check whether the battery cable is properly plugged into the charging leads inside. Disconnect and reconnect the battery cable while making sure you slide it all the way through.
- Restart the tablet and see if it’s charging properly.
Note: If you don’t want this problem to repeat, you can use any type of silicone rubber to fill the extra battery space in order to prevent it to from moving around.
Method 2: Do a soft reset
If you managed to leave your Nexus 7 battery to discharge completely, you may need to do a soft reset in order to signal that your battery has no juice left. As I’ve said above, it’s a manufacturing flaw. Although this should fix the issue immediately, it doesn’t always work on a first try.
You can perform a soft reset by holding the power button for a full 30 seconds while it is plugged into a power outlet. The device should then restart and display a battery icon signaling it’s charging. Let it charge for at least an hour before turning it on again.
Note: If holding the power button doesn’t do anything at first, try repeating the procedure and hold it for a longer period of time.
Method 3: Power OFF your device manually
If method two hasn’t yielded any results, let’s try performing a hard power off from within recovery mode. Here’s what you need to do:
- With the power cord connected, press and hold the Power button and the Volume down button for a minimum of 10 seconds.
- Release both buttons when you see an arrow and the word ‘start’.
- Hit the Volume down button twice to highlight Recovery Mode. Hit the Power button to enter it.

- Once recovery mode is fully loaded, use the volume down button to cycle down and highlight Power Off.
- Press the power button to select the entry, then press it again to confirm.
- Once you see the screen goes black, disconnect the power cord and connect it again within 10 seconds.
- If all goes well, you should see the battery icon appearing on the screen.

- Let it charge for at least an hour before turning it on again.
Method 4: Fixing the Black Screen Error
If a Nexus 7 device is discharged to the point where it won’t power up again, it might trigger a black screen error. If you have this problem, your device won’t power on and the battery icon won’t show on the screen when the charger is plugged in.
However, if you hold down the power button for 30 seconds, you can see a faint backlight visible at the edge of the screen. It will only be visible if you are in a dark room.
If that’s the case, here’s what you need to do to fix your Nexus 7 tablet:
- While holding both Volume buttons, plug in the charger and keep them pressed for another 40 seconds.
- Release the Volume buttons then press and hold the Power button for another 40 seconds to boot up.
- Your Nexus 7 should boot up normally now.
- Make sure you don’t let it discharge completely again.
Method 5: Performing a “Wipe Partition Cache”
If your Nexus 7 tablet is charging normally but you are stuck on the boot screen, it might mean you need to delete the temporary data stored in the partition cache.
Here’s how to clear it out:
- Power off your device completely.
- Press and hold down the Power button + Volume Up button.
- When you see the icon with an Android lying on it’s back, release both buttons.
- Press the Power button first and then Volume Up – keep them pressed for 2-3 seconds before releasing them at the same time.
- Use the Volume down key to highlight Wipe Partition Cache and then hit the Power button to confirm.
- Once the process is complete, the device will power off. Turn it on and see if it get past the boot loop.
Method 6: Performing a device reset
If you still can’t get your device to boot up, but it is now charging normally, doing a device reset might restore its previous functionalities.
Warning: This will erase all your data from the device, so proceed carefully. It will also take some time to complete, thus it’s a good idea to make sure it’s fully charged or plugged into a power source. Here’s what you need to do:
- Power off your device completely.
- Press and hold Volume down + Power button at the same time until you see an arrow with the word ‘start‘.
- Acess the Recovery Mode by pressing the Volume down button twice and then the Power button.
- Once you’re in Recovery Mode, hold down the Power button and press Volume Up once.
- This will bring out another menu. Press the Volume down button twice to select Wipe Data/Factory Reset and hit the Power button to confirm.
- Use the Volume down button to go downwards until you highlight “Yes -Erase All User Data” and hit the Power button.
- After the process is complete, your device will reboot and hopefully manages to get past the booting screen.
I genuinely hope one of the methods above fixed your issue. If none of them were successful, your device might suffer from a hardware failure, in which case you need to take it to a service.
So, I know it’s been almost 2 years since you posted this. My tablet does literally nothing when I do any of these things. And when I plug it into my computer it doesn’t even show up, so how is Restoro going to find it to fix it? Or is it just too old now that nothing will get it to work again?