Fix: Nexus 5 Won’t Turn On
For the most part, Nexus devices have a reputation for being worth the money. Nexus models are typically equipped with high-powered features at an affordable price. But sometimes, switching focus to making the product more affordable will sacrifice the overall user experience.
Back when Nexus 5 arrived in the fall of 2013, it was quickly adopted by the Android smartphone market as the best buy. With impressive specs and running on the purest version of Android, it sold like crazy in the first two months from the initial launch. But after a few weeks, news started coming in that a lot of Nexus 5 devices we’re breaking down after just days of use.
The reason for a high-return rate wasn’t a badly designed motherboard or another hardware defect, but a firmware glitch that rendered Nexus 5 devices unusable. Since then, Google issued more than 3 OTA updates specifically deployed to tackle software glitches, but things are far from being fixed.
Although Nexus 5 devices are a lot stable than they were years ago, users are still reporting problems. Aside from the ever-lasting boot loop error, some devices seem to turn off automatically and refuse to come back on. Sometimes, aside from not getting past the initial boot screen, Nexus 5 devices will also refuse to charge.
With this in mind, I have put together a series of guides that will help you troubleshoot and restore your device back to life. Keep in mind that if the issue originates from a hardware issue, you’ll have little choice but to send it in for a repair.
Before we get technical, let’s walk through the most common causes that will render your Nexus 5 device unusable:
- Faulty battery
- Bad charger
- Corrupted firmware data
- Device overheating
- Broken internal power button
- 3rd party app conflict
- Cache data glitch after OS update
- Dirt or lint in the micro-USB charging port
Now that we know the culprits, let’s see what can be done to restore your device’s functionality. The methods below are ordered by frequency and severity, so make sure you follow each guide in order until you find a fix that manages to fix your Nexus 5 smartphone.
Method 1: Troubleshooting the battery & charger
If your device looks completely dead and is refusing to charge, let’s eliminate the possibilities of a faulty charger or a degraded battery. Sometimes a bad charger might trick you into believing your phone is suffering from a hardware issue. Here are some useful troubleshooting steps:
- Connect your Nexus 5 to its original charger. Check to see if the charging indicators are there.
- If it charges normally, you should see the charging icon on the screen and a pulsating LED in the top-right corner of your device.

- In the event that it doesn’t show signs of charging, use another micro-USB cable and try again.
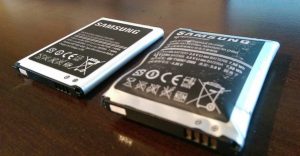
- Take out the back case of your Nexus 5 and remove the battery. Does it seem bloated? If it appears to be larger than it should be, it’s a clear sign of bad battery. Another indicator that you have a degraded battery is screen flickering.
 Note: If your battery is older than two years, chances are it has degraded to a state where it doesn’t have the power to make it past the initial screen.
If the device isn’t showing signs of charging after these steps, move over to Method 2.
Method 2: Cleaning the micro-USB port
Now that we know the charger and battery are not to blame, let’s see if the same can be said about your charging port. I’ve seen cases where a foreign object made its way into the micro-USB port and blocked the transfer of electricity completely. If you carry your Nexus device in your pocket too much, the charging port might suffer from lint or dirt accumulation. Here’s what you need to do:
- Use a flashlight and take a look inside the charging port. Do you spot anything that shouldn’t be there?
- Power off your device and use something small like a needle or a pair of tweezers to drag any foreign object out of there.
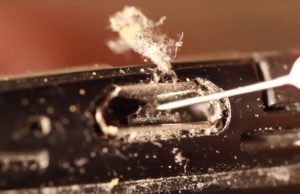
- Dip a small cotton swab in rubbing alcohol and insert it into the port. With rotational movements make sure you remove any of the remaining dirt that might be present on the gold connectors.
- Leave it to dry for at least two hours in a warm environment before attempting to power up again.
Method 3: Dislodging the Power button
The power button being stuck is a known design flaw on N5 devices. If your power button becomes stuck and stays pushed all the time, it will cause your device to boot loop and refuse to charge. In the event that the power button isn’t stuck, move straight to method 4.
If you confirm that the power button is stuck and you don’t want to take it to a technician just yet, here’s what you can do:
- If you have an external case, take it off.
- Use your finger to roll the power button around in every direction possible, until it gets dislodged.
- If it doesn’t do the trick, find a hard surface. I know it seems ridiculous, but a lot of users managed to unstuck the power button by hitting it against a hard surface.
- Smack the backside of your phone near the power button against a hard surface several times until you hear the button pop out.
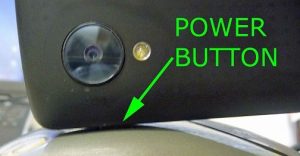
- Roll your thumb around it for a couple of seconds.
- Press the power button again and see if your device get’s past the boot loop.
Method 4: Wiping the cache partition
If your phone refuses to boot up after an OS update, you might be looking at a software glitch. In most cases, a software glitch is solved by rebooting into recovery mode and clearing the device’s cache.
If you have doubts about using recovery mode, don’t. Booting into recovery is not detrimental to your device. In fact, it’s used by smartphone technicians worldwide in situations where a device gets stuck in a boot loop. Here’s what you need to do:
- Power off your device completely.
- Hold Volume Up + Power button.
- When you feel your phone vibrating, release both keys.
- After a couple of seconds, you should see the Android logo along with some device information and a few options to choose from.
- Use the volume keys to navigate to Recovery mode.
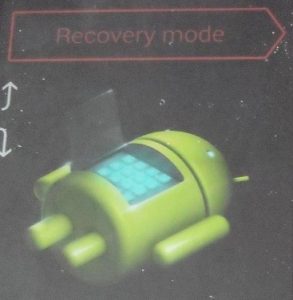
- When you see Recovery Mode displaying in red, press and hold the power button and push the volume up key. Your screen should then shift to the recovery menu.
- Use the volume down key to highlight Wipe cache partition.
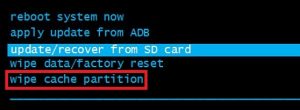
- Tap on the power button to confirm.
- Wait for the cache to be cleared. It can take anywhere from 5 to 10 minutes.
- When completed, highlight reboot system now and push the power button to confirm.

Method 5: Booting up in Safe Mode
If you already wiped the cache partition to no avail, let’s eliminate the possibility of a 3rd app conflict by booting up in Safe Mode.
Safe Mode will start your device with only the original suite of apps and proceses that came with it. This means all the apps that you installed after that won’t be permitted to run. Latest versions of stock Android don’t have this problem anymore. But if you’re rooted or you’ve downloaded apps from outside Google Play, chances are the steps below will fix your Nexus 5 boot looping issue.
If your device is stuck in a boot loop or shuts down in the middle of it, booting it in Safe Mode will help you pinpoint if an app is conflicting with your system files. Here’s what you need to do:
- With your phone turned off, press the power button and release it immediately.
- Once you see the initial animation, press and hold the Volume down key.
- Your device should restart and boot in Safe Mode.
- You can confirm it’s in Safe Mode by seeing if the icon is present on the bottom of your screen.

- If your device manages to boot up (and it couldn’t previously), it’s clear that you have a 3rd party conflict.
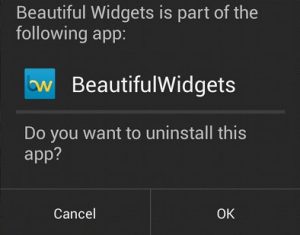
- Eliminate any app you might have installed around the time your device broke down. Go to Settings > Apps (Applications) and Uninstall them one by one.
- Restart your device. It should boot back into normal mode. If it manages to boot up without looping, you managed to fix the software conflict.
Method 6: Doing a factory reset with the hardware keys
If you’ve come this far too without a result, there are a couple of other things you can try before sending your phone to a certified technician. Doing a factory reset will solve a lot of potential glitches that might prevent your device from booting up. The downside is, it will wipe your data clean. All your personal data present on the internal storage such as music, images, apps, and contacts will be forever lost.
If you’re ready to commit to a factory reset, here are the steps you need to take:
- Make sure your device is completely turned off.
- Press and hold the Volume down key, then press and hold the power button.
- Release both keys when your phone vibrates.
- Once you see the Android recovery menu, press the Volume down key twice to highlight Recovery Mode.
- Press the power button to enter Recovery Mode. You should be able to see an icon with a red exclamation mark after a couple of seconds.
- Press and hold the power button, then press and immediately release the Volume up key.
- After you see the recovery menu release the power button.
- Use the volume keys to navigate downwards and highlight Wipe data/factory reset.
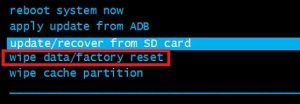
- Press the power button to select the option, then navigate with the volume keys to Yes – erase all user data.
- Tap the power button again to confirm.
- Wait for the process to complete. When it’s done, press the power button to select Reboot system now.
Method 7: Flashing a factory image (expert users only)
Since you run the risk of bricking your device even further, this method should only be atempted by users with experience on flashing a factory image. Aside from reflashing your device to a factory image, the following steps will unroot your device. It also involves unlocking the bootloader, which will void the warranty if you have one. If you’ve never done this before, skip this method and send your phone to a technician for a repair.
Warning: If you decide on flashing a factory image, go with an older iteration like 4.4 or 5.0. Please understand that it’s a tedious procedure that involves a fair amount of risk, so don’t attempt it unless you’re confident you will be able to do it on your own. Here’s how to reflash to a factory image on Nexus 5:
- Make sure all the fast-boot drivers are correctly installed and configured just in case your OS will need them. There are several ways to do it, but you can go the easy way and install Koush’s Universal drivers from here.
- Download and install the fast-boot files from here. If you’re not sure what to do with them, follow this guide.
- Download the factory image from Google Developer website. This is the link for Nexus 5 devices.
- Extract the factory image and paste its contents into the same folder as the fast boot files.

- Make sure your device is powered off and connect it to your PC. Push Volume down + power button to make it connect in fast-boot mode.
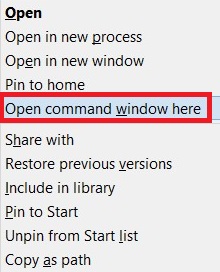
- Open the folder with the fast boot files, then Shift + Ctrl + Right Click somewhere in the folder.
- From the following menu, click on Open command window here.
- In the newly opened command window, type in “fastboot devices“. If it returns a device id, your device is recognized.
- In the event that you already unlocked the bootloader, skip this step. If not, type “fastboot oem unlock“.
- Now that the bootloader is unlocked, type in the following commands in order:
“fastboot erase boot“, “fastboot erase cache“, “fastboot erase recovery” and “fastboot erase system“. - Now make sure you don’t mess with your device during the following commands. If you manage to disconnect the cable while doing this you’ll hard brick it. Type the following in order: “fastboot flash bootloader *name of bootloader*” and “fastboot reboot-bootloader“. You can find the name of your bootloader in the folder we previously set up. You can rename it to avoid typing that much.
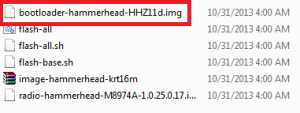
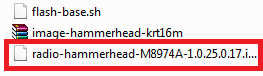
- Flash the mobile radios by typing “fastboot flash radio *name of radio*” and “fastboot reboot-bootloader“. You can find the name of the radio inside the folder we previously set up. If the name is too long, you can rename it to make it smaller.
Note: Keep in mind that you might have more than one radio file in that folder. If that’s the case, start with the CDMA radio and then repeat the two commands with the LTE radio.
- Type in “fastboot -w update *name of zip file*“. This will flash the system, boot, and recovery.
- Type in “fastboot reboot“. Your device should restart and boot back up on stock.