Fix: Mobile Hotspot not Working after Update 1709
Windows 10 had a feature introduced called “Mobile Hotspot”. Using this feature, you can easily share your internet connection with other devices using Wi-Fi. Using this feature, you can share a Wi-Fi, Ethernet or cellular data connection. This addition was a great addition to the already existing features present in Windows and provided ease of use for all its users.
Recently after the 1709 update, the mobile hotspot stopped working properly. In some cases, it even refused to start up and initialize. The issue is very common with some easy workarounds available. Take a look.
Solution 1: Resetting Windows Defender Firewall Settings
Windows Firewall is a security mechanism present in Windows operating system which protects your computer from external threats over any network. This feature has been present for a very long time and is also known to cause problems with a lot of modules including system applications. We can try resetting the Firewall settings and check if this solves the problem for us.
- Press Windows + S to launch the search bar. Type “settings” in the dialogue box and open the relevant result.
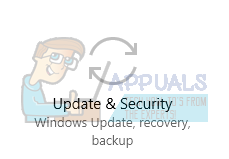
- Once in settings, open the sub-category of Update and Security.
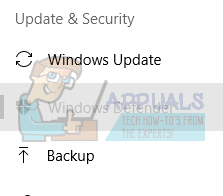
- Once in the menu, click on “Windows Defender” present at the left side of the screen.
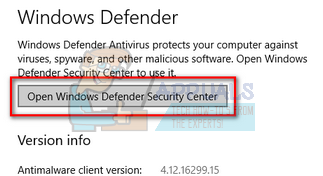
- Click on “Open Windows Defender Security Center” so we can access Firewall settings.
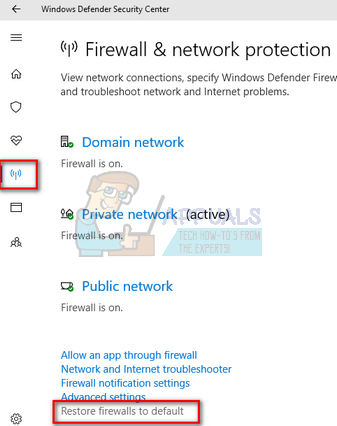
- Click on the network icon present at the left side of the screen. Navigate to the bottom and select “Restore firewalls to default”.
- Windows will now confirm your actions. Press “Restore defaults”. After the reset is complete, restart your computer and check if the problem is solved.

Note: You can also execute this solution by executing the following command in an elevated command prompt. Make sure that you are running this command while in an administrator account.
netsh advfirewall reset
Solution 2: Resetting Wireless Adapters
If the above solution doesn’t work, we can try resetting your Wireless Adapters. After the recent updates, a lot of wireless cards were not configured properly which led to the problem. If the resetting doesn’t work, you can also try updating the drivers for your wireless hardware either automatically (through Windows update) or manually by downloading them from the manufacturer’s website.
- Press Windows + R, type “devmgmt.msc” in the dialogue box and press Enter.
- Once in the device manager, expand the category of “Network adapters”. Select your Wireless hardware, right-click it and select “Disable device”.

- Wait for the device to be disabled completely. This would be shown by an arrow present in front of the hardware icon.
- Right-click the device again and select “Enable device”. After a few seconds, the device will start working again. Now check if your hotspot successfully operates as expected.
Note: Also make sure that you are not using any kind of proxy while creating a mobile hotspot from your computer.
Solution 3: Running Internet Connections Troubleshooter
It is often the case that after any Windows Update, many files are mismatched or have incorrect configurations saved. We can try running the Internet Connections troubleshooter which will automatically scan your computer and after running some diagnostic tests, it will determine the cause of the issue and fix it.
- Press Windows + S to launch the search bar. Type “troubleshoot” in the dialogue box and open the most relevant result.

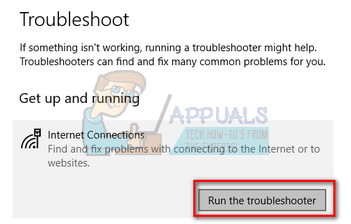
- Once in the troubleshooting menu, click on “Internet Connections” and select “Run the troubleshooter”. Now the troubleshooting process will begin.
- Windows will now check if all the drivers are working properly and there isn’t any mismatch in the configuration files. Wait for the process to complete. After the completion, restart your computer and check if this solves the problem.

Solution 4: Re-enabling Sharing of the Internet Connection
If you are using internet of your Ethernet connection for your hotspot, you can re-enable the sharing mechanism involved. Whenever you make a hotspot through your computer, the internet is redirected from the existing connection to the hotspot module and vice versa. We can try re-enabling it and check if refreshing this solves the problem.
- Press Windows + S, type “control panel” in the dialogue box and open the relevant application which comes forth.
- Once in the control panel, click on “Ethernet” present in front of “Connection” in your active networks listed.

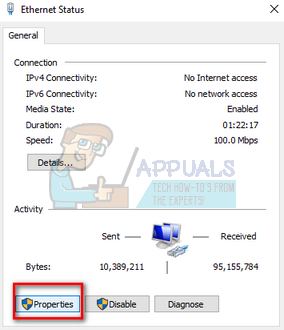
- Click on “Properties” when the new window comes forth consisting of details of your internet connection.
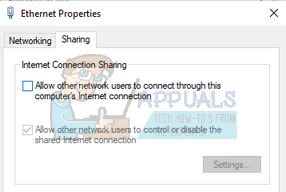
- Open the “Sharing” tab and uncheck both the checkboxes accordingly. Press Ok to save changes and exit. Now navigate to the same settings once again and check the options again.
- After saving changes, check if the problem at hand got solved.
Solution 5: Letting Windows Manage Connection (If you are using dongle for providing internet to hotspot module)
Another problem which seems to arise is when you are using internet from a dongle to provide internet connectivity for the hotspot module on your computer. Many devices tend to manage their own traffic and have their own firewalls installed in the system. Whenever you connect this device to your computer, make sure that the option “Let Windows manage this connection” is checked. This checkbox can be accessed after connecting your device, navigating to the taskbar and clicking on the network icon. Make sure that you are logged in as an administrator and turn off your hotspot before proceeding with this solution. If things don’t go as expected, you can easily revert the changes.