Fix: Missing @system32\drivers\pci.sys
If system files or applications are corrupted your operating system will not be able to startup properly, and your application will not be able to work until the error is fixed. PCI.sys is a file which can be corrupted or damaged, and your operating system will not be able to work properly. If you turn on your Windows and you see following error: “Windows could not start because the following file is missing or corrupt system32\DRIVERS\pci.sys”, that means pci.sys file is corrupted and should be fixed by you.
What is pci.sys? PCI.SYS is a system file, located on following location C:\Windows\System32\Drivers. By default, Windows is installed on C: partition which is named system partition.
This error occurs on operating system Windows 2000 and Windows XP. So why this problem occurs? There are more reasons including malware infections, faulty hardware component, forced shut down of your computer and other.
We will show you how to solve issues using Windows XP SP3. All methods are compatible with both operating system, Windows 2000 and Windows XP.
Method 1: Repair pci.sys using Recovery Console
When system files are corrupted and your Windows can not boot, the first option is to run Recovery console and repair corrupted files. For this method, you will need bootable CD, DVD or USB with burned Windows 2000 or Windows XP installation. Because we know which system file is corrupted (pci.sys), we will fix only that file.
As you know Microsoft stopped extended and mainstream support for Windows 2000 and Windows XP, and there are a lot of security exploits which can be discovered by hackers. If you are using Windows 2000 or Windows XP, please upgrade your operating system to minimum Windows 7. In case you are using some applications which are only compatible with Windows XP, you do not need to worry because you will be able to run the legacy application on a newest operating system using additional tools. You can install Windows 2000 on Windows 7, Windows 8, Windows 8.1 and Windows 10 using virtualization software. If you are using Windows 7, you can run Windows XP using Virtual PC and Windows XP Mode. If you are using Windows 8, Windows 8.1 and Windows 10, you can run Windows XP using virtualization technology named Hyper-V Client.
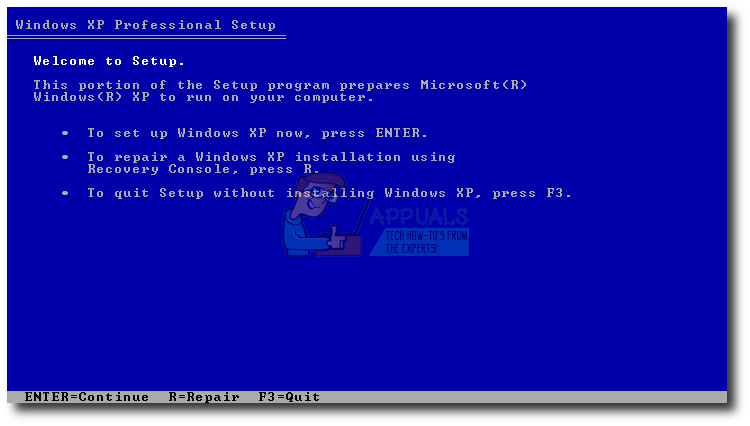
- Insert bootable Windows XP CD or DVD disk, or bootable USB flash disk
- Restart your computer
- Boot your computer from the CD or DVD drive or USB flash drive
- Press any key to boot from CD. Setup will inspect your hardware configuration.
- Press R to enter Recovery console
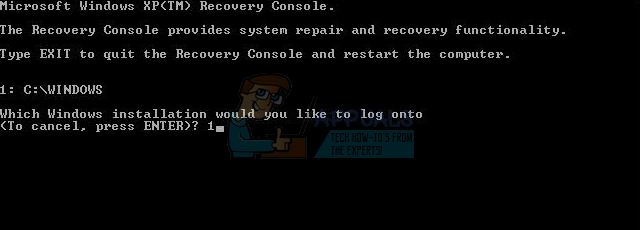
- Select the installation you want to access (by default it is C:\Windows)
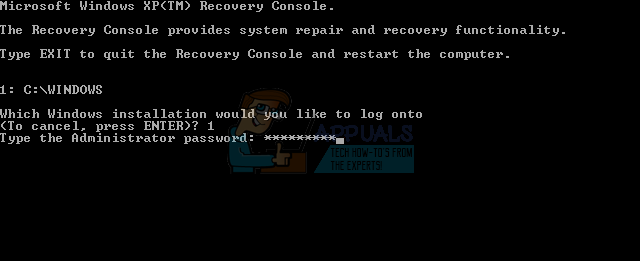
- Enter the Administrator Password. In some cases, the Administrator password is set to a blank password. In this case, press ENTER.
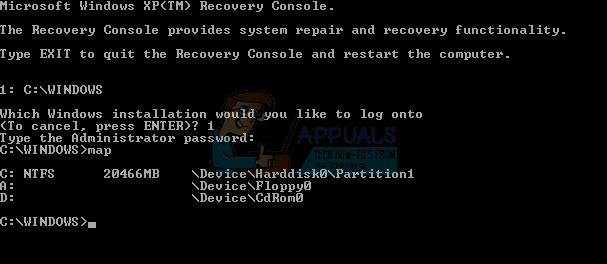
- Type map to see available partition and volumes. As you see, Windows XP is installed on NTFS partition C: and CD-ROM is using letter D:
- Type the following at the Command Prompt and press Enter
expand D:\i386\pci.sy_ c:\Windows\system32\drivers /y, where D: is the drive letter of your CD or DVD ROM drive, C: is the drive on which Windows XP is installed, and where Windows is the folder in which Windows XP is installed.
In case you are using Windows 2000, Instead C:\Windows\system32\drivers you need to type C:\winnt\system32\drivers
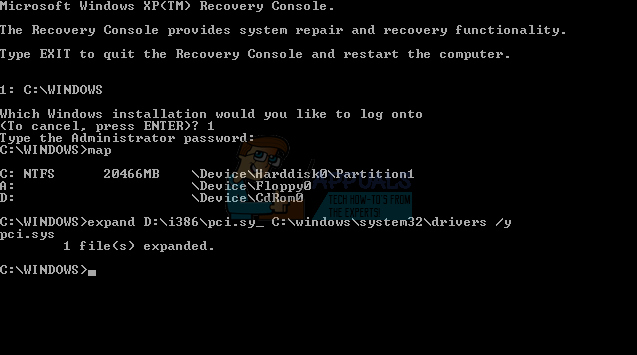
- Type Exit and press Enter to quit the Recovery console. Windows XP will restart.
- Enjoy your Window XP
Method 2: Change BIOS configuration
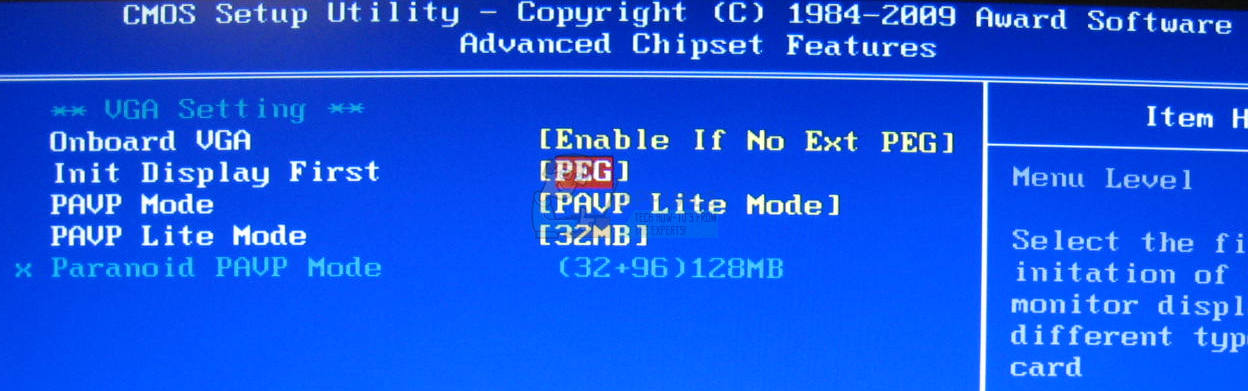
If you upgraded your computer or notebook with new hardware components, and you tried to install your Windows, but you couldn’t because of PCI.sys error, we are recommending you to change current BIOS configuration. The procedure of changing BIOS configuration depends from the vendor, so you need to read the technical documentation of your motherboard. You need to change SATA and VGA configuration.
- Restart or turn on your computer or notebook
- Press F2 or Dell to access BIOS
- Navigate to SATA configuration and change SATA configuration to Combination mode (AHCI, SATA)
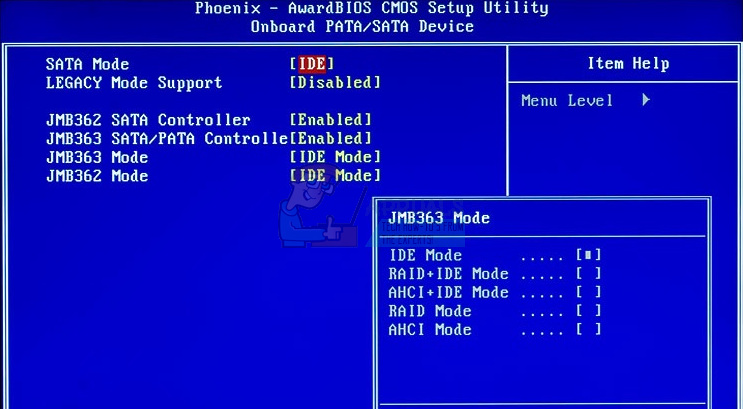
- Navigate to VGA settings and change video settings from PEG to PCI
- Save your settings
- Restart your computer
- Install Windows, applications, and drivers
- Change Video display settings back to PEG
- Restart your computer
- Enjoy your Windows
Method 3: Wipe and reinstall operating system
This is the last software method you can try to solve issues. If this method did not help you, next methods will include hardware components. If you do not have or you do not care so much about your data, Windows settings or application configuration, please format your hard disk and reinstall Windows and application. If you have some important data, we are recommending you to boot Linux Live CD on your computer and backup all important data. After that, you can reinstall your Windows.
Please note, that all application, settings, and data will be deleted from system partition.
Method 4: Change RAM module
Sometimes because of faulty RAM, system or application instructions can not be addressed in RAM. The best solution is to change your RAM. How will you do it? If you are using more RAM modules, you should try to unplug one by one and test is there a problem with RAM module. Also, if you are planning to purchase another RAM module, you should check which generation of RAM memory is using your motherboard. As always, we are recommending you to check the technical documentation of your motherboard and based on that you can purchase proper RAM module for your computer or notebook. We guess you are using an old computer with DDR or DDR2 memory. We will show you how to identify which RAM memory do you need. We have motherboard P5Q manufactured by ASUS company. This motherboard is using DDR2 RAM.
- Open Internet browser (Google Chrome, Mozilla Firefox, Internet Explorer or other)
- Open ASUS’s website on this LINK. We will open ASUS Support site because we are using ASUS motherboard
- Navigate to the Memory The motherboard P5Q has four slots and supports max. 16 GB DDR2 RAM.

- Purchase RAM memory
- Install RAM memory
- Enjoy your Windows
Method 5: Change your HDD
Another hardware component which can be faulty is a hard disk (HDD). HDD stores operating system, applications, and our data. Sometimes, files can not be read from hard disk because of bad sectors or some other problem. The best solution for is to buy compatible HDD. As always, we are recommending you to read the technical documentation of your computer or notebook. There are two types of HDD, ATA HDD, and SATA HDD. Be careful when buying HDD, because ATA HDD can not be connected to SATA port, and vice versa. We will show you which HDD is using motherboard ASUS P5Q.
- Open Internet browser (Google Chrome, Mozilla Firefox, Internet Explorer or other)
- Open ASUS website on this LINK. We will open ASUS Support site because we are using ASUS motherboard
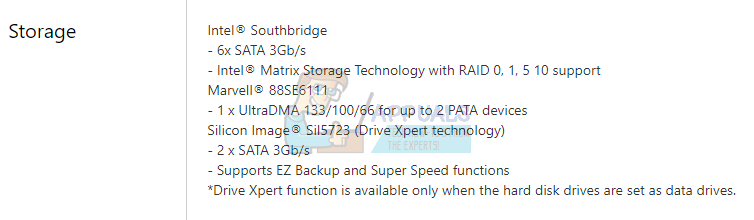
- Navigate to Storage The motherboard P5Q has six SATA connectors and supports transfer rate up to 3Gb/s.
- Purchase HDD
- Install RAM memory
- Install We are recommending you to install minimum Windows 7.
- Enjoy your Windows
What if you don’t have a bootable disk? I’ve tried Method 1 & 2 but didn’t work for me. Any more options?