Fix: Low Disk Space Notification on Windows
Microsoft releases new updates very consistently. The main goal of these updates is to fix the bugs and deliver new features. But, a lot of the times the latest update introduced an unwanted bug as well. This error message is one of those bugs. If you recently installed a Windows 10 update then you might see a completely new drive on your computer. This drive will appear after the installation of the update and you will start getting low disk space notifications for that drive. The notification will keep appearing even if you have a lot of free space available on your other drives. This notification will keep popping up and it obviously is frustrating for a lot of users.

The main reason behind this problem is the Windows Update. As mentioned above, the problem is caused by a Windows bug that was introduced in one of the latest Windows Updates. This bug unhide the recovery partition drive and allocates it a drive letter. This is the reason why you are seeing a new drive on your system. The notification you are seeing can easily be disabled by simply removing the letter of your drive.
Note: Do not delete anything from the recovery partition drive nor should you try to format the drive. Deleting or formatting the recovery partition drive can have an effect on the recovery of your Windows. The data on the drive is used by the Windows Recovery Environment or your system’s manufacturer.
Method 1: Remove Drive Letter
Note: If you don’t mind the notification or you don’t want to follow the technical steps given below then simply wait. Microsoft knows about this issue and a fix will most likely be released in the upcoming Windows Updates. But, keep in mind that the fix will “prevent” this issue from happening to users who will install the April Update. The fix won’t work for people who are experiencing this issue. If you have already installed this update then you have to follow the steps given below.
Removing the drive letter has resolved the issue for the majority of users. Manually removing the partition’s assigned letter will make the notifications go away. Do not worry, removing a drives letter doesn’t mean you are deleting the drive. This solution is harmless and has worked for almost everyone facing this issue. Simply follow the steps given below.
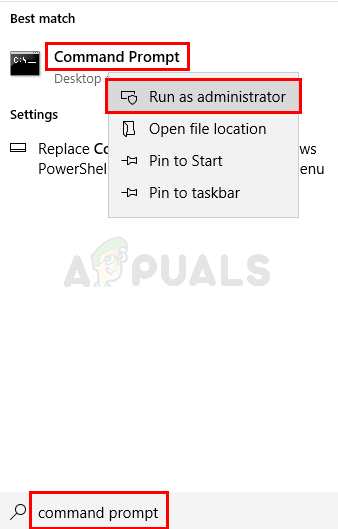
- Press Windows key once
- Type command prompt in the Windows Start Search
- Right click Command Prompt from the search results and select Run as administrator
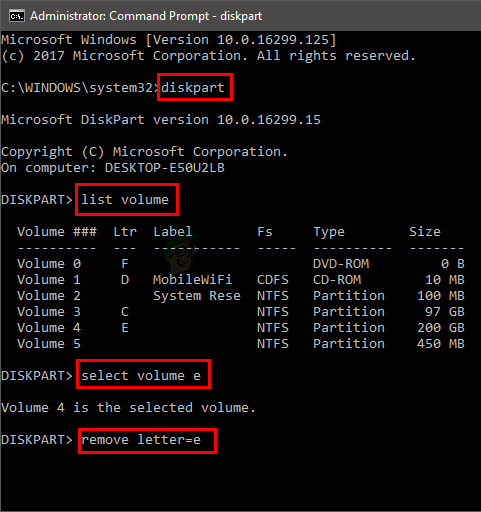
- Type diskpart and press Enter
- Type list volume and press Enter
- You should see a list of drives now. Note down the letter associated with the newly created drive
- Type select volume <drive letter> and press Enter. Note: Replace <drive letter> with the drive letter you found in step 6
- Type remove letter=<drive letter> and press Enter. Note: Replace <drive letter> with the drive letter you found in step 6