Fix: Just Cause 2 Crashing on Windows 10
Just Cause 2 is one of the finest examples of open world games and it’s been one of most popular games if its genre for a long time now with its gadgets and creative ways of doing everything; even simple things like hijacking a car!

However, plenty of users weren’t able to play the game properly for a long time and they have always struggled with crashes either on the game’s startup or during the gameplay. We have prepared quite a few easy solutions which have worked for people in various scenarios and we highly recommend you try them all out before giving up as you never know which one will work for you.
What Causes the Crashes?
The number of things which can cause this game to crash on a PC is just enormous. That is why we firmly suggest you don’t give up and follow through every solution listed below. We are 100% confident that one of them is going to produce a result. Here are some causes for Just Cause 2 crashes:
- Outdated or even new video card drivers
- In-game graphic settings which were buggy from the release
- Missing or corrupt system or game files directly related to the game
- Overlocking the GPU or using two of them simultaneously
Solution 1: Turn off Various In-Game Settings
Some graphical settings have experienced crashes and glitches from the first day the game was released but the makers never bothered to release the patch as this problem came into their attention only after the support and patches for the game were dropped.
Some graphical settings which can be turned off from within the game might help you stop the crashes and play the game normally. Note that only one of the graphics settings may cause the error on your computer so try out turning them off one by one and checking if the game runs.
- If you have purchased the game on Steam, open up your Steam client by double-clicking its icon from the Desktop or by searching for it in the Start menu or the Cortana button next to it (if you are using Windows 10).
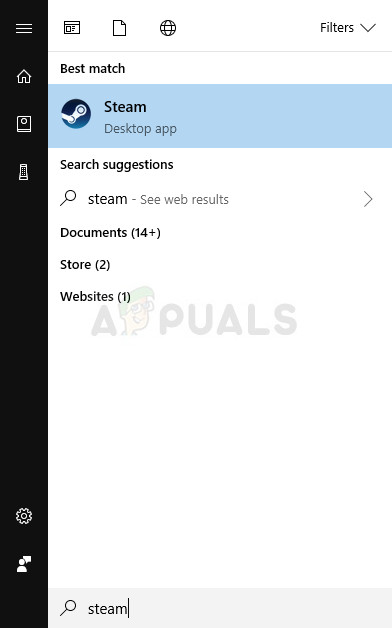
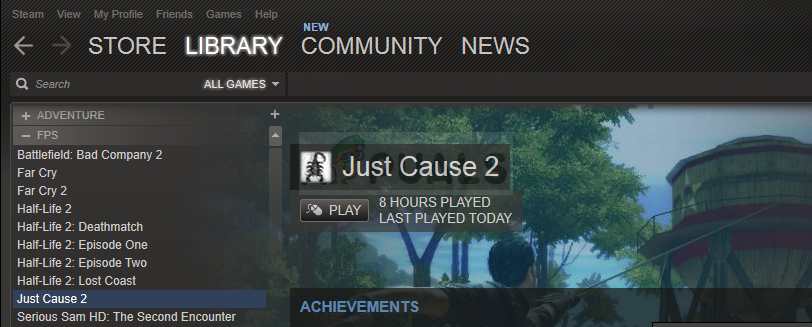
- Navigate to the Library tab in the Steam client window and locate Just Cause 2 in the list of the games you own in your library.
- Right-click on the game and choose the Play Game option. If the game is not on Steam, simply locate the game’s icon on your computer and double click on it.
- From the game’s main menu, scroll down and click on Settings. Scroll down until you reach the Display Settings section and click the Motion Blur option. Set it to off. Locate the Advanced Display Settings section and check for the following option: Decals, GPU Water Simulation, Bullet Impact, Bokeh filter…
- Try turning these settings off one by one and check to see if the game runs. Your issue should be resolved after running the game again.

Solution 2: Run the Game in Compatibility More for Windows 7
If you are using a version of Windows newer than Windows 7 (Windows 8 or 10), you might have luck simply setting the game’s main executable to run in the Compatibility Mode for Windows 10. The real reason why this has to be done in some cases is unknown but it’s good as long as it works and doesn’t affect your in-game experience at all.
- Locate the Just Case 2 shortcut on the Desktop or look for the original executable available in the folder where you have installed the game if you can find it
- You can also search for the game’s client by clicking the Start menu button or the search button next to it and typing its name. Anyway, right-click on the executable and choose the Properties option from the context menu which will appear.
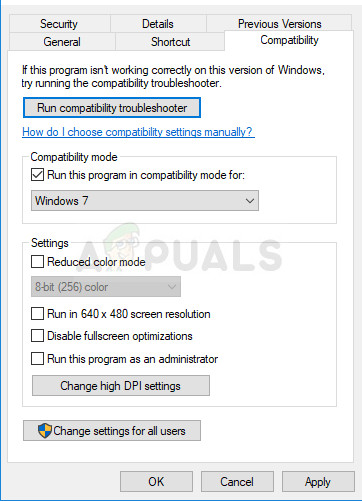
- Navigate to the Compatibility tab in the Properties window and check the box next to the “Run this program in compatibility mode for:” option under the Compatibility mode section. Click the dropdown menu and choose Windows 7 from the list.
- Click on either OK or Apply and restart your computer just to make sure the changes have been applied. Check to see if the game is now crashing as it used to.
Solution 3: Replace a System DLL File
Atidxx32.dll is a type of a DLL file associated with Advanced Micro Devices, Inc. Radeon DirectX 11 Driver developed by Advanced Mirco Devices, Inc. for the Windows OS. In other words, it’s related to a ATI Radeon driver and this solution can only be helpful to users who use a vide card made my this manufacturer. Good luck.
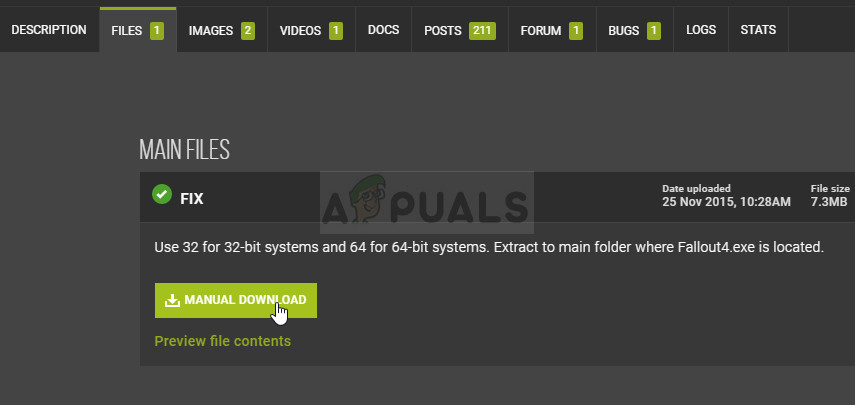
- Navigate to this link and scroll down until you see a bunch of tab. Click the Files tab and click the Manual Download button on the site. Save the file in your Downloads folder.
- Open your File Explorer and try navigating to this location from either My Computer or This PC:
- C:\Windows\SysWOW64 or C:\Windows\SysWOW32 depending on your computer’s architecture
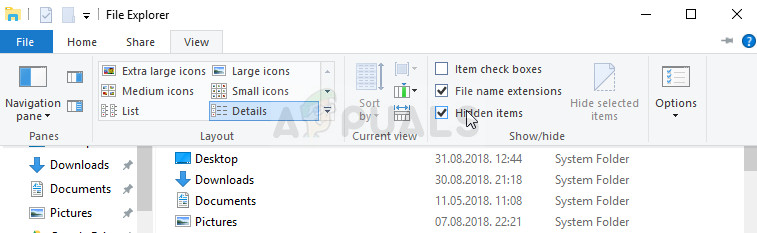
- If you are unable to see any of the folders in the process, that is because the hidden files are disabled from your system and you will need to enable the view of them.
- Click on the “View” tab on File Explorer’s menu and click on the “Hidden items” checkbox in the Show/hide section. File Explorer will show the hidden files and will remember this option until you change it again.
- Locate a file named atidxx32.dll and be careful as plenty of them look alike. Right-click on it and choose Rename. Rename the file to atidxx32.old.dll. We are doing this only to backup the file so that we can revert the changes if something bad happens after this.
- Navigate to your Downloads folder, right-click the .rar file you just downloaded in the first step, and choose the Extract to.. option. In the File Explorer, choose to extract the file to C:\Windows\SysWOW64 or C:\Windows\SysWOW32 depending on your computer’s architecture.

- Check to see if Just Cause 2 still crashes!
Solution 4: Set Launch Settings in Steam
There is a certain Steam launch setting which can help you fix this problem simply by adding this line. This fix is aimed at Steam users who have downloaded and installed the game via Steam. It’s especially helpful for users who have two or more graphics cards and the game gets confused and doesn’t know which one to use.
This often occurs if users have an updated integrated graphics card along with the external one they purchased.
- Open up Steam by double-clicking its entry on the Desktop or by searching for it in the Start menu. Windows 10 users can also search for it using Cortana or the search bar, both of them next to the Start menu.
- Navigate to the Library tab in the Steam window, and locate Just Cause 2 in the list of the games you own in your respective library.
- Right-click on the game’s entry in the list and choose the Properties option from the context menu which will pop up. Stay in the General tab in the Properties window and click the Set launch options button.
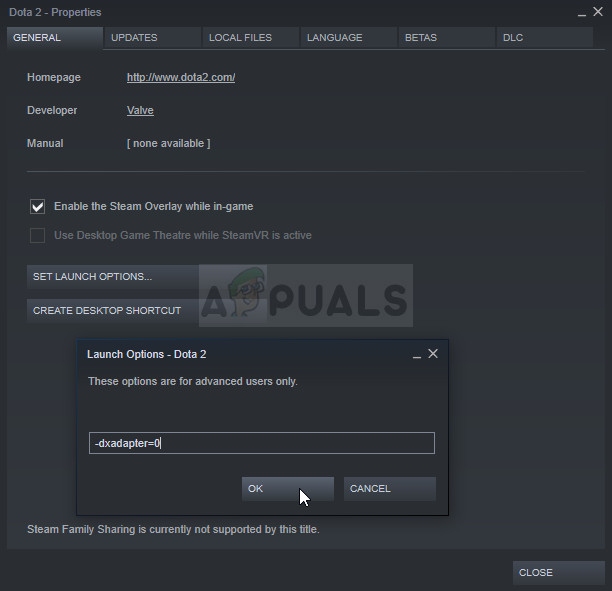
- Type in “-dxadapter=0” in the Launch Options window. If there were some launch options from before in the window, make sure you separate them by a space. Check to see if the game still crashes on your computer.
Solution 5: Disable Steam Overlay for the Game
There is something about Steam Overlay which makes games simply want to crash. It’s a weird occurrence and this overlay is sometimes quite useful but you might want to consider disabling it for this game only as it causes it to crash for some users.
Note: Obviously, this method can only be applied to users who have purchased and downloaded the game via Steam.
- Open up Steam by double-clicking its entry on the Desktop or by searching for it in the Start menu. Windows 10 users can also search for it using Cortana or the search bar, both of them next to the Start menu.
- Navigate to the Library tab in the Steam window, and locate Just Cause 2 in the list of the games you own in your library.
- Right-click the game’s entry in the library and choose the Properties option from the context menu which will appear. Stay in the General tab in the Properties window and clear the box next to the “Enable the Steam Overlay while in-game” entry.
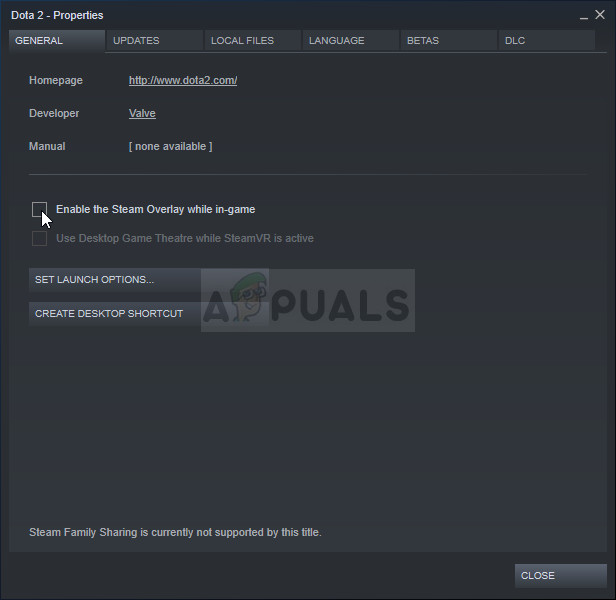
- Apply the changes, exit, and try starting the game. Check to see if the game still crashes during any time or playing.
Solution 6: Verify Integrity of Game Files
This is yet another methods which might be useful for users who have downloaded and installed the game through Steam. Verifying the integrity of game files is such a useful feature as it allows you to redownload broken or missing files from the game’s installation no matter how and why they went missing.
- Open up Steam by double-clicking its entry on the Desktop or by searching for it in the Start menu. Windows 10 users can also search for it using Cortana or the search bar, both of them next to the Start menu.
- Navigate to the Library tab in the Steam window, and locate Just Cause 2 in the list of the games you own in your library.
- Right-click the game’s entry in the library and choose the Properties option from the context menu which will appear. Navigate to the Local Files tab in the Properties window and click the Verify Integrity of Game Files button..
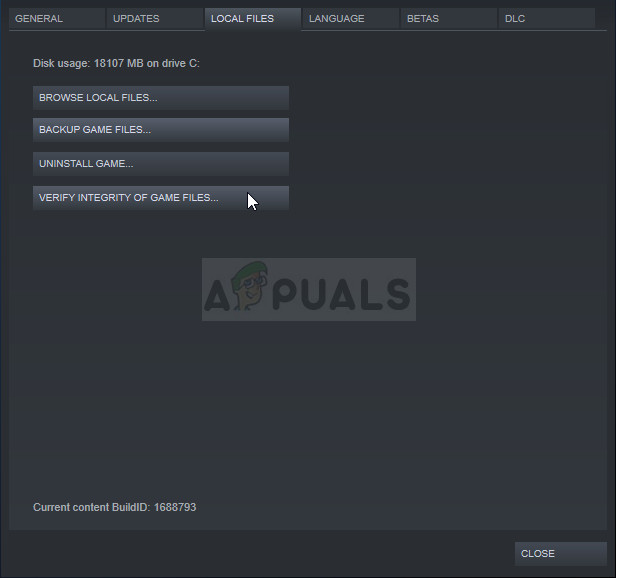
- Wait for its process to finish, exit, and try starting the game. Check to see if the game still crashes during any time or playing.
Solution 7: Update or Roll Back Your Driver
If Jus Cause 2 has been crashing for a while, especially since you installed it, you might want to blame it on the game’s video drivers as new games often require the latest graphics card drivers in order to run properly. It’s also recommended if you have just updated the game and it used to work properly.
The other scenario is the one in which the crashes start to occur just after a driver update and that can be blamed directly on the new drivers which aren’t well optimized for the game or they use technologies not accepted by the game. Either way, the problem becomes easy to solve if you follow the steps below.
Updating the Driver:
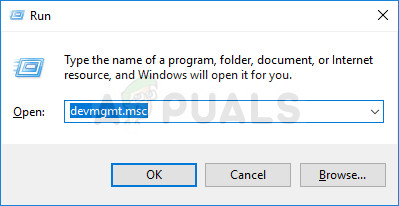
- Click on the Start menu, type in “Device Manager” with Start menu open, and select it from the list of results by simply clicking on the first one. You can also use the Windows Key + R key combo in order to bring up the Run dialog box. Type in “devmgmt.msc” in the box and click OK in order to run it.
- Since it’s the video card driver you want to update on your computer, expand the Display adapters section, right click on your graphics card and select the Uninstall Device option.

- Confirm any dialogues which may ask you to confirm the uninstallation of the current graphics device driver and wait for the process to finish.
- Look for your graphics card driver on the card’s manufacturer’s website and follow their instructions which should be available on the site. Save the installation file on your computer and run it from there. Your computer may restart several times during the installation.
- Check to see if Just Cause 2 keeps on crashing!
Nvidia Drivers — Click Here!
AMD Drivers — Click Here!
Note: You can try experimenting with old drivers in this step as some of them proved to be useful in this scenario.
Rolling Back the Driver:
- Right click on the video card driver you want to roll back and select Properties. After the Properties window opens, click the Driver tab and locate the Roll Back Driver button at the bottom.
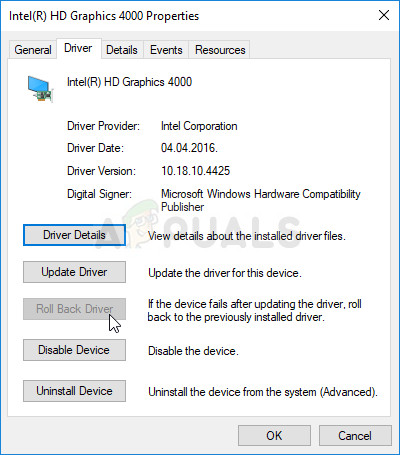
- If the option is grayed out, it means that the device wasn’t updated in the near future as it has no backup files recalling the old driver. This also means that the recent driver update is probably not the cause of your problem.
- If the option is available to click on, click on it and follow the instructions on-screen to proceed with the rolling back to the old driver. Restart the computer and check to see if the problem still occurs when running Just Cause 2.
Solution 8: Uninstall a Windows Update (Windows 7 Users Only)
There is a specific Windows Update which has made changes to DirectX API files and changes certain settings which the game hasn’t yet adapted to. This update caused other issues as well so it’s for the best if you simply uninstall it. This update came out for Windows 7 only so this method is only helpful for Windows 7 users.
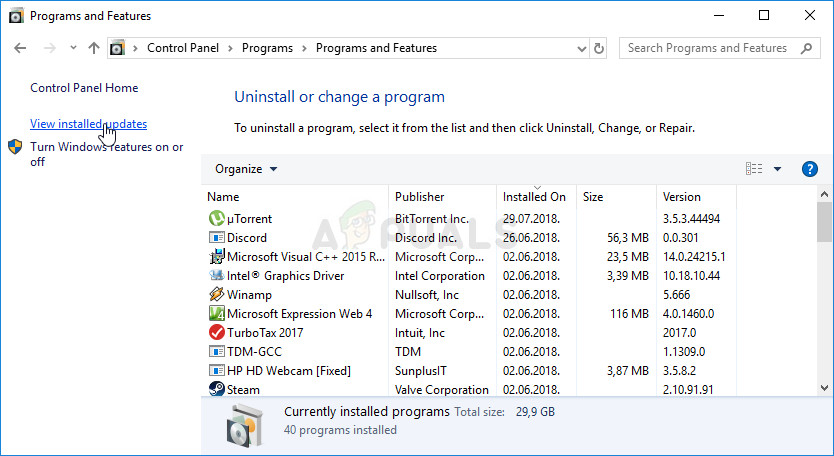
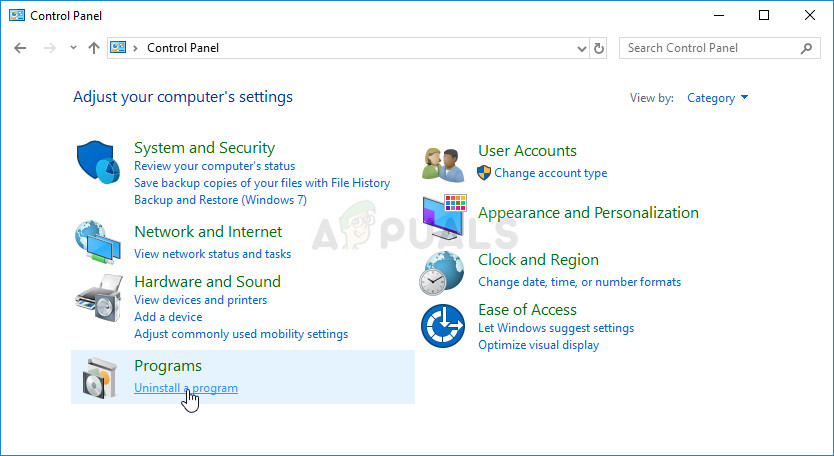
- Click the Start menu button and open Control Panel by typing its name and clicking the first option at the top.
- If you are using Control Panel, switch to View as: Category at the top right corner and click on Uninstall a Program under the Programs area. At the right side of the screen, you should see the View installed updates button in blue so click on it.
- You should now be able to see the list of installed Windows updates for your computer. Check the Microsoft Windows section at the bottom for the relevant updates which may have affected Just Cause 2 and caused constant crashes.
- Scroll to the left in order to check the Installed on column which should display the date when the update was installed so make sure you locate the update whose KB number is KB2670838.
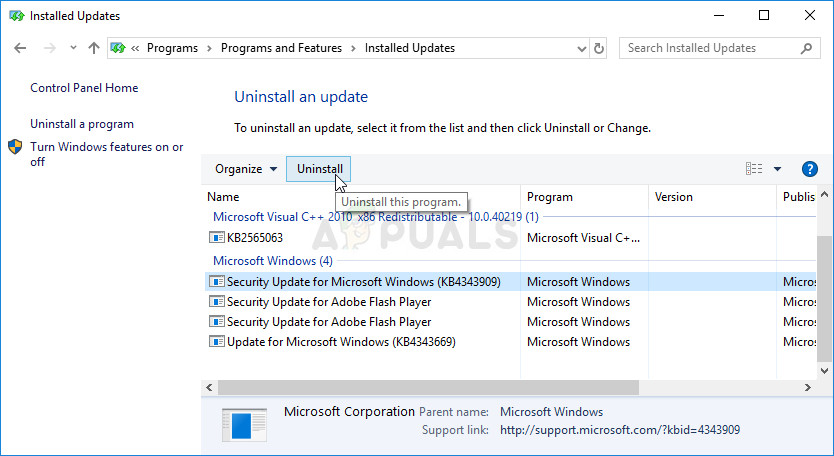
- Click on the update once and choose the Uninstall option at the top and follow the instructions which will appear on screen in order to get rid of the update.
- Wait for Microsoft to release a new update which should be installed automatically if you have configured automatic Windows updates.
Solution 9: Disable SLI
Scalable Link Interface (SLI) is a GPU technology made by Nvidia for combining two or more video cards to produce a single output. SLI is a parallel processing algorithm for video, meant to increase the available processing power.
However, Just Cause 2 doesn’t appear to support this technology and you should turn it off while playing the game. Most users have reported that disabling this option for the game has prevented the constant crashes from occurring.
- Right-click on your desktop screen and select the NVIDIA Control Panel entry from the context menu or double-click the NVIDIA icon in the system tray if you see it. NVIDIA Control Panel can also be located in the regular Control Panel by switching to the Large icons view.
- Once you’ve opened the NVIDIA Control Panel, navigate to the 3D settings menu at the left side navigation pane and click the Set SLI configuration option.

- At the end, select the Do not use SLI technology option and click on Apply to confirm the changes. Launch Just Cause 2 again and check to see if the same error still appears.
Solution 10: Stop Overclocking Your GPU
Overclocking is a process where users alter the maximum frequency of the graphics of central processor to a value which is above the recommended one set by your GPU’s manufacturer. This can give your PC a significant performance and speed advantage when playing video games and improve it in all ways but you have to absolutely careful since there were instances where entire rigs broke down and even ended up in smoke.
Some CPUs and GPUs were definitely not made to be overclocked with certain tools or with certain games and it’s a fact that some processors perform way better than others. What’s even more crucial is that different tools used to overclock your processors (CPU or GPU) work better or worse depending on the processor which is being used.
Returning your processor’s frequency to its original state depends on which software you used to overclock it in the first place. Stop overlocking your GPU and check to see if the issue persists.
Solution 11: Reinstall the Game
Reinstalling the game can do miracles for the game since any corrupt and missing files will be reinstalled and you should be able to keep your progress as it’s tied to your Steam account as you are playing on a PC. Still, the process might take a while depending on your Internet speed as the game files need to be redownloaded if you are using Steam.
Uninstalling the game:
- Click on the Start menu button and open Control Panel by searching for it. Alternatively, you can click on the gear icon in order to open the Settings app if you are using Windows 10.
- In Control Panel, switch to View as: Category at the top right corner and click on Uninstall a Program under the Programs section.
- If you are using the Settings on Windows 10, clicking on Apps should immediately open a list of all installed tools and programs on your PC.
- Locate Rocket League in the list either in Settings or Control Panel, click on it once and click the Uninstall button located in the respective window. Confirm any dialog choices to uninstall the game, and follow the instructions which will appear on screen.
Alternative for Steam Users:
- If you have purchased the game on Steam, open up your Steam client by double-clicking its icon from the Desktop or by searching for it in the Start menu or the Cortana button next to it (if you are using Windows 10).
- Navigate to the Library tab in the Steam client window and locate Just Cause 2 in the list of the games you own in your library.
- Right-click on the game and choose the Play Game option. If the game is not on Steam, simply locate the game’s icon on your computer and double click on it.
- Follow the instructions which will appear on screen and wait for the process to finish patiently.
In order to reinstall Just Cause 2, you will either need to insert the disc you bought it on and follow the instructions within the installation wiard or you will need to download it again from Steam. The game will still be still located in your library so just right click on it and choose the Install option. Check to see if Just Cause 2 still crashes.


Thanx